


Printing is managed on Mageia by a server named CUPS. It has its own configuration interface which is accessible via an Internet browser, but Mageia offers its own tool for installing printers called system-config-printer which is shared with other distributions such as Fedora, Mandriva, Ubuntu and openSUSE.
You should enable the non-free repository before proceeding with the installation, because some drivers may only be available in this way.
Printer installation is carried out in the Hardware section of the Mageia Control Centre. Select the Configure printing and scanning tool[17].
MCC will ask for the installation two packages:
task-printing-server
task-printing-hp
It is necessary to accept this installation to continue. Up to 230MB of dependencies are needed.
To add a printer, choose the "Add" printer button. The system will try to detect any printers and the ports available. The screenshot displays a printer connected to a parallel port. If a printer is detected, such as a printer on a USB port, it will be displayed on the first line. The window will also attempt to configure a network printer.
This usually refers to USB printers. The utility automatically finds the name of the printer and displays it. Select the printer and then click "Next". If there is a known driver associated for the printer, it will be automatically installed. If there is more than one driver or no known drivers, a window will ask you to select or furnish one, as explained in the next paragraph. Continue with „Complete the installation process”
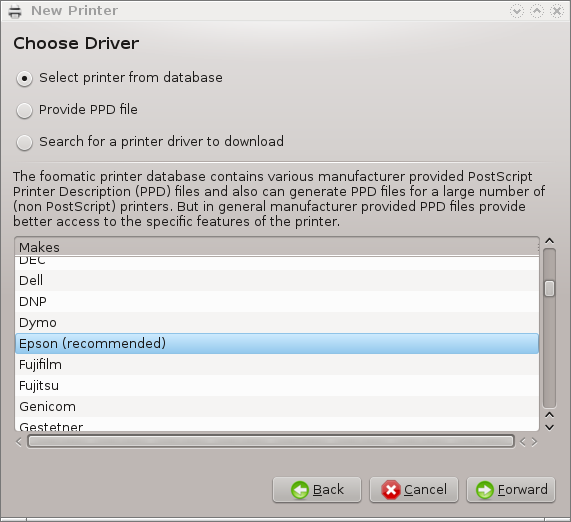
When you select a port, the system loads a driver list and displays a window to select a driver. The choice can be made through one of the following options.
Select printer from database
provide PPD file
search for a driver to download
By selecting from the database, the window suggests a printer manufacturer first, and then a device and a driver associated with it. If more than one driver is suggested, select one which is recommended, unless you have encountered some problems with that one before, in this case select the one which know to work.
After the driver selection, a window requests some information which will allow the system to designate and discover the printer. The first line is the name under which the device will appear in applications in the list of available printers. The installer then suggests printing a test page. After this step, the printer is added and appears in the list of available printers.
Network printers are printers that are attached directly to a wired or wireless network, that are attached to a printserver or that are attached to another workstation that serves as printserver.
Notatka
Often, it is better to configure the DHCP server to always associate a fixed IP address with the printer's MAC-address. Of course that should be the same as the IP address the printer of printserver is set to, if it has a fixed one.
The printer's Mac-address is a serial number given to the printer or
printserver or computer it is attached to, that can be obtained from a
configuration page printed by the printer or which may be written on a label
on the printer or printserver. If your shared printer is attached to a
Mageia system, you can run ifconfig on it
as root to find the MAC-address. It is the sequence of numbers and letters
after "HWaddr".
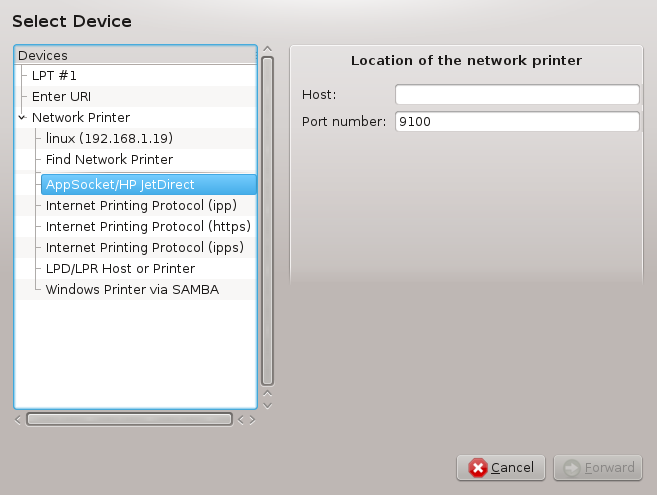
You can add your network printer by choosing the protocol it uses to talk to your computer over the network. If you don't know which protocol to choose, you can try the Network Printer - Find Network Printer option in the Devices menu and give the IP address of the printer in the box on the right, where it says "host".
If the tool recognises your printer or printserver, it will propose a protocol and a queue, but you can choose a more appropriate one from the list below it or give the correct queue name if it isn't in the list.
Look in the documentation that came with your printer or printserver to find which protocol(s) it supports and for possible specific queue names.
One current technique is one developed by Hewlett-Packard and known as JetDirect. It allows access to a printer directly connected to the network via an Ethernet port. You must know the IP-address at which the printer is known on the network. This technique is also used inside some ADSL-routers which contain an USB port to connect the printer. In this case, the IP-address is that of the router. Note that the tool "Hp Device manager" can manage dynamically configured IP-adress, setting an URI like hp:/net/<name-of-the-printer> . In this case, fixed IP-adress is not required.
Choose the option AppSocket/HP JetDirect as the protocol and set the address in Host:, do not change the Port Number, unless you know that it needs to be changed. After the selection of the protocol, the selection of the driver is the same as above.
The other protocols are:
Internet Printing Protocol (ipp): a printer which can be accessed on a TCP/IP network via the IPP protocol, for example a printer connected to a station using CUPS. This protocol may also be used also by some ADSL-routers.
Internet Printing Protocol (https): the same as ipp, but using http transport and with TLS secured protocol. The port has to be defined. By default, the port 631 is used.
Internet Printing Protocol (ipps): the same as ipp, but with TLS secured protocol.
LPD/LPR host or Printer: a printer which can be accessed on a TCP/IP network via the LPD protocol, for example a printer connected to a station using LPD.
Windows printer via SAMBA: a printer connected to a station running Windows or a SMB server and shared.
The URI can also be added directly. Here are some examples on how to form the URI:
Appsocket
socket://ip-address-or-hostname:portInternet Printing Protocol (IPP)
ipp://ip-address-or-hostname:port-number/resourcehttp://ip-address-or-hostname:port-number/resourceLine Printer Daemon (LPD) Protocol
lpd://username@ip-address-or-hostname/queue
Additional information can be found in the CUPS documentation.
You can access the properties of the device. The menu allows access to parameters for the CUPS server. By default a CUPS server is launched on your system, but you can specify a different one with the | menu, another window which gives access to the tuning of other specific parameters of the server, following |
You can find some information on occurring errors during printing by
inspecting /var/log/cups/error_log
You can also access to a tool to diagnose problems using the | Troubleshoot menu.
It is possible that some drivers for specific printers are not available in Mageia or are not functional. In this case, have a look at the openprinting site to check if a driver for your device is available. If yes, check if the package is already present in Mageia and in this case install it manually. Then, redo the installation process to configure the printer. In all cases, report the problem in bugzilla or on the forum if you are comfortable with this tool and furnish the model and driver information and whether the printer works or not after installation. Here are some sources to find other up-to-date drivers or for more recent devices.
Brother printers
This page give a list of drivers provided by Brother. Search the driver for your device, download the rpm(s) and install.
You should install Brother drivers before running the configuration utility.
Hewlett-Packard printers and All in one devices
These devices use the hplip tool. It is installed automatically after the detection or the selection of the printer. You can find other information here. The tool "HP Device Manager" is available in the System menu. Also view configuration for the management of the printer.
A HP All in one device must be installed as a printer and the scanner features will be added. Note that sometimes, the Xsane interface doesn't allow to scan films or slides (the lighting slid can't operate). In this case, it is possible to scan, using the standalone mode, and save the picture on a memory card or USB stick inserted in the device. Afterwards, open your favourite imaging software and load your picture from the memory card which is appeared in the /media folder.
Samsung colour printer
For specific Samsung and Xerox colour printers, this site provides drivers for the QPDL protocol.
Epson printers and scanners
Drivers for Epson printers are available from this search page. For the scanner part, you must install the "iscan-data" package first, then "iscan" (in this order). A iscan-plugin package can also be available and is to install. Choose the rpm packages according to your architecture.
It is possible that the iscan package will generate a warning about a conflict with sane. Users have reported that this warning can be ignored.
Canon printers
For Canon printers, it may be advisable to install a tool named turboprint available here .
[17] You can start this tool from the command line, by typing system-config-printer. The root password will be asked for.
