This tool[20] allows to configure much of local network or Internet access. You have to know some information from your access provider or your network administrator.
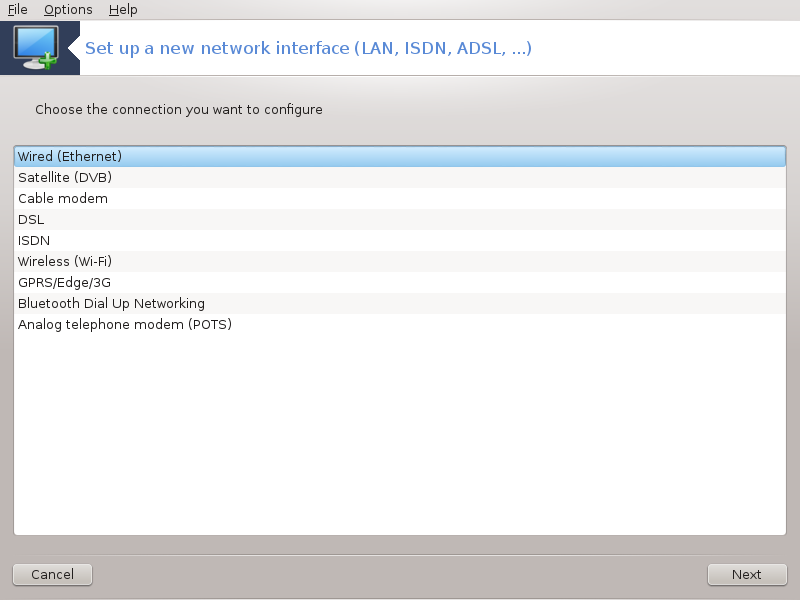
Select the type of connection you want to set, according to which hardware and provider you have.
The first window lists the interfaces which are available. Select the one to configure.
At this point, the choice is given between an automatic or a manual IP address.
Automatic IP
Ethernet/IP settings: you have to select if DNS servers are declared by the DHCP server or are manually specified, as explained below. In the last case, the IP address of DNS servers has to be set. The HOSTNAME of the computer can be specified here. If no HOSTNAME is specified, the name
localhost.localdomainis attributed by default. The Hostname can also be provided by the DHCP server with the option Assign host name from DHCP server. Not all DHCP servers have such a function and if you're setting up your PC to get an IP address from a domestic ADSL router, it is unlikely.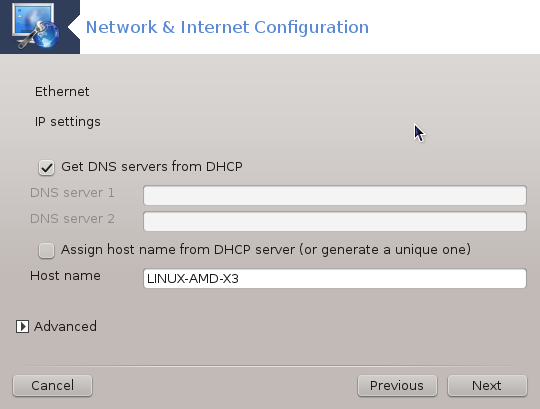
The advanced button give the opportunity to specify:
Search domain (not accessible, as provided by the DHCP server)
the DHCP client
DHCP timeout
Get YP server from DHCP (checked by default): specify the NIS server
Get NTPD server from DHCP (synchronisation of clocks)
the HOSTNAME required by DHCP. Only use this option if the DHCP server requires the client to specify a hostname before receiving an IP address. This option is not dealt by some DHCP servers.
After accepting, the last steps which are common to all connection configurations are explained: „Ending the configuration”
Konfiguracja ręczna
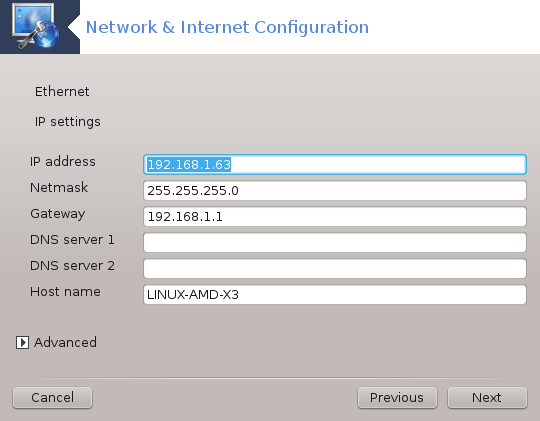
Ethernet/IP settings: you need to declare what DNS servers to use. The HOSTNAME of the computer can be specified here. If no HOSTNAME is specified, the name
localhost.localdomainis attributed by default.For a residential network, the IP address usually looks like 192.168.x.x, Netmask is 255.255.255.0, and the Gateway and DNS servers are available from your service provider's website.
In advanced settings, you can specified a Search domain. It would usually be your home domain, i.e. if your computer is called "splash", and it's full domain name is "splash.boatanchor.net", the Search Domain would be "boatanchor.net". Unless you specifically need it, it's ok not to define this setting. Again, domestic ADSL would not need this setting.
The next steps are exposed at „Ending the configuration”
This section hasn't been written yet for lack of resources. If you think you can write this help, please contact the Doc team. Thanking you in advance.
The first window lists the interfaces which are available. Select the one to configure.
At this point, the choice is given between an automatic or a manual IP address.
You have to specify a authentication method:
Brak
BPALogin (necessary for Telstra). In this case you have to provide User name and password.
Automatic IP
Cable/IP settings: you have to select if DNS servers are declared by the DHCP server or are manually specified, as explained below. In the last case, the IP address of DNS servers has to be set. The HOSTNAME of the computer can be specified here. If no HOSTNAME is specified, the name
localhost.localdomainis attributed by default. The Hostname can also be provided by the DHCP server with the option Assign host name from DHCP server. Not all DHCP servers have such a function and if you're setting up your PC to get an IP address from a domestic ADSL router, it is unlikely.The advanced button give the opportunity to specify:
Search domain (not accessible, as provided by the DHCP server)
the DHCP client
DHCP timeout
Get YP server from DHCP (checked by default): specify the NIS server
Get NTPD server from DHCP (synchronisation of clocks)
the HOSTNAME required by DHCP. Only use this option if the DHCP server requires the client to specify a hostname before receiving an IP address. This option is not dealt by some DHCP servers.
After accepting, the last steps which are common to all connection configurations are explained: „Ending the configuration”
Konfiguracja ręczna
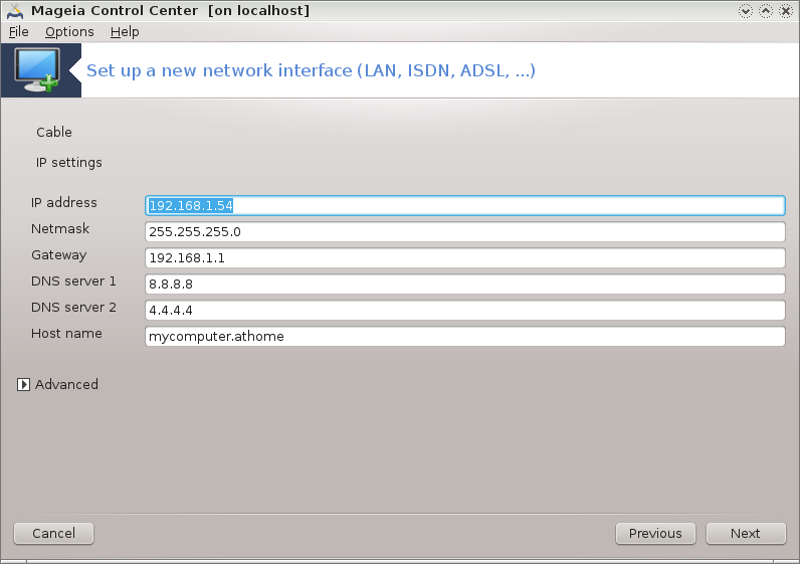
Cable/IP settings: you need to declare what DNS servers to use. The HOSTNAME of the computer can be specified here. If no HOSTNAME is specified, the name
localhost.localdomainis attributed by default.For a residential network, the IP address usually looks like 192.168.x.x, Netmask is 255.255.255.0, and the Gateway and DNS servers are available from your service provider's website.
In advanced settings, you can specified a Search domain. It would usually be your home domain, i.e. if your computer is called "splash", and it's full domain name is "splash.boatanchor.net", the Search Domain would be "boatanchor.net". Unless you specifically need it, it's ok not to define this setting. Again, domestic connection would not need this setting.
The next steps are exposed at „Ending the configuration”
If the tool detects network interfaces, it offers to select one and to configure it.
A list of providers is proposed, classified by countries. Select your provider. If it is not listed, select the option Unlisted and then enter the options your provider gave.
Select one of the protocols available:
Protokół dynamicznej konfiguracji komputera (DHCP)
Konfiguracja ręczna TCP/IP
PPP over ADSL (PPPoA)
PPP przez Ethernet (PPPoE)
Protokół tunelowania punkt-do-punktu (PPTP)
Ustawienia dostępu
Konto (nazwa użytkownika)
Account password
(Advanced) Virtual Path ID (VPI)
(Advanced) Virtual Circuit ID (VCI)
The next steps are exposed at „Ending the configuration”
The wizard asks which device to configure:
Manual choice (internal ISDN card)
Zewnętrzny modem ISDN
A list of hardware is proposed, classified by category and manufacturer. Select your card.
Select one of the protocols available:
Protocol for the rest of the world, except Europe (DHCP)
Protocol for Europe (EDSS1)
A list of providers is then offered, classified by countries. Select your provider. If it is not listed, select the option Unlisted and then enter the options your provider gave you. Then it is asked for parameters:
Nazwa połączenia
Numer telefonu
Identyfikator logowania
Account password
Metoda uwierzytelniania
After that, you have to select if you get the IP address by automatic or manual method. In the last case, specify IP address and Subnet mask.
The next step is to choose how DNS servers address are obtained, by automatic or manual method. In the case of manual configuration, you have to put:
Domena
First and second DNS Server
Select if the hostname is set from IP. This option is to select only if you are sure that your provider is configured to accept it.
The next step is to choose how the gateway address is obtained, by automatic or manual method. In the case of manual configuration, you have to enter the IP address.
The next steps are exposed at „Ending the configuration”
A first window lists the interfaces which are available and an entry for Windows driver (ndiswrapper). Select the one to configure. Use ndiswrapper only if the other configuration methods did not work.
At this step, the choice is given between the different access points that the card has detected.
Specific parameter for the wireless card are to provide:
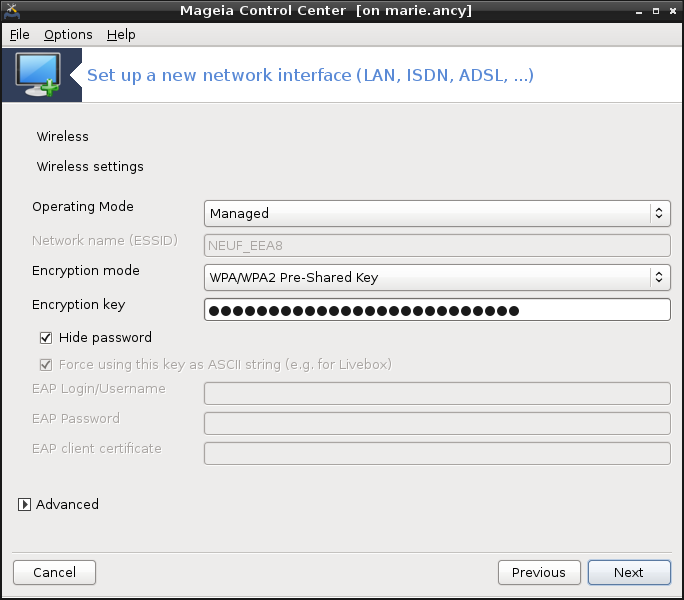
Operating mode:
- Zarządzany
To access to an existing access point (the most frequent).
- Ad-Hoc
To configure direct connection between computers.
Network Name (ESSID)
Encryption mode: it depends of how the access point is configured.
- WPA/WPA2
This encryption mode is to prefer if your hardware allows it.
- WEP
Some old hardware deals only this encryption method.
Klucz szyfrujący
It is generally provided with the hardware which give the access point.
At this step, the choice is given between an automatic IP address or a manual IP address.
Automatic IP
IP settings: you have to select if DNS servers are declared by the DHCP server or are manually specified, as explained below. In the last case, IP address of DNS servers has to be set. The HOSTNAME of the computer can be specified here. If no HOSTNAME is specified, the name localhost.localdomain is attributed by default. The Hostname can also be provided by the DHCP server with the option Assign host name from DHCP server
The advanced button give the opportunity to specify:
Search domain (not accessible, as provided by the DHCP server)
the DHCP client
DHCP timeout
Get YP server from DHCP (checked by default): specify the NIS servers
Get NTPD server from DHCP (synchronisation of clocks)
the HOSTNAME required by DHCP. Only use this option if the DHCP server requires the client to specify a hostname before receiving an IP address. This option is not dealt by some DHCP servers.
After accepting the configuration the step, which is common to all connection configurations, is explained: „Ending the configuration”
Konfiguracja ręczna
IP settings: you have to declare DNS servers. The HOSTNAME of the computer can be specified here. If no HOSTNAME is specified, the name
localhost.localdomainis attributed by default.For a residential network, the IP address always looks like 192.168.x.x, Netmask is 255.255.255.0, and the Gateway and DNS servers are available from your providers website.
In advanced settings, you can specified a Search domain. It must seem to your hostname without the first name, before the period.
The next steps are exposed at „Ending the configuration”
If the tool detects wireless interfaces, it offers to select one and to configure it.
The PIN is asked. Leave empty if the PIN is not required.
The wizard asks for network. If it is not detected, select the option Unlisted.
A list of providers is proposed, classified by countries. Select your provider. If it is not listed, select the option Unlisted and then enter the options your provider gave.
Provide access settings
Nazwa punktu dostępowego
Konto (nazwa użytkownika)
Account password
The next steps are exposed at „Ending the configuration”
This section hasn't been written yet for lack of resources. If you think you can write this help, please contact the Doc team. Thanking you in advance.
The wizard asks which device to configure:
Ręczny wybór
Detected hardware, if any.
A list of ports is proposed. Select your port.
If not yet installed, it will be suggested that you install the package kppp-provider.
A list of providers is proposed, classified by countries. Select your provider. If it is not listed, select the option Unlisted and then enter the options your provider gave. Then it is asked for Dialup options:
Connection name
Phone number
Login ID
Password
Authentication, choose between:
PAP/CHAP
Oparta o skrypt
PAP
Poprzez terminal
CHAP
The next steps are exposed at „Ending the configuration”
In the next step, you can specify:
Allow users to manage the connection
Start the connection at boot
Enable traffic accounting
Allow interface to be controlled by Network Manager
In the case of a wireless connection, a supplemental box is Allow access point roaming which give the possibility to switch automatically between access point according to the signal strength.
With the advanced button, you can specify:
Metric (10 by default)
MTU
Hotplugging sieci
Włącz tunelowanie IPv6 do IPv4
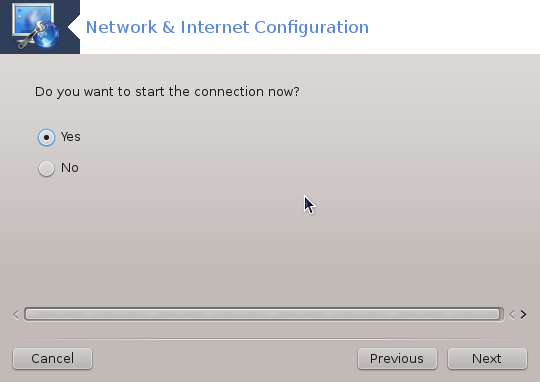
The last step allows you to specify if the connection is to start immediately or not.