

Mageia is distributed via ISO images. This page will help you to choose which image match your needs.
There is two families of media:
Classical installer: After booting the media, it will follow a process allowing to choose what to install and how to configure your target system. This give you the maximal flexibility for a customized installation, in particular to choose which Desktop Environment you will install.
LIVE media: you can boot the media in a real Mageia system without installing it, to see what you will get after installation. The installation process is simpler, but you get lesser choices.
Details are given in the next sections.
Here, a medium (plural: media) is an ISO image file that allows you to install and/or update Mageia and by extension any physical support the ISO file is copied to.
Puoi trovarli qui.
Queste ISO usano l'installer tradizionale chiamato drakx
Possono fare sia un'installazione pulita o un update da una release precedente.
Diversi media per architetture a 32 o 64 bit.
Alcuni strumenti sono disponibili nella schermata di benvenuto: Recupero di Sistema, Test della Memoria, Strumento di Identificazione Hardware.
Ogni DVD contiene diversi desktop environments e lingue.
Ti sarà data la possibilità, durante l'installazione, di aggiungere software non free.
Può essere utilizzato per avere un'anteprima della distribuzione senza installarla su di un HDD avendo comunque la possibilità di farlo.
Each ISO contains only one desktop environment (Plasma, GNOME or Xfce).
Diversi media per architetture a 32 o 64 bit.
Le Live ISO possono solo essere utilizzate per un'installazione da zero. Non possono essere usate per aggiornare una precedente release.
Contengono del software non libero.
Plasma desktop environment only.
Sono presenti tutte le lingue.
64 bit architecture only.
Ognuna è una piccola immagine che contiene non più del necessario per avviare l'installer Drakx e trovare drakx-installer-stage2 e altri pacchetti che sono necessari per continuare e completare l'installazione. Questi pacchetti possono essere nell'hard disk del pc, su di un disco locale, su un network locale o su internet.
Questi media sono davvero leggeri (meno di 100 MB) e convenienti quando la connessione è troppo lenta per scaricare un intero DVD, quando si ha un PC senza DVD o un PC che non può eseguire il boot da una chiavetta USB.
Diversi media per architetture a 32 o 64 bit.
Solamente la lingua inglese.
Contains only free software, for those people who prefer not to use non-free software.
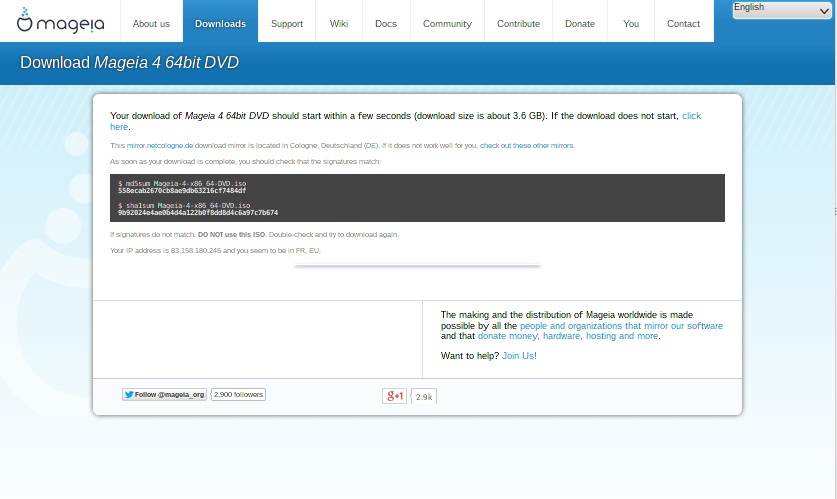
Once you have chosen your ISO file, you can download it using either http or BitTorrent. In both cases, a window gives you some information, such as the mirror in use and an opportunity to change if the bandwidth is to low. If http is chosen, you may also see something like
md5sum and sha1sum are tools to check the ISO integrity. Use only one of them. Keep one of them for further usage. Then a window similar to this one appears:
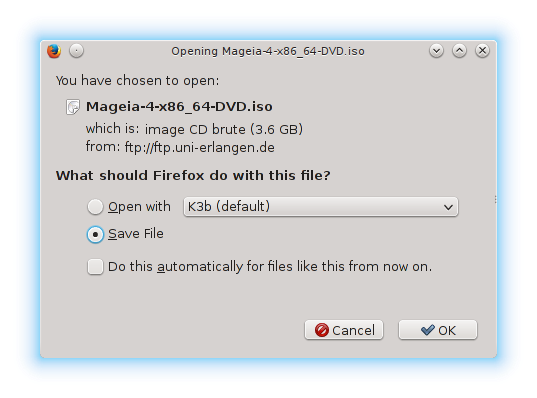
Check the radio button Save File.
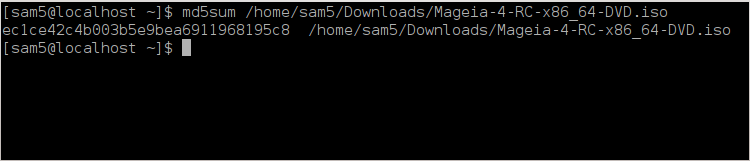
Both checksums are hexadecimal numbers calculated by an algorithm from the file to be downloaded. When you ask these algorithms to recalculate this number from your downloaded file, either you have the same number and your downloaded file is correct, or the number is different and you have a failure. A failure infers that you should retry the download or attempt a repair using BitTorrent.
Aprire la console, senza obbligo di essere root, e:
- Per usare md5sum digitare: [sam@localhost]$ md5sum
path/to/the/image/file.iso.
- Per usare sha1susm digitare: [sam@localhost]$ sha1sum
path/to/the/image/file.iso.
e comparate il numero ottenuto a computer (potrebbe essere necessario attendere un poco) a quello dato da Mageia. Per esempio:
L'ISO controllata può essere masterizzata su un CD o un DVD o dumpata su di una chiavetta USB. Queste operazioni non sono una semplice copia e puntano e creare un media avviabile.
Usa qualsiasi programma di masterizzazione che desideri, ma assicurati che il dispositivo sia correttamente impostato in masterizza un immagine, masterizza data o files non va bene. Maggiori informazioni sul wiki di Mageia.
Tutte le ISO di Mageia sono ibride il che significa che puoi 'dumparle' in una chiavetta USB e usarle per avviare e installare il sistema.
Avvertimento
"dumpare" un'immagine in un flash drive distrugge ogni precedente file-system su quel dispositivo; ogni altro dato verrà perso e la capacità della partizione ridotta alla grandezza dell'immagine del disco.
To recover the original capacity, you must redo partitioning and re-format the USB stick.
Puoi usare uno strumento grafico come IsoDumper
Potresti provare:
- Rufus using the "ISO image" option;
Avvertimento
It is potentially *dangerous* to do this by hand. You risk to overwrite a disc partition if you get the device-ID wrong.
Puoi anche usare il tool dd in una console:
Apri una console
Diventa root con il comando
su -(non dimenticare la '-' finale)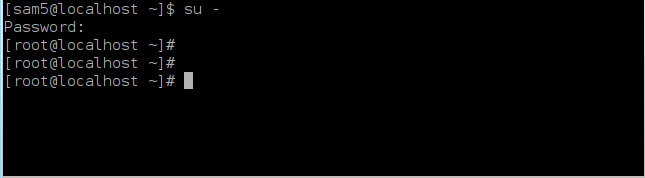
Collega la tua chiavetta USB (non montarla, questo significa anche non aprire alcuna applicazione o file manager che può averne accesso o leggerla).
Inserisci il comando
fdisk -l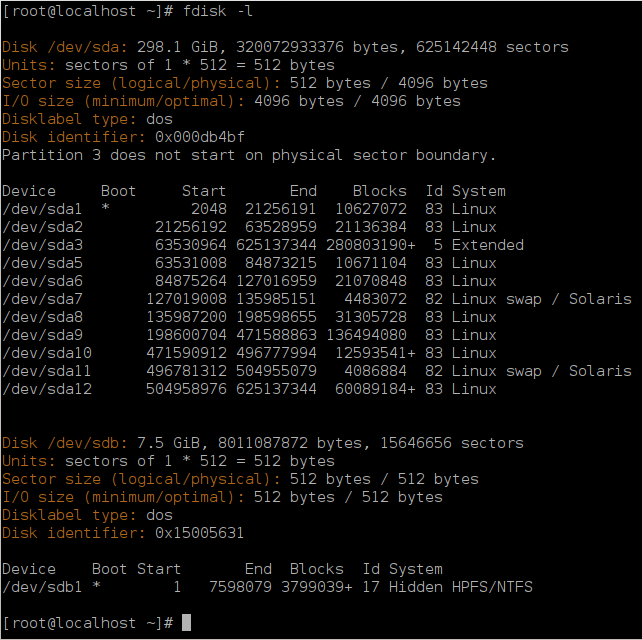
Alternatively, you can get the device name with the command
dmesg: at end, you see the device name starting with sd, and sdd in this case:[72594.604531] usb 1-1: new high-speed USB device number 27 using xhci_hcd [72594.770528] usb 1-1: New USB device found, idVendor=8564, idProduct=1000 [72594.770533] usb 1-1: New USB device strings: Mfr=1, Product=2, SerialNumber=3 [72594.770536] usb 1-1: Product: Mass Storage Device [72594.770537] usb 1-1: Manufacturer: JetFlash [72594.770539] usb 1-1: SerialNumber: 18MJTWLMPUCC3SSB [72594.770713] usb 1-1: ep 0x81 - rounding interval to 128 microframes, ep desc says 255 microframes [72594.770719] usb 1-1: ep 0x2 - rounding interval to 128 microframes, ep desc says 255 microframes [72594.771122] usb-storage 1-1:1.0: USB Mass Storage device detected [72594.772447] scsi host8: usb-storage 1-1:1.0 [72595.963238] scsi 8:0:0:0: Direct-Access JetFlash Transcend 2GB 1100 PQ: 0 ANSI: 4 [72595.963626] sd 8:0:0:0: [sdd] 4194304 512-byte logical blocks: (2.14 GB/2.00 GiB) [72595.964104] sd 8:0:0:0: [sdd] Write Protect is off [72595.964108] sd 8:0:0:0: [sdd] Mode Sense: 43 00 00 00 [72595.965025] sd 8:0:0:0: [sdd] No Caching mode page found [72595.965031] sd 8:0:0:0: [sdd] Assuming drive cache: write through [72595.967251] sdd: sdd1 [72595.969446] sd 8:0:0:0: [sdd] Attached SCSI removable diskFind the device name for your USB stick (by its size), for example
/dev/sdbin the screenshot above, it is a 8GB USB stick.Inserisci il comando: #
dd if=path/to/the/ISO/file of=/dev/sdX
bs=1M
Dove X = nome del tuo dispositivo esempio: /dev/sdc
Example: #
dd if=/home/user/Downloads/Mageia-6-x86_64-DVD.iso
of=/dev/sdb bs=1M
Inserire il comando: #
syncTogli la tua chiavetta USB, hai concluso
