

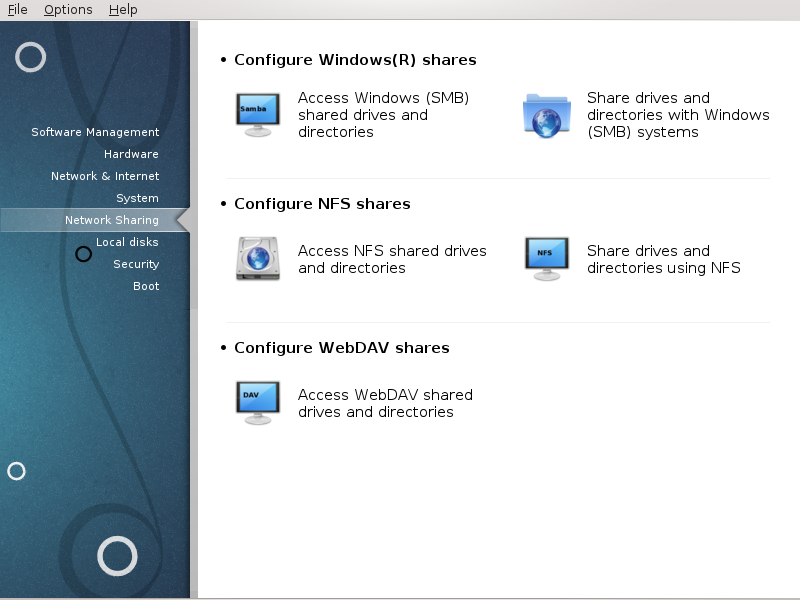
Në këtë ekran ju mund të zgjidhni midis disa mjete për ndarjen drejtuesve dhe skedarëve. Klikoni mbi një lidhje më poshtë për të mësuar më shumë.
Konfiguro shpërndarësin Windows(R)
seksioni i quajtur “Hyrje në shpërndarjen e drejtuesve dhe skedarëve Windows (SMB)”
seksioni i quajtur “Share directories and drives with Samba” = Share drives and directories with Windows (SMB) systems
Konfigurimi shpërndarësin WebDAV
This tool[35] allows you to declare which shared directories to be accessible to all users on the machine. The protocol used for this is SMB which has been popularized on Windows(R) systems. The shared directory will be available directly at boot. Shared directories can be also accessed directly in a single session by a user with tools such as file browsers.
Para fillimit të veglës, është mirë të deklaroni emrat e serverëve në dispozicion, për shembull me seksioni i quajtur “Përcaktimi i pritësit”
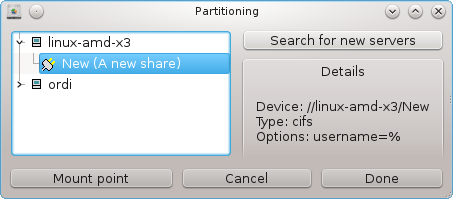
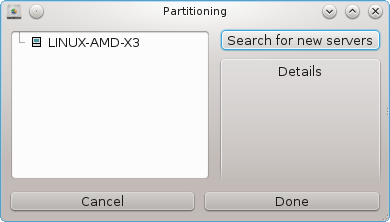
Zgjedh për të marrë një listë të serverëve që ndajnë dosjet.
Klikoni në emrin e serverit dhe në > para emrit të serverit për të shfaqur listën e dosjeve të përbashkëta dhe zgjidhni dosjen që dëshironi të përdorni.
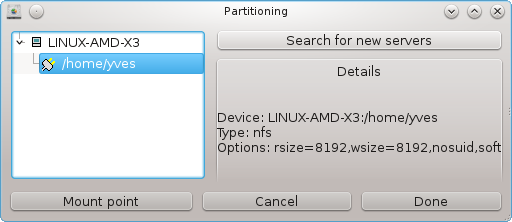
Butoni do të bëhet i disponueshëm, duhet të specifikoni se ku duhet ngarkuar dosja.
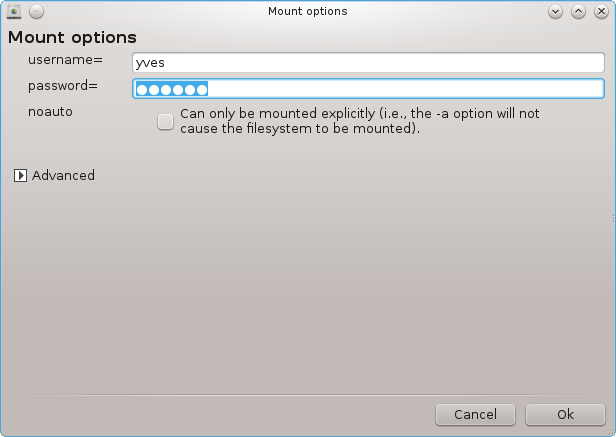
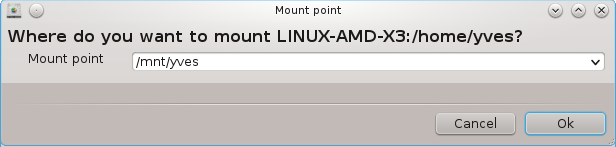
Pas zgjedhjes së pikës ngarkuese, ajo mund të ngarkohet me . Ju gjithashtu mund të verifikoni dhe ndryshoni disa alternativa me butonin .
Në alternativat, mund të specifikoni emrin e përdoruesit dhe fjalëkalimin e atyre që janë në gjendje të lidheni me serverin SMB. Pas ngarkimit të dosjeve, mund ta zgjidhni atë me të njëjtën buton.

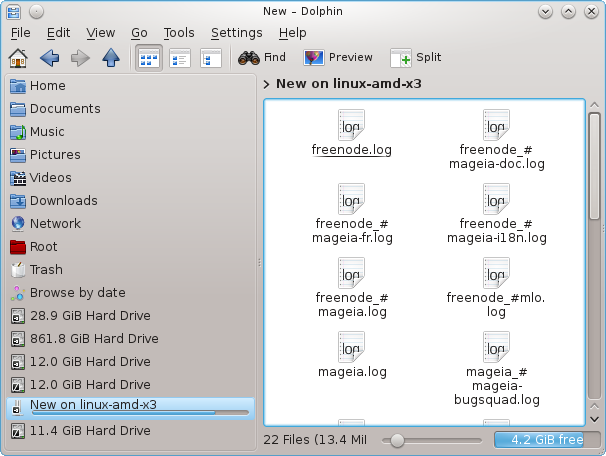
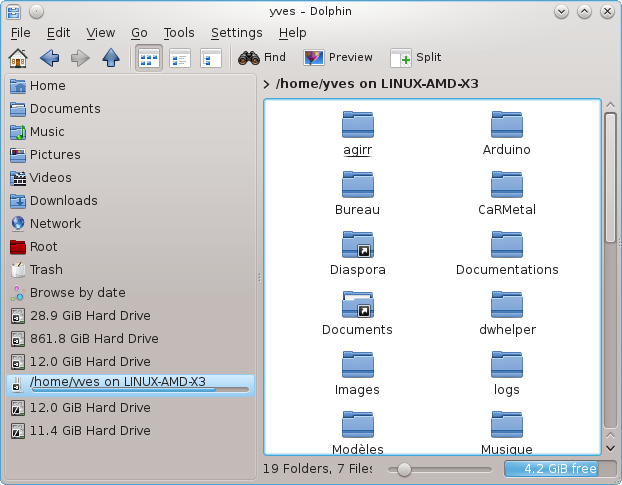
Pas pranimit të konfigurimit me butonin Bërë, një mesazh do të kërkojë "A doni të ruani modifikimet e /etc/fstab". Ruajtja, do të lejojë që dosja të vihet në dispozicion në çdo ndezje, nëse rrjeti është i arritshëm. Dosja e re është pastaj e disponueshme në shfletuesin tuaj të skedarëve, për shembull në dolphin.
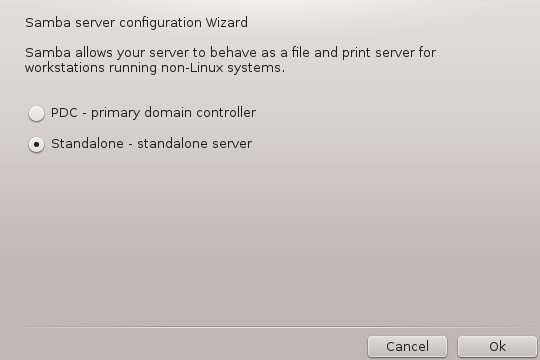
Samba is a protocol used in different Operating Systems to share some resources like directories or printers. This tool allows you to configure the machine as a Samba server using the protocol SMB/CIFS. This protocol is also used by Windows(R) and workstations with this OS can access the resources of the Samba server.
To be accessed from other workstations, the server has to have a fixed IP address. This can be specified directly on the server, for example with seksioni i quajtur “Qendra Rrjetit”, or at the DHCP server which identifies the station with its MAC-address and give it always the same address. The firewall has also to allow the incoming requests to the Samba server.
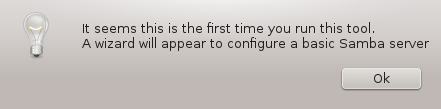
At the first run, the tools [36] checks if needed packages are installed and proposes to install them if they are not yet present. Then the wizard to configure the Samba server is launched.
In the next window the Standalone server configuration option is already selected.
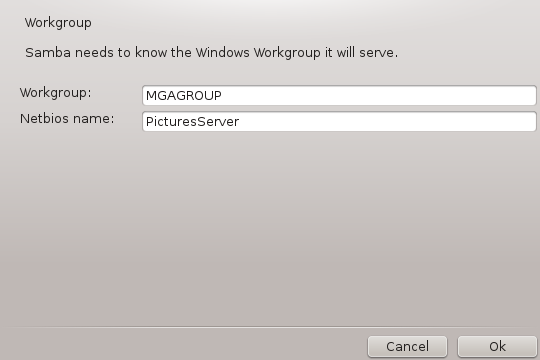
Then specify the name of the workgroup. This name should be the same for the access to the shared resources.
The netbios name is the name which will be used to designate the server on the network.
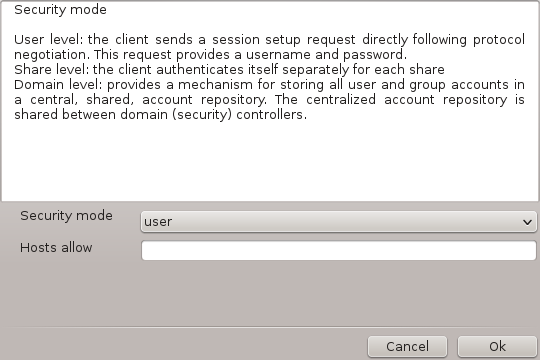
Choose the security mode:
user: the client must be authorized to access the resource
share: the client authenticates itself separately for each share
You can specify which hosts are allowed to access the resources, with IP address or host name.
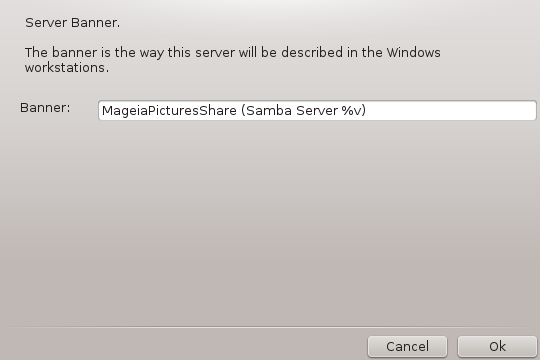
Specify the server banner. The banner is the way this server will be described in the Windows workstations.
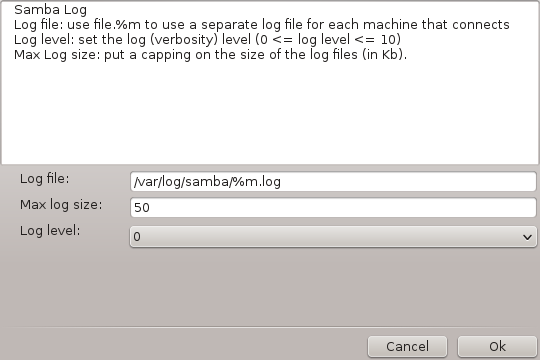
The place where Samba can log information can be specified at the next step.
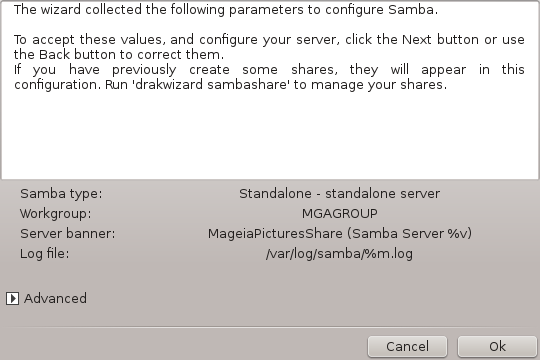
The wizard displays a list of the chosen parameters before you accept the
configuration. When accepted, the configuration will be written in
/etc/samba/smb.conf.
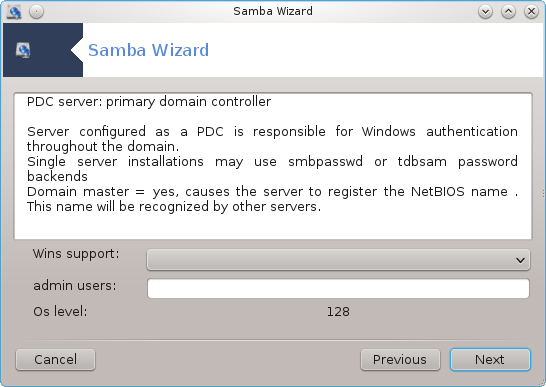
If the "Primary domain controller" option is selected, the wizard asks for indication if Wins is to support or not and to provide admin users names. The following steps are then the same as for standalone server, except you can choose also the security mode:
domain: provides a mechanism for storing all user and group accounts in a central, shared, account repository. The centralized account repository is shared between (security) controllers.
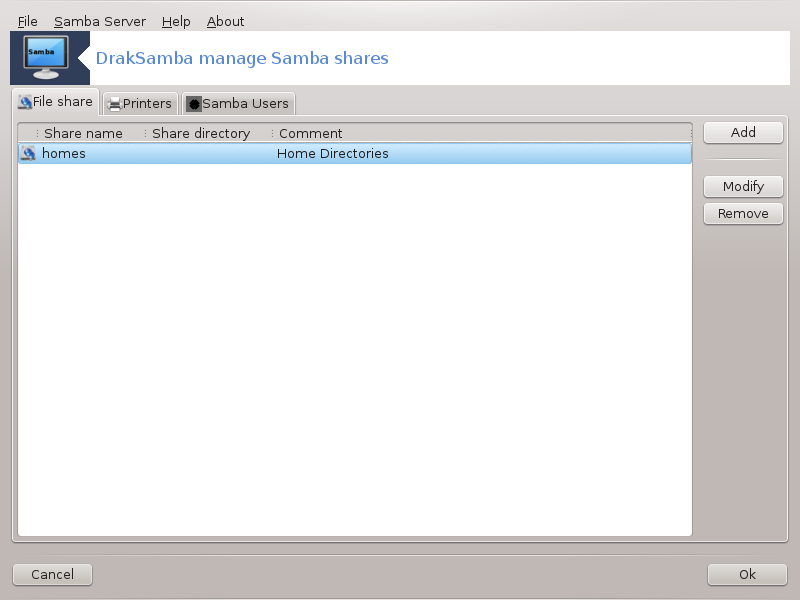
With the button, we get:
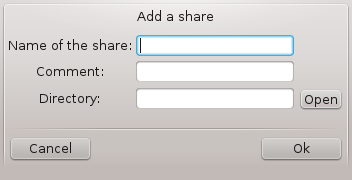
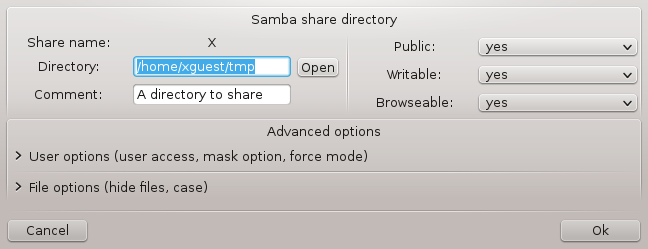
A new entry is thus added. It can be modified with the button. Options can be edited, such as whether the directory is visible to the public, writable or browseable. The share name can not be modified.
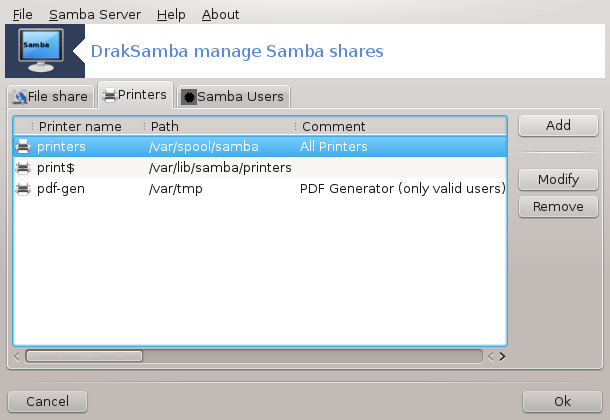
When the list has at least one entry, menu entries can be used.
File|Write conf. Save the current configuration in /etc/samba/smb.conf.
Samba server|Konfiguro. The wizard can be run again with this command.
Samba server|Rifillo. Server është ndalur dhe rifilluar me skedarët aktuale konfigurimit.
Samba Server|Ngarko. The configuration displayed is reloaded from the current configuration files.
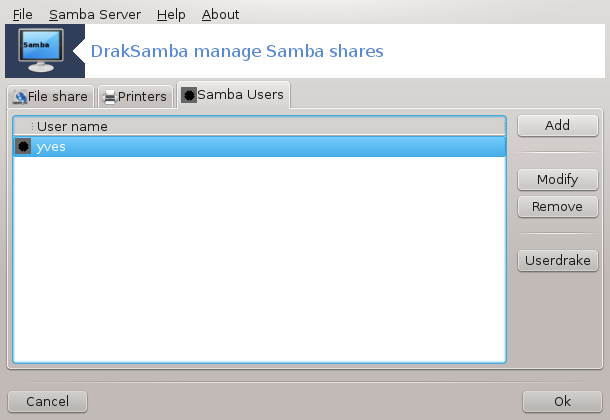
In this tab, you can add users who are allowed to access the shared resources when authentication is required. You can add users from seksioni i quajtur “Përdoruesit dhe grupet”
.
Kjo vegël[37] ju lejon të deklaroni disa dosje të përbashkëta që të jenë të lejuara për të gjithë përdoruesit në makinë. Protokolli i përdorur për këtë është NFS i cili është i disponueshëm në shumicën e sistemeve Linux ose Unix. Dosja e përbashkët do të jetë në dispozicion në mënyrë të drejtpërdrejtë në boot. Dosjet e përbashkëta mund të jenë gjithashtu të arritshme direkt në një sesion të vetëm për një përdorues me mjete të tilla si programi i skedarëve.
Zgjedh për të marrë një listë të serverëve që ndajnë dosjet.
Kliko në > simbolin përpara emrit të serverit për të shfaqur listën e dosjeve të përbashkëta dhe zgjidhni dosjen që dëshironi të përdorni.
Butoni do të jetë i disponueshëm dhe ju duhet të specifikoni se ku duhet ngarkuar dosja.
Pas zgjedhjes së pikës ngarkuese, Ju mund ta ngarkoni atë. Ju gjithashtu mund të verifikoni dhe ndryshoni disa alternativa me buton . Pas ngarkimit të dosjes, mund ta zgjidhni atë me të njëjtin buton.
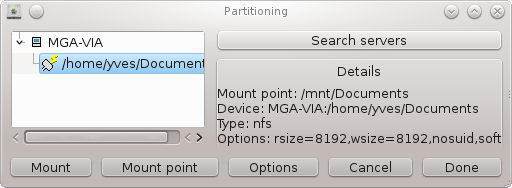
Për pranimin e konfigurimit me butonin , do të shfaqet një mesazh, duke pyetur "A doni të ruani modifikimet e /etc/fstab". Kjo do ta bëjë dosjen në dispozicion në çdo ndezje, nëse rrjeti është i arritshëm. Dosja e re është më pas e disponueshme në shfletuesin tuaj të skedarëve, për shembull në Dolphin.
When the wizard[38] is launched for the first time, it may display the following message:
The package nfs-utils needs to be installed. Do you want to install it?
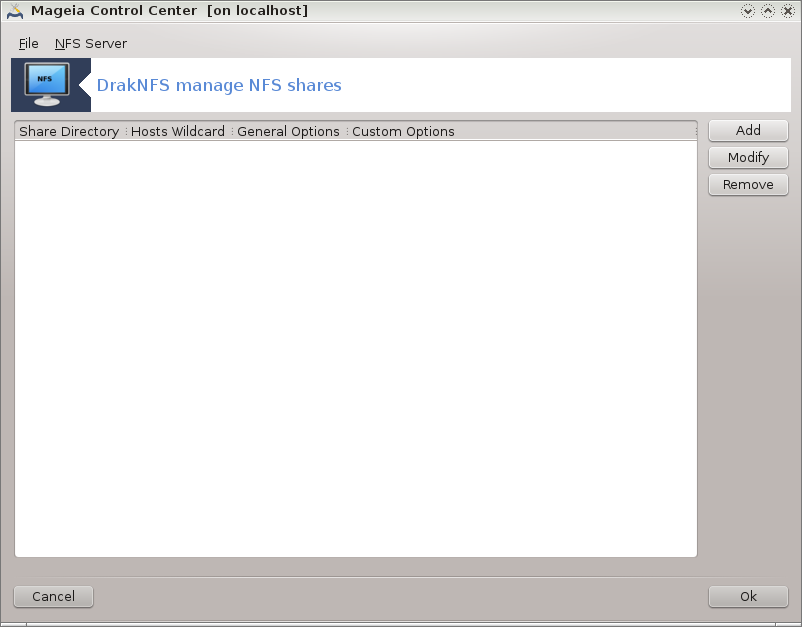
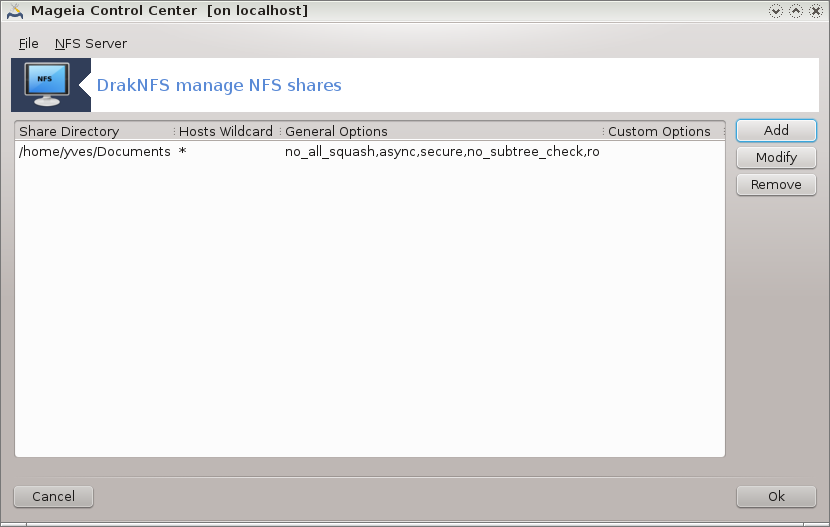
Pas përfundimit të instalimit, një dritare me një listë të zbrazët shfaqet.
A list of directories which are shared is displayed. At this step, the list is empty. The button gives access to a configuration tool.
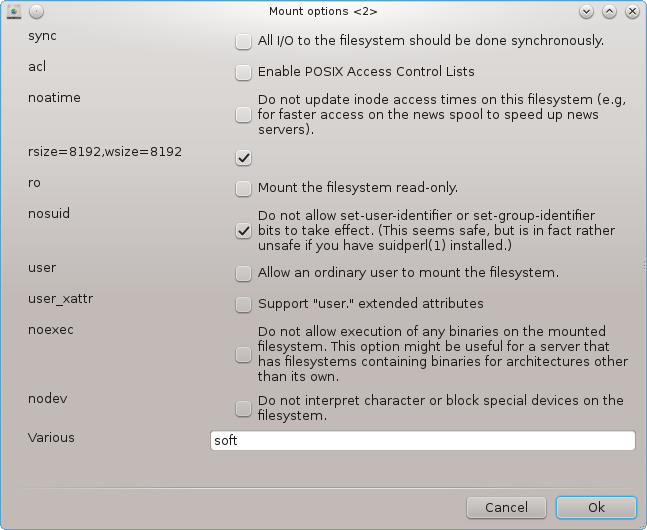
Mjeti konfigurimit është emërtuar "Modifiko hyrjen". Ajo mund të jetë nisur edhe me butonin . Parametrat e mëposhtme janë të disponueshme.
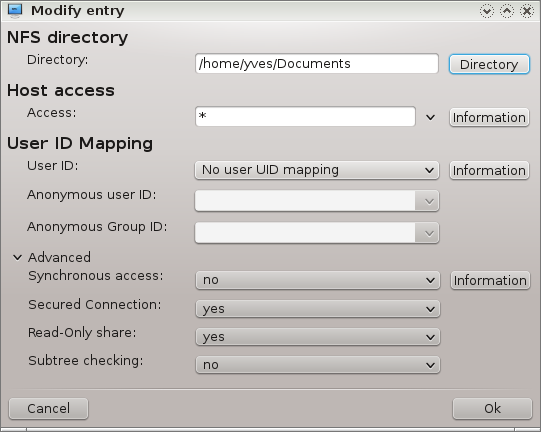
Këtu ju mund të specifikoni cili skedarë është që të ndahet. Butoni jep hyrje në një shfletues për të zgjedhur atë.
Here you can specify the hosts that are authorized to access the shared directory.
NFS clients may be specified in a number of ways:
single host: a host either by an abbreviated name recognized be the resolver, fully qualified domain name, or an IP address
netgroups: NIS netgroups may be given as @group.
wildcards: machine names may contain the wildcard characters * and ?. For instance: *.cs.foo.edu matches all hosts in the domain cs.foo.edu.
IP networks: you can also export directories to all hosts on an IP (sub-)network simultaneously. For example, either `/255.255.252.0' or `/22' appended to the network base address.
map root user as anonymous: maps requests from uid/gid 0 to the anonymous uid/gid (root_squash). The root user from the client cannot read or write to the files on the server which are created by root on the server itself.
allow real remote root access: turn off root squashing. This option is mainly useful for diskless clients (no_root_squash).
map all users to anonymous user: maps all uids and gids to the anonymous user (all_squash). Useful for NFS-exported public FTP directories, news spool directories, etc. The opposite option is no user UID mapping (no_all_squash), which is the default setting.
anonuid and anongid: explicitly set the uid and gid of the anonymous account.
Secured Connection: this option requires that requests originate on an internet port less than IPPORT_RESERVED (1024). This option is on by default.
Read-Only share: allow either only read or both read and write requests on this NFS volume. The default is to disallow any request which changes the filesystem. This can also be made explicit by using this option.
Synchronous access: prevents the NFS server from violating the NFS protocol and to reply to requests before any changes made by these requests have been committed to stable storage (e.g. disc drive).
Subtree checking: enable subtree checking which can help improve security in some cases, but can decrease reliability. See exports(5) man page for more details.
Kjo vegël[39] gjendet në Qendrën e Kontrollit Mageia, nën faqen Shpërndarje Rrjetit, me etiketim Konfiguro Shpërndarjen WebDAV.
WebDAV është një protokoll që lejon për të montuar skedarin e një web serveri në nivel lokal, në mënyrë që të duket si një skedarë lokale. Është e nevojshme që kompjuteri në distance të fillojnjë server WebDAV. Ky nuk është qëllimi i kësaj vegle për të konfiguruar server WebDAV.
Ekran i parë i mjetit tregon shënimet hyrëse të konfiguruara tashmë, nëse ka, dhe një buton. Përdorini për të krijuar një hyrje të re. Vendos server URL në fushën e ekranit të ri.
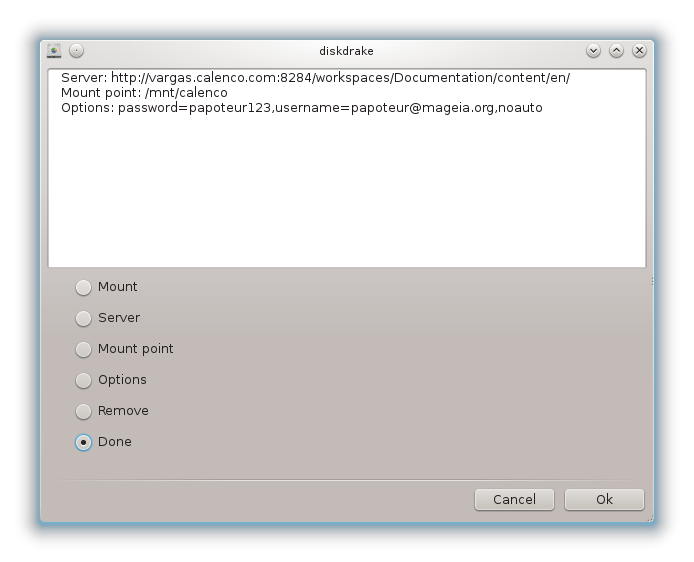
Pastaj ju merrni një ekran me butonat e radios për të zgjedhur disa veprime. Vazhdo me veprimin duke klikuar pas zgjedhjes butonit radio, si është konfiguruar tashmë. Ju mund megjithatë të korrigjoni atë, nëse është e nevojshme.
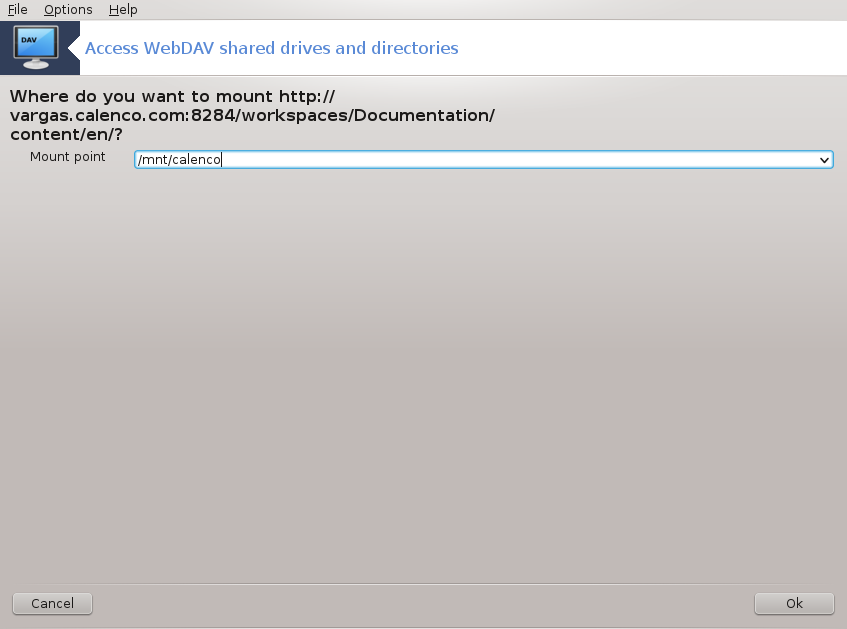
Përmbajtja e skedarit në distancë do të jetë i mundshëm përmes kësaj pike montimi.
Në hapin e ardhshëm, jepni emrin tuaj të përdoruesit dhe fjalëkalimin. Nëse keni nevojë për disa opsione të tjera, ju mund të jepni atyre në ekranin .

Alternativa ju lejon të ngarkoni menjëherë qasjen.
Pasi ta keni pranuar konfigurimin me butonin e radios , ekrani i parë shfaqet përsëri dhe pika juaj e re e ngarkimit është e shënuar. Pasi ta zgjidhni , ju pyeteni nëse do të ruani modifikimet ose jo /etc/fstab. Zgjidhni këtë alternativë nëse doni që dosja e largët të jetë e disponueshme në çdo ndezje. Nëse konfigurimi juaj është për përdorim një herë, mos e ruani.
[35] You can start this tool from the command line, by typing diskdrake --smb as root.
[36] You can start this tool from the command line, by typing draksambashare as root.
[37] Ju mund të filloni këtë vegël nga command line, duke shtypur diskdrake --nfs si root.
[38] You can start this tool from the command line, by typing draknfs as root.
[39] Ju mund të filloni këtë vegël nga command line, duke shtypur diskdrake --dav si root.
