

In this screen you can choose between several network tools. Click on a link below to learn more.
Administra dispositius de xarxa
This tool[19] is found under the Network & Internet tab in the Mageia Control Center labelled "Network Center"
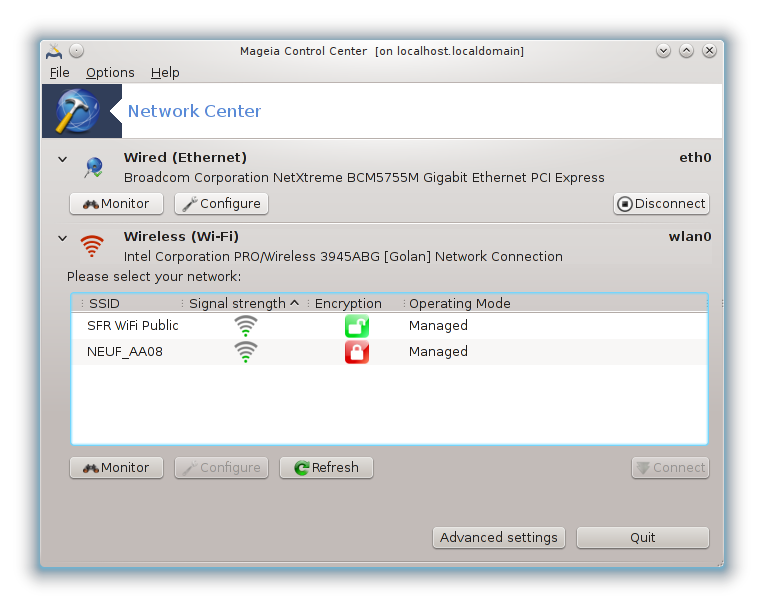
When this tool is launched, a window opens listing all the networks configured on the computer, whatever their type (wired, wireless, satellite, etc.). When clicking on one of them, three or four buttons appear, depending on the network type, to allow you to look after the network, change its settings or connect/disconnect. This tool isn't intended to create a network, for this see Set up a new network interface (LAN, ISDN, ADSL, ...) in the same MCC tab.
In the screenshot below, given as example, we can see two networks, the
first one is wired and connected, recognizable by this icon  (this one is not connected
 ) and the second section shows wireless
networks, not connected recognizable by this icon
) and the second section shows wireless
networks, not connected recognizable by this icon  and this one
  if connected. For the other network types,
the colour code is always the same, green if connected and red if not
connected.
if connected. For the other network types,
the colour code is always the same, green if connected and red if not
connected.
In the wireless part of the screen, you can also see all the detected networks, with the SSID, the Signal strengh, if they are encrypted (in red) or not (in green), and the Operating mode. Click on the chosen one and then either on , or . It is possible here to go from a network to another one. If a private network is selected, the Network Settings window (see below) will open and ask you for extra settings ( an encryption key in particular).
Click on to update the screen.
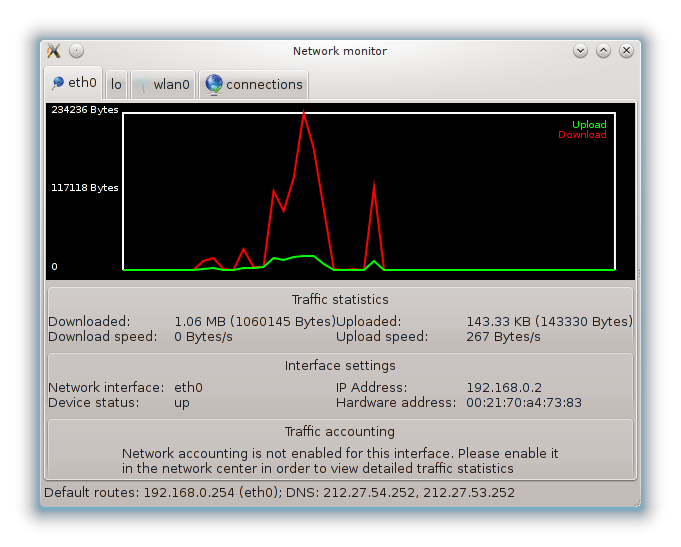
This button allows you to watch the network activity, downloads (toward the PC, in red) and uploads (toward the Internet, in green). The same screen is available by right clicking on the .
There is a tab for each network (here eth0 is the wired network, lo the local loopback and wlan0 the wireless network) and a tab connection which gives details about connection status.
Nota
At the bottom of the window is a title Traffic accounting, we will look at that in the next section.
A - For a wired network
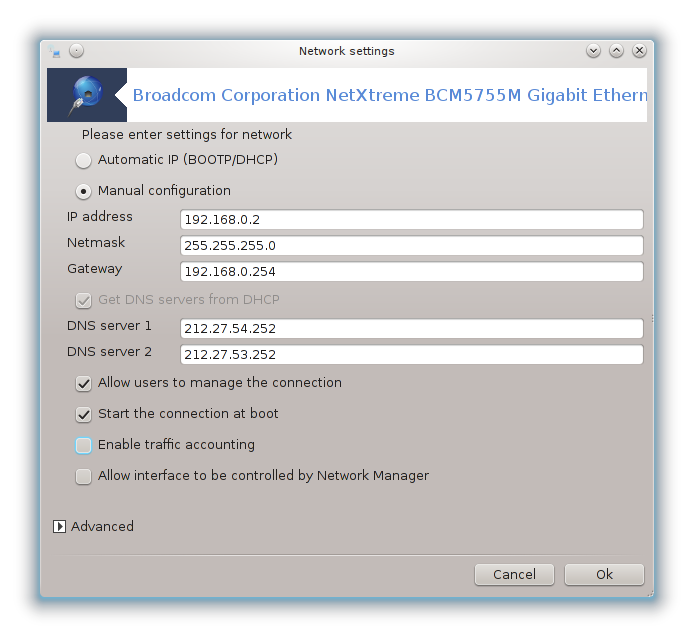
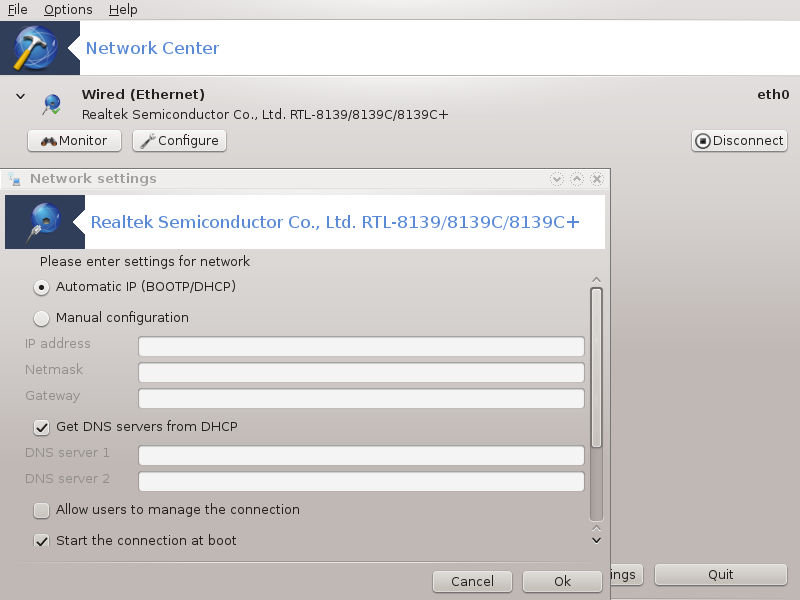
It is possible to change all the settings given during network creation. Most of the time, checking will do, but in case of problems, manual configuration may give better results.
For a residential network, the IP address always looks like 192.168.0.x, Netmask is 255.255.255.0, and the Gateway and DNS servers are available from your providers website.
if checked this will count the traffic on a hourly, daily or monthly basis. The results are visible in the Network monitor detailed in the previous section. Once enabled, you may have to reconnect to the network.
Allow interface to be controlled by Network Manager:
This section hasn't been written yet for lack of resources. If you think you can write this help, please contact the Doc team. Thanking you in advance.
This section hasn't been written yet for lack of resources. If you think you can write this help, please contact the Doc team. Thanking you in advance.
B - For a wireless network
Only the items not already seen above are explained.

Operating mode:
Select Managed if the connection is via an access point, there is an ESSID detected. Select Ad-hoc if it is a peer to peer network. Select Master if your network card is used as the access point, your network card needs to support this mode.
Encryption mode and Encryption key:
If it is a private network, you need to know these settings.
WEP uses a password and is weaker than WPA which uses a passphrase. WPA Pre-Shared Key is also called WPA personal or WPA home. WPA Enterprise is not often used in private networks.
Allow access point roaming:
Roaming is a technology which enables allows computer to change its access point while remaining connected to the network.
This page hasn't been written yet for lack of resources. If you think you can write this help, please contact the Doc team. Thanking you in advance.
This section hasn't been written yet for lack of resources. If you think you can write this help, please contact the Doc team. Thanking you in advance.

Aquesta eina[20] permet configurar la major part de la xarxa local o connexió a Internet. Heu de conèixer una mica d'informació del vostre proveïdor d'accés o l'administrador de la xarxa.
Seleccioneu el tipus de connexió que desitjar establir, segons el tipus de maquinari i el tipus de proveïdor.
La primera finestra enumera les interfícies que estan disponibles. Seleccioneu la que vulgueu configurar.
En aquest punt, l'elecció es dona entre una automàtica o una adreça IP manual.
IP automàtica.
Paràmetres de xarxa/IP: heu de seleccionar si els servidors DNS són declarats per servidor DHCP o s'especifiquen de forma manual, com s'explica a continuació. En l'últim cas, l'adreça IP dels servidors DNS s'ha d'establir. El nom d'amfitrió de l'ordinador es pot especificar aquí. Si no s'especifica HOSTNAME, el nom
localhost.localdomains'atribueix per defecte. El nom d'amfitrió també pot ser proporcionat pel servidor DHCP amb l'opció Assignar un nom d'amfitrió del servidor DHCP. No tots els servidors DHCP tenen una funció d'aquest tipus i si està configurant el seu PC per obtenir una adreça IP d'un encaminador domèstic ADSL, és poc probable.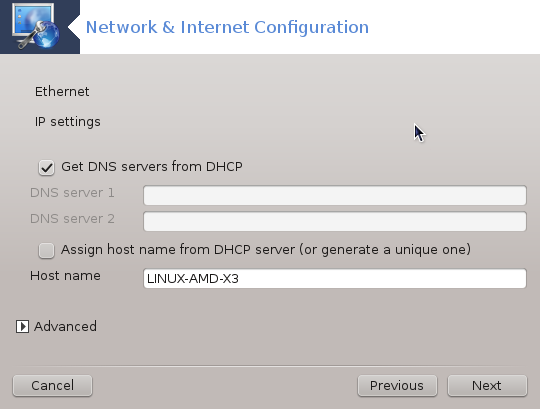
El botó avançat dona l'oportunitat d'especificar:
Domini de cerca (no accessible, segons el que disposa pel servidor DHCP)
el client DHCP
Temps esgotat DHCP
Utilitzeu el servidor YP des de DHCP (s'activa per defecte): especifiqueu el servidor NIS
Utilitzi el servidor NTPD des de DHCP (sincronització de rellotge)
El HOSTNAME requerit per DHCP. Utilitzeu aquesta opció si el servidor DHCP requereix que el client especifiqui un nom d'amfitrió abans de rebre una adreça IP. Aquesta opció no és tractada per alguns servidors DHCP.
Després d'acceptar, els últims passos que són comuns a tots els paràmetres de connexió s'expliquen: “Acabant la configuració”
Configuració manual
Configuració Ethernet/IP: heu de declarar quins servidors DNS es volen utilitzar. El HOSTNAME de l'ordinador es pot especificar aquí. Si no s'especifica el HOSTNAME , el nom
localhost.localdomains'atribueix per defecte.For a residential network, the IP address usually looks like 192.168.x.x, Netmask is 255.255.255.0, and the Gateway and DNS servers are available from your service provider's website.
Dins dels paràmetres avançats, podeu especificar un domini de cerca. En general, seria el vostre domini personal, és a dir, si el vostre ordinador es diu "splash", i el seu nom de domini complet és "splash.boatanchor.net", el domini de cerca seria "boatanchor.net". A menys que específicament es necessiti, no fa falta definir-ho. Un cop més, l'ADSL domèstica no necessitaria aquest paràmetre.

Els propers passos estan exposalts a “Acabant la configuració”
This section hasn't been written yet for lack of resources. If you think you can write this help, please contact the Doc team. Thanking you in advance.
La primera finestra enumera les interfícies que estan disponibles. Seleccioneu la que vulgueu configurar.
En aquest punt, l'elecció es dona entre una automàtica o una adreça IP manual.
Heu d'especificar un mètode d'autentificació:
Cap
BPALogin (necessari per a Telstra). En aquest cas, heu de proporcionar el nom d'usuari i contrasenya.
IP automàtica.
Paràmetres del cable/IP: heu de seleccionar si els servidors DNS són declarats pel servidor DHCP o s'especifiquen de forma manual, com s'explica a continuació. En l'últim cas, s'ha d'establir l'adreça IP dels servidors DNS. El nom d'amfitrió de l'ordinador es pot especificar aquí. Si no s'especifica el HOSTNAME, el nom
localhost.localdomains'atribueix per defecte. El nom d'amfitrió també pot ser proporcionat pel servidor DHCP amb l'opció Assigna el nom d'amfitrió des del servidor DHCP. No tots els servidors DHCP tenen una funció d'aquest tipus i si està configurant el vostre PC per obtenir una adreça IP d'un encaminador ADSL domèstic, és poc probable.El botó avançat dona l'oportunitat d'especificar:
Domini de cerca (no accessible, segons el que disposa pel servidor DHCP)
el client DHCP
Temps esgotat DHCP
Utilitzeu el servidor YP des de DHCP (s'activa per defecte): especifiqueu el servidor NIS
Utilitzi el servidor NTPD des de DHCP (sincronització de rellotge)
El HOSTNAME requerit per DHCP. Utilitzeu aquesta opció si el servidor DHCP requereix que el client especifiqui un nom d'amfitrió abans de rebre una adreça IP. Aquesta opció no és tractada per alguns servidors DHCP.
Després d'acceptar, els últims passos que són comuns a tots els paràmetres de connexió s'expliquen: “Acabant la configuració”
Configuració manual
Paràmetres del cable/IP: cal declarar els servidors DNS a utilitzar. El HOSTNAME de l'ordinador es pot especificar aquí. Si no s'especifica el HOSTNAME, el nom
localhost.localdomains'atribueix per defecte.For a residential network, the IP address usually looks like 192.168.x.x, Netmask is 255.255.255.0, and the Gateway and DNS servers are available from your service provider's website.
Dins dels paràmetres avançats, podeu especificar un domini de cerca. En general seria el vostre domini personal, és a dir, si el vostre ordinador es diu "splash", i el seu nom de domini complet és "splash.boatanchor.net", el domini de cerca seria "boatanchor.net". A menys que específicament no ho necessiteu, no caldria definir aquest paràmetre. Un cop més, la connexió domèstica no necessitaria aquest paràmetre.
Els propers passos estan exposalts a “Acabant la configuració”
Si l'eina detecta interfícies de xarxa, ofereix selecciona una i configurar-la.
Es proposa una llista de proveïdors, classificats per països. Seleccioni el seu proveïdor. Si no apareix, seleccioni l'opció No llistades i després ingressi les opcions donades pel seu proveïdor.
Seleccioneu un dels protocols disponibles:
DHCP (Dynamic Host Configuration Protocol)
Configuració TCP/IP manual
PPP sobre ADSL (PPPoA)
PPP sobre Ethernet (PPPoE)
Protocol de tunneling punt a punt (PPTP)
Paràmetres de l'accés
Compte d'accés (nom d'usuari)
Contrasenya del compte
(Avançat) Virtual Path ID (VPI)
(Avançat) Virtual Circuit ID (VCI)
Els propers passos estan exposalts a “Acabant la configuració”
L'auxiliar us demana quin dispositiu s'ha de configurar:
Elecció manual (targeta XDSI interna)
Mòdem XDSI extern
Es proposa una llista de maquinari, classificats per categoria i fabricant. Seleccioneu la seva targeta.
Seleccioneu un dels protocols disponibles:
Protocol per la resta del món, excepte Europa (DHCP)
Protocol for Europe (EDSS1)
A continuació s'ofereix una llista de proveïdors, classificats per països. Seleccioneu el seu proveïdor. Si no apareix, selecció l'opció No és a la llista i després ingresseu les opcions que el seu proveïdor li va donar. Després li demanarà paràmetres:
Nom de la connexió
Número de telèfon
ID d'entrada
Contrasenya del compte
Mètode d'autenticació
Després d'això, heu de seleccionar si s'obté l'adreça IP pel mètode automàtic o manual. En l'últim cas, introduïu l'adreça IP i la màscara de subxarxa.
El següent pas és triar com s'obtenen les adreces dels servidors DNS, pel mètode automàtic o manual. En el cas de la configuració manual, heu de posar:
Nom de domini
Primer i segon Servidor DNS
Selecciona si el nom de l'amfitrió està configurat des de la IP. Aquesta opció se selecciona únicament si esteu segur que el vostre proveïdor està configurat per acceptar-ho.
El següent pas és triar la forma en què s'obté la direcció de la passarel·la, pel mètode automàtic o manual. En el cas de la configuració manual, ha d'introduir l'adreça IP.
Els propers passos estan exposalts a “Acabant la configuració”
A first window lists the interfaces which are available and an entry for Windows driver (ndiswrapper). Select the one to configure. Use ndiswrapper only if the other configuration methods did not work.
At this step, the choice is given between the different access points that the card has detected.
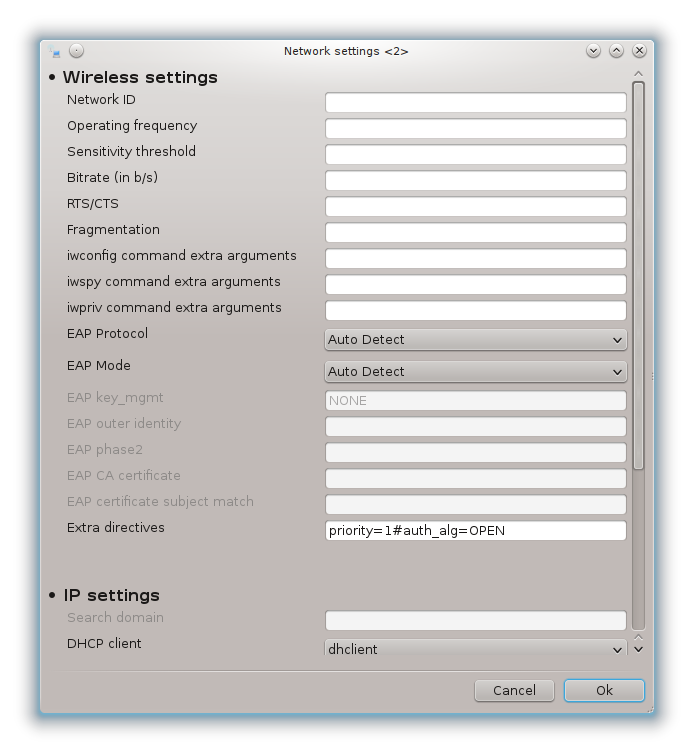
Specific parameter for the wireless card are to provide:
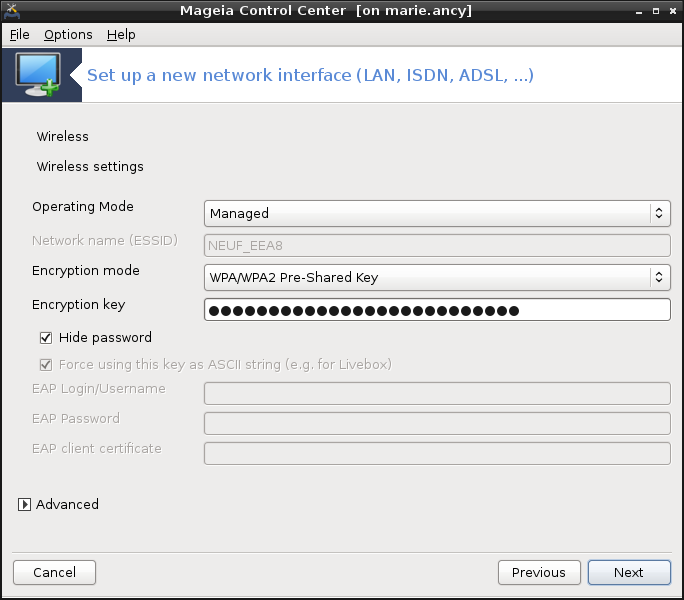
Operating mode:
- Gestionat
To access to an existing access point (the most frequent).
- Ad-Hoc
To configure direct connection between computers.
Network Name (ESSID)
Encryption mode: it depends of how the access point is configured.
- WPA/WPA2
This encryption mode is to prefer if your hardware allows it.
- WEP
Some old hardware deals only this encryption method.
Clau de xifratge
It is generally provided with the hardware which give the access point.
At this step, the choice is given between an automatic IP address or a manual IP address.
IP automàtica.
IP settings: you have to select if DNS servers are declared by the DHCP server or are manually specified, as explained below. In the last case, IP address of DNS servers has to be set. The HOSTNAME of the computer can be specified here. If no HOSTNAME is specified, the name localhost.localdomain is attributed by default. The Hostname can also be provided by the DHCP server with the option Assign host name from DHCP server
El botó avançat dona l'oportunitat d'especificar:
Domini de cerca (no accessible, segons el que disposa pel servidor DHCP)
el client DHCP
Temps esgotat DHCP
Obtén el servidor YP mitjançant DHCP (marcat per defecte): especifiqueu els servidors NIS
Utilitzi el servidor NTPD des de DHCP (sincronització de rellotge)
El HOSTNAME requerit per DHCP. Utilitzeu aquesta opció si el servidor DHCP requereix que el client especifiqui un nom d'amfitrió abans de rebre una adreça IP. Aquesta opció no és tractada per alguns servidors DHCP.
After accepting the configuration the step, which is common to all connection configurations, is explained: “Acabant la configuració”
Configuració manual
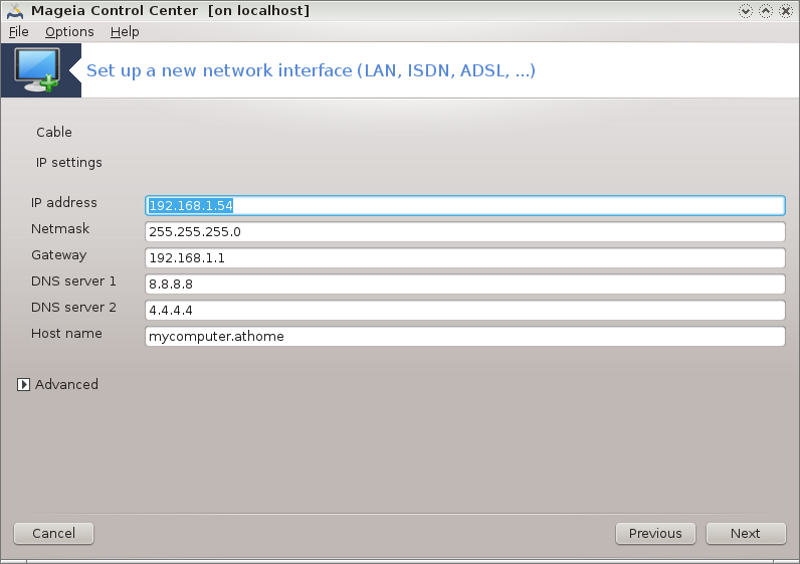
IP settings: you have to declare DNS servers. The HOSTNAME of the computer can be specified here. If no HOSTNAME is specified, the name
localhost.localdomainis attributed by default.For a residential network, the IP address always looks like 192.168.x.x, Netmask is 255.255.255.0, and the Gateway and DNS servers are available from your providers website.
In advanced settings, you can specified a Search domain. It must seem to your hostname without the first name, before the period.
Els propers passos estan exposalts a “Acabant la configuració”
If the tool detects wireless interfaces, it offers to select one and to configure it.
The PIN is asked. Leave empty if the PIN is not required.
The wizard asks for network. If it is not detected, select the option Unlisted.
Es proposa una llista de proveïdors, classificats per països. Seleccioni el seu proveïdor. Si no apareix, seleccioni l'opció No llistades i després ingressi les opcions donades pel seu proveïdor.
Provide access settings
Nom del punt d'accés
Compte d'accés (nom d'usuari)
Contrasenya del compte
Els propers passos estan exposalts a “Acabant la configuració”
This section hasn't been written yet for lack of resources. If you think you can write this help, please contact the Doc team. Thanking you in advance.
L'auxiliar us demana quin dispositiu s'ha de configurar:
Selecció manual
Detected hardware, if any.
A list of ports is proposed. Select your port.
If not yet installed, it will be suggested that you install the package kppp-provider.
A list of providers is proposed, classified by countries. Select your provider. If it is not listed, select the option Unlisted and then enter the options your provider gave. Then it is asked for Dialup options:
Connection name
Phone number
Login ID
Password
Authentication, choose between:
PAP/CHAP
Basat en script
PAP
Basat en terminal
CHAP
Els propers passos estan exposalts a “Acabant la configuració”
En el pas pròxim, pots especificar:
Permetre als usuaris gestionar la connexió
Inicieu la connexió en l'arrencada
Habilita el comptatge del trànsit
Allow interface to be controlled by Network Manager
In the case of a wireless connection, a supplemental box is Allow access point roaming which give the possibility to switch automatically between access point according to the signal strength.
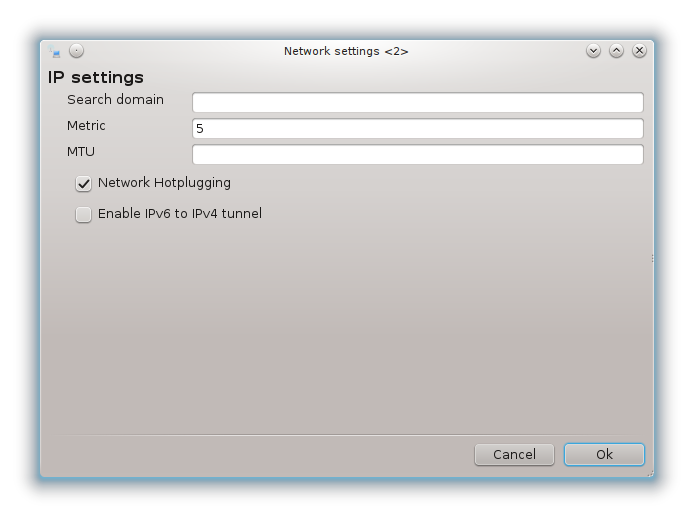
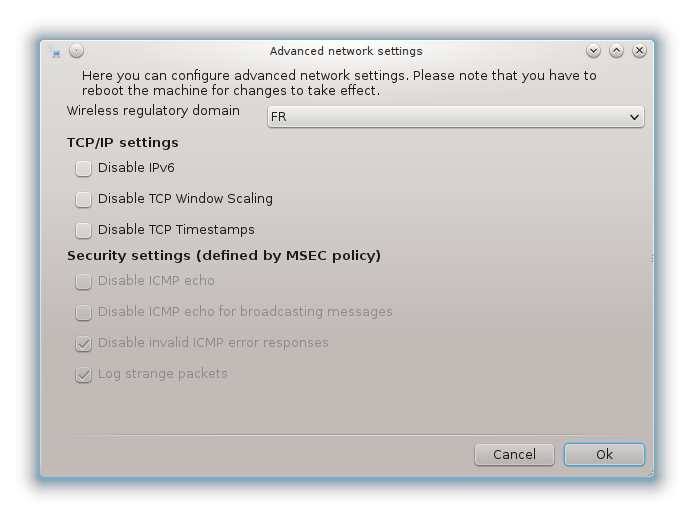
With the advanced button, you can specify:
Metric (10 by default)
MTU
Connexió en calent de la xarxa
Habilita el túnel d'IPv6 a IPv4
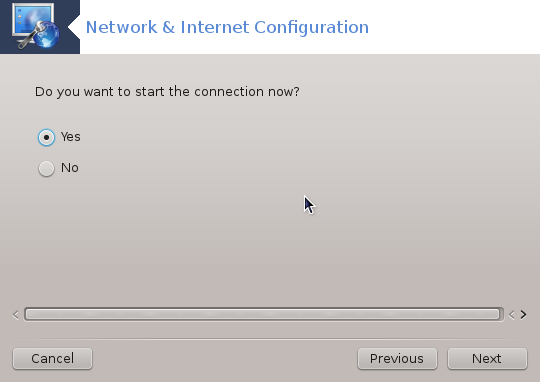
The last step allows you to specify if the connection is to start immediately or not.
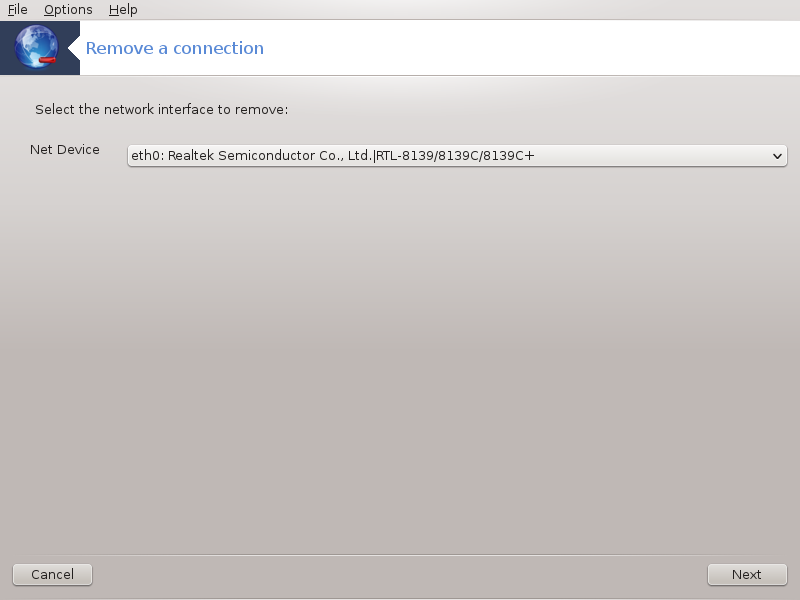
Aquí podeu suprimir una interfície de xarxa[21].
Feu clic al menú desplegable, trieu el que vulgueu suprimir i després feu clic a següent.
Veureu un missatge que dirà que la interfície de xarxa s'ha suprimit correctament.
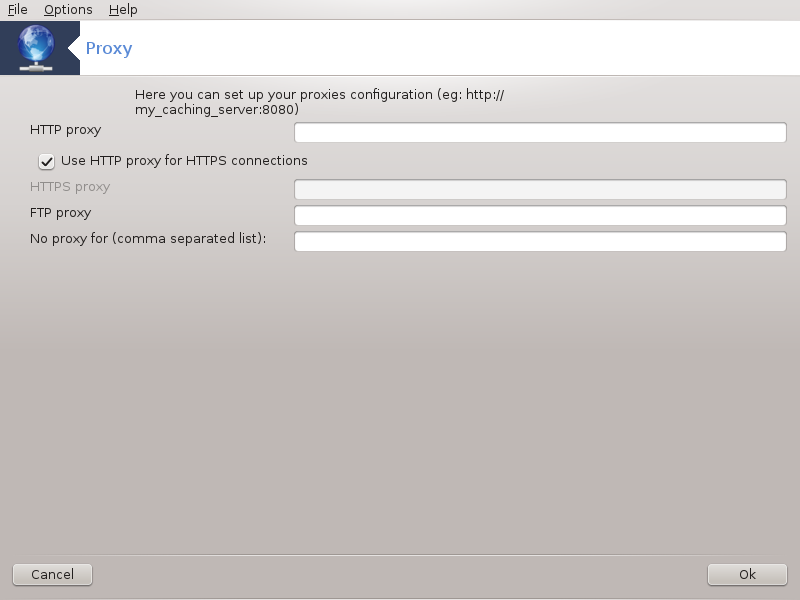
If you have to use a proxy server to access to the internet, you can use this tool[22] to configure it. Your net administrator will give you the information you need. You can also specify some services which can be accessed without the proxy by exception.
From Wikipedia, on 2012-09-24, article Proxy server: In computer networks, a proxy server is a server (a computer system or an application) that acts as an intermediary for requests from clients seeking resources from other servers. A client connects to the proxy server, requesting some service, such as a file, connection, web page, or other resource available from a different server. The proxy server evaluates the request as a way to simplify and control their complexity.
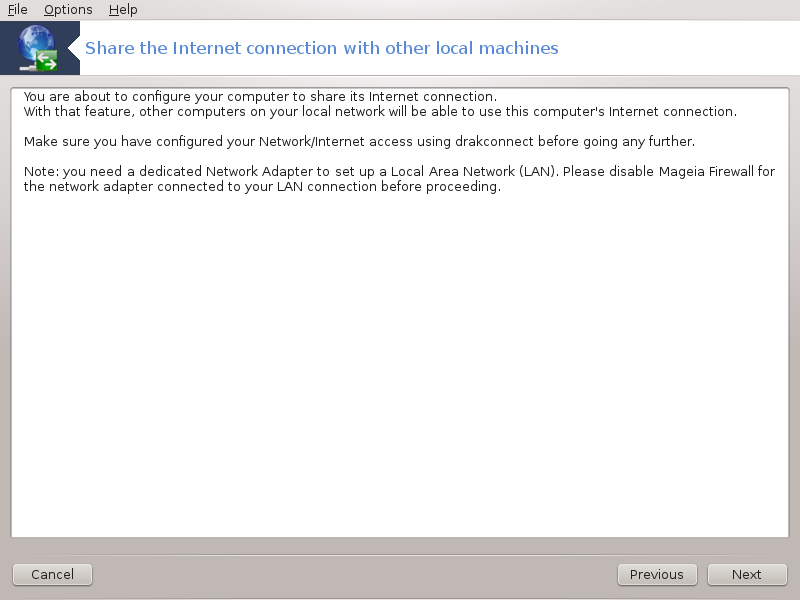
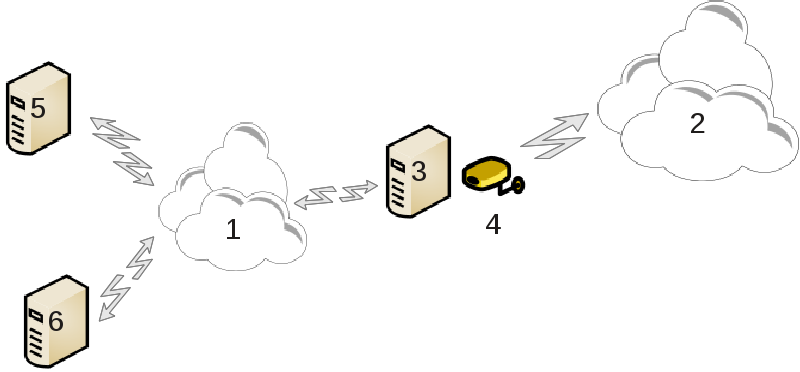
This is useful when you have a computer (3) which has Internet (2) access and is connected also to a local network (1). You can use computer (3) as a gateway to give that access to other workstations (5) and (6) in the local network (1). For this, the gateway must have two interfaces; the first one such as an ethernet card must be connected to the local network, and the second one (4) connected to the Internet (2).
The first step is to verify that the network and the access to Internet are set up, as documented in “Centre de xarxes”.
The wizard[23] offers successive steps which are shown below:
If the wizard does not detect at least two interfaces, it warns about this and asks to stop the network and configure the hardware.
specify the interface used for the Internet connection. The wizard automatically suggests one of the interfaces, but you should verify that what is proposed is correct.
specify which interface is used for the Lan access. The wizard also proposes one, check that this is correct.
The wizard proposes parameters for the Lan network, such as IP address, mask and domain name. Check that these parameters are compatible with the actual configuration. It is recommended that you accept these values.
specify if the computer has to be used as a DNS server. If yes, the wizard will check that
bindis installed. Otherwise, you have to specify the address of a DNS server.specify if the computer is to be used as a DHCP server. If yes, the wizard will check that
dhcp-serveris installed and offer to configure it, with start and end addresses in the DHCP range.specify if the computer is to be used as a proxy server. If yes, the wizard will check that
squidis installed and offer to configure it, with the address of the administrator (admin@mydomain.com), name of the proxy (myfirewall@mydomaincom), the port (3128) and the cache size (100 Mb).The last step allows you to check if the gateway machine is connected to printers and to share them.
You will be warned about the need to check the firewall if it is active.
If you have configured the gateway machine with DHCP, you only need to specify in the network configuration tool that you get an address automatically (using DHCP). The parameters will be obtained when connecting to the network. This method is valid whatever operating system the client is using.
If you must manually specify the network parameters, you must in particular specify the gateway by entering the IP-address of the machine acting as the gateway.
Each network interface of a Mageia system is initially configured with a fix set of parameters. This corresponds to what is expected by a user of a desktop computer, but may not be adequate when the system is moved between various network environments: having the system run in different network environments will require that multiple configurations co-exist for a given network device - otherwise the interface might need to be re-configured each time the network environment changes.
Linux provides support for multiple configurations of network devices as a standard feature. The notion of a "network profile" refers to a set of configurations of network devices, defined for a specific network environment. Each network profile has a name - the initial configuration that comes out of system generation has the name "default"; when a new profile is created, a name must be specified which is different from all already existing profile names.
Draknetprofile is a - very simple - component of the Mageia Control Center (MCC), it provides a Graphical User Interface (GUI) for managing profiles. This GUI allows to
switch between profiles - i.e. activate a target profile to become the "current profile",
create a new, additional profile,
delete a profile from the list of defined profiles.
Defining/modifying profiles concerns the entire Linux system and all its users. Running draknetprofile therefore requires root privileges. Normally, launching is achieved from within MCC (which already runs as root):
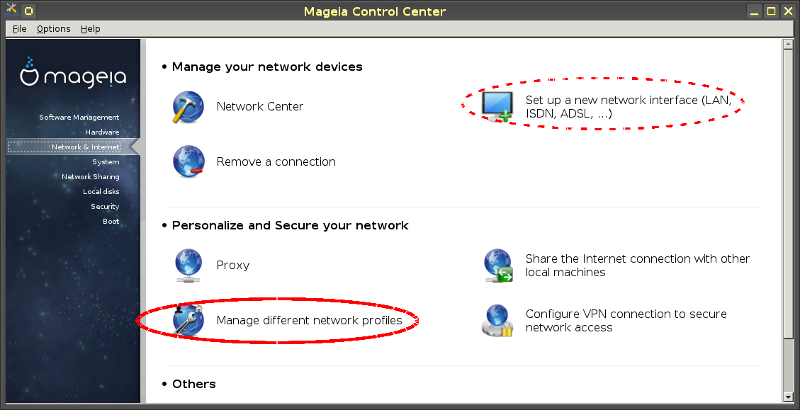
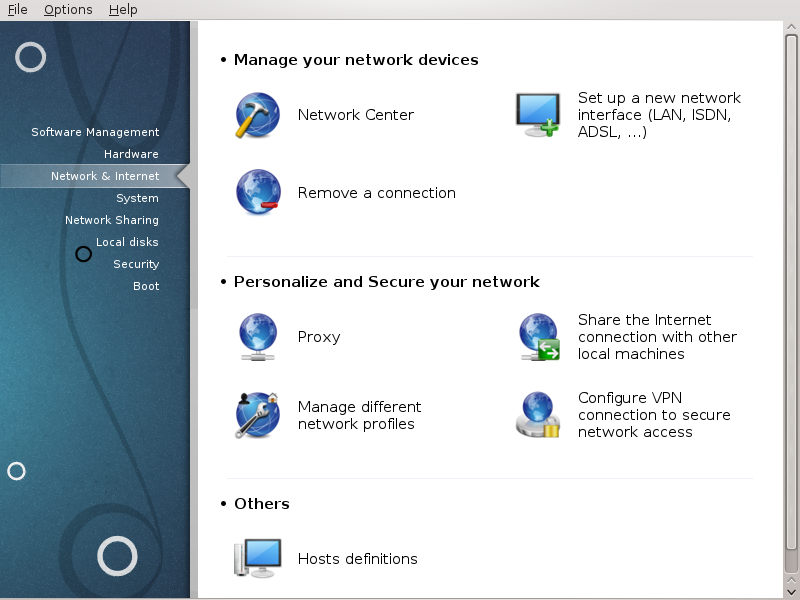
Figure 1: Mageia Control Center: Network & Internet tab
launch the MCC by hitting the MCC icon in one of the panels of your desktop,
select the "Network & Internet" tab,
hit "Manage different network profiles" in the "Personalize and Secure your network" Section (solid red contour in Figure 1).
Draknetprofile can also be launched by a command-line instruction from a terminal emulator with root privileges (this may be helpful when standard-output or error-output from draknetprofile needs to be consulted - for instance for debugging). Simply type:
draknetprofile |
After the launch, the main page of Draknetprofile will be displayed:
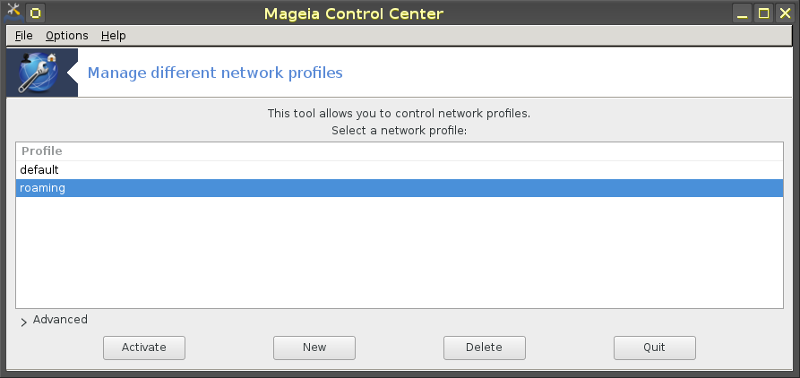
Figure 2: Management actions of Draknetprofile
The upper zone of the window contains the list of the names of all presently defined profiles. The bottom zone presents a series of buttons:
"Activate" ... establish the selected profile (top zone of the window) as the current profile (and save the properties of the old profile);
"New" ... create a new profile;
"Delete" ... delete the selected profile from the list of defined profiles;
"Quit" ... exit from Draknetprofile.
Before hitting the "Activate" or the "Delete" button, you have to select a profile from the list: select it by a left-button click on the name of the target profile.
Hitting the "New" button will launch an auxiliary window where you can type the name of the profile you want to create; this name must be different from any already existing profile. This profile will be created as a precise copy of the currently active profile and immediately activated as the current profile. You will probably then need to specify its properties (modify the automatically created configuration) in a second, independent action:
exit from Draknetprofile (hit the "Quit" button),
back in the "Network & Internet" tab, you select the tab "Set up a new network interface (...)" (marked with dashed red contour in Figure 1),
you then go through the steps for configuring the interface; they are similar to those you did for configuring the original interface during system generation - as documented in the Drakconnect manual.
The middle zone of the window is normally hidden, hit the "Advanced" button to make it visible. It should display the list of names of Draknetprofile "modules" (such as "network", "firewall", "urpmi"), each with a check-button next to the name; these check-buttons determine whether the properties controlled by that module are included into the profile or not.
In a system where several profiles are defined, an additional user interaction is required when the system boots: at the very end of the bootstrapping activities - just before the Desktop Environment starts - you will get a message like
 Select network profile: (1) default (2)
roaming* |
Type 1 or 2 to select the "default", respectively the "roaming" profile, or carriage-return to select the profile that is marked with an asterisk (the profile that was active when the system had been shut down).
Presently (Mageia-5) there appears to be an intermittent problem: it happens that the system becomes unresponsive after soliciting the user to select a profile. The only way out of this situation is to launch another boot. This problem is under investigation.
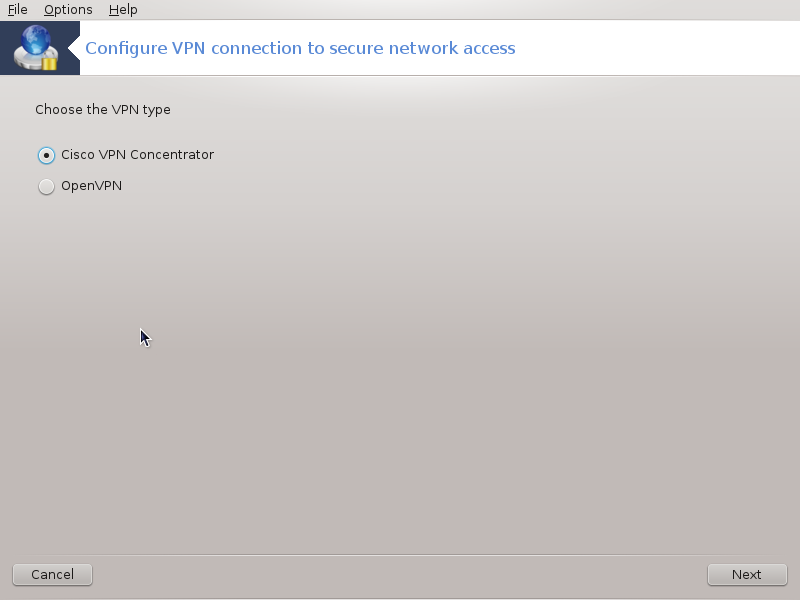
This tool[24] allows to configure secure access to a remote network establishing a tunnel between the local workstation and the remote network. We discuss here only of the configuration on the workstation side. We assume that the remote network is already in operation, and that you have the connection information from the network administrator, like a .pcf configuration file .
First, select either Cisco VPN Concentrator or OpenVPN, depending on which protocol is used for your virtual private network.
Then give your connection a name.
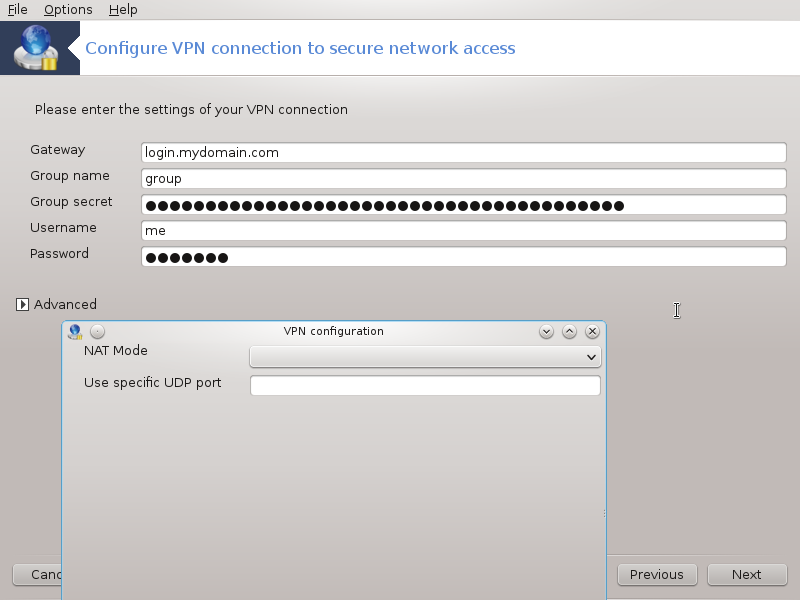
At the next screen, provide the details for your VPN connection.
For Cisco VPN
For openvpn. The openvpn package and its dependencies will be installed the first time the tool is used.
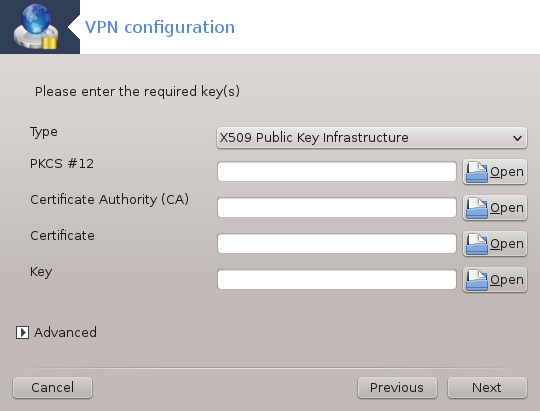
Select the files that you received from the network administrator.
Advanced parameters:
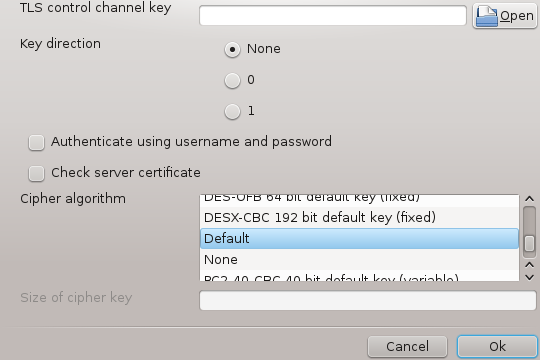
The next screen asks for IP-address of the gateway.
When the parameters are set, you have the option of starting the VPN connection.
This VPN connection can be set to start automatically with a network connection. To do this, reconfigure the network connection to always connect to this VPN.
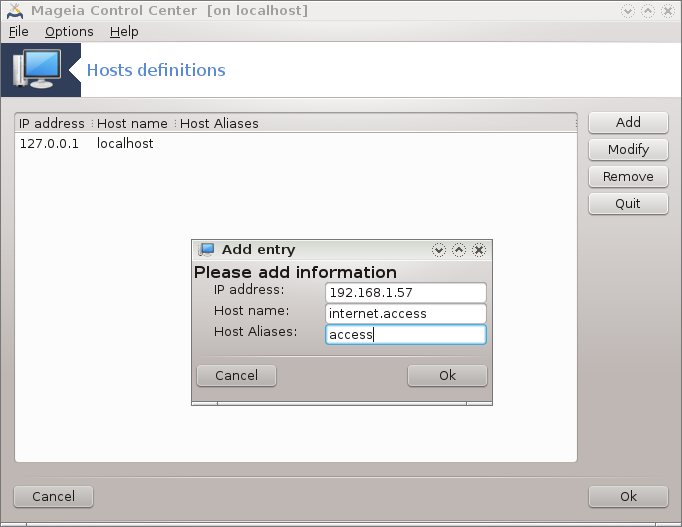
If some systems on your network grant you services, and have fixed IP-addresses, this tool[25] allows to specify a name to access them more easily. Then you can use that name instead of the IP-address.
With this button, you add the name for a new system. You will get a window to specify the IP-address, the host name for the system, and optionally an alias which can be used in the same way that the name is.
You can access the parameters of an entry previously defined. You get the same window.
[19] You can start this tool from the command line, by typing draknetcenter as root.
[20] Podeu iniciar aquesta eina des de la línia d'ordres, escrivint drakconnect com a root.
[21] També podeu iniciar aquesta eina des de la línia d'ordres, drakconnect --del com a root.
[22] You can start this tool from the command line, by typing drakproxy as root.
[23] You can start this tool from the command line, by typing drakgw as root.
[24] You can start this tool from the command line, by typing drakvpn as root.
[25] You can start this tool from the command line, by typing drakhosts as root.
