This tool[20] allows to configure much of local network or Internet access. You have to know some information from your access provider or your network administrator.
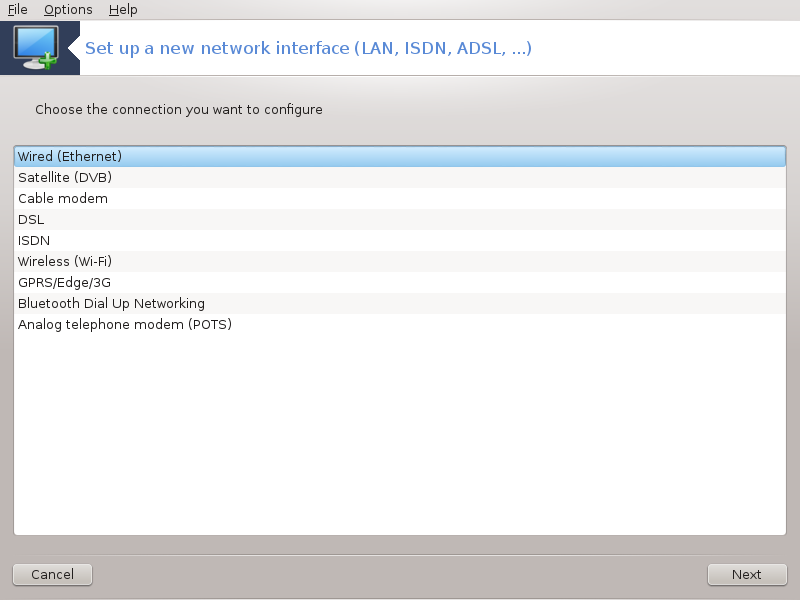
Seleziona il tipo di connessione che vuoi impostare in base a quale hardware e provider possiedi.
La prima finestra mostra le interfacce disponibili. Scegliere quella da configurare.
At this point, the choice is given between an automatic or a manual IP address.
IP automatico
Ethernet/IP settings: you have to select if DNS servers are declared by the DHCP server or are manually specified, as explained below. In the last case, the IP address of DNS servers has to be set. The HOSTNAME of the computer can be specified here. If no HOSTNAME is specified, the name
localhost.localdomainis attributed by default. The Hostname can also be provided by the DHCP server with the option Assign host name from DHCP server. Not all DHCP servers have such a function and if you're setting up your PC to get an IP address from a domestic ADSL router, it is unlikely.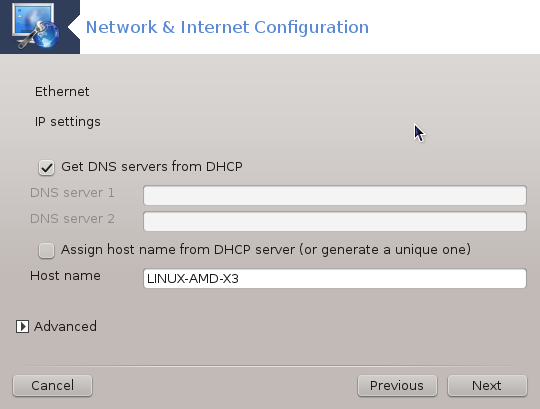
Il bottone avanzate permette di specificare:
Search domain (not accessible, as provided by the DHCP server)
il client DHCP
DHCP timeout
Get YP server from DHCP (checked by default): specify the NIS server
Get NTPD server from DHCP (synchronisation of clocks)
the HOSTNAME required by DHCP. Only use this option if the DHCP server requires the client to specify a hostname before receiving an IP address. This option is not dealt by some DHCP servers.
After accepting, the last steps which are common to all connection configurations are explained: la sezione chiamata «Concludendo la configurazione»
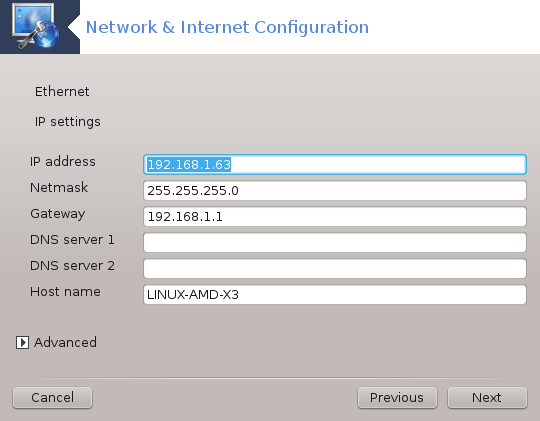
Configurazione manuale
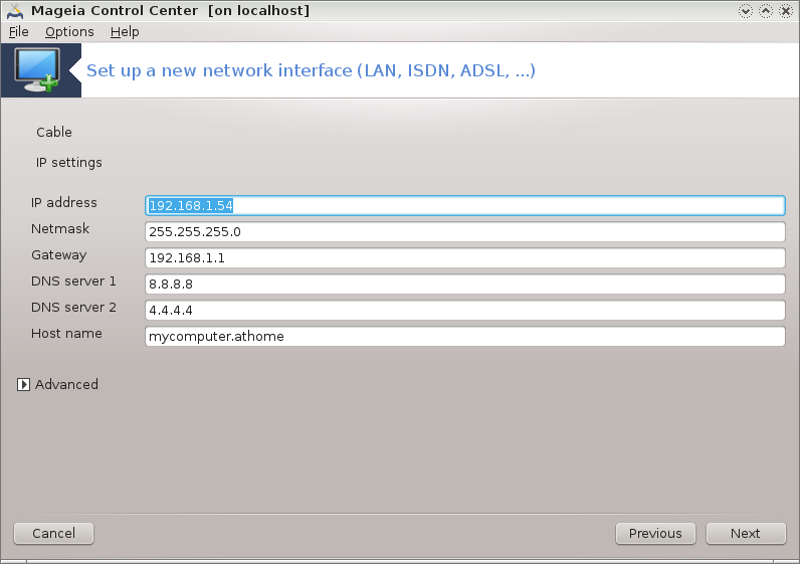
Ethernet/IP settings: you need to declare what DNS servers to use. The HOSTNAME of the computer can be specified here. If no HOSTNAME is specified, the name
localhost.localdomainis attributed by default.For a residential network, the IP address usually looks like 192.168.x.x, Netmask is 255.255.255.0, and the Gateway and DNS servers are available from your service provider's website.
In advanced settings, you can specified a Search domain. It would usually be your home domain, i.e. if your computer is called "splash", and it's full domain name is "splash.boatanchor.net", the Search Domain would be "boatanchor.net". Unless you specifically need it, it's ok not to define this setting. Again, domestic ADSL would not need this setting.
The next steps are exposed at la sezione chiamata «Concludendo la configurazione»
This section hasn't been written yet for lack of resources. If you think you can write this help, please contact the Doc team. Thanking you in advance.
La prima finestra mostra le interfacce disponibili. Scegliere quella da configurare.
At this point, the choice is given between an automatic or a manual IP address.
You have to specify a authentication method:
Nessuno
BPALogin (necessary for Telstra). In this case you have to provide User name and password.
IP automatico
Cable/IP settings: you have to select if DNS servers are declared by the DHCP server or are manually specified, as explained below. In the last case, the IP address of DNS servers has to be set. The HOSTNAME of the computer can be specified here. If no HOSTNAME is specified, the name
localhost.localdomainis attributed by default. The Hostname can also be provided by the DHCP server with the option Assign host name from DHCP server. Not all DHCP servers have such a function and if you're setting up your PC to get an IP address from a domestic ADSL router, it is unlikely.Il bottone avanzate permette di specificare:
Search domain (not accessible, as provided by the DHCP server)
il client DHCP
DHCP timeout
Get YP server from DHCP (checked by default): specify the NIS server
Get NTPD server from DHCP (synchronisation of clocks)
the HOSTNAME required by DHCP. Only use this option if the DHCP server requires the client to specify a hostname before receiving an IP address. This option is not dealt by some DHCP servers.
After accepting, the last steps which are common to all connection configurations are explained: la sezione chiamata «Concludendo la configurazione»
Configurazione manuale
Cable/IP settings: you need to declare what DNS servers to use. The HOSTNAME of the computer can be specified here. If no HOSTNAME is specified, the name
localhost.localdomainis attributed by default.For a residential network, the IP address usually looks like 192.168.x.x, Netmask is 255.255.255.0, and the Gateway and DNS servers are available from your service provider's website.
In advanced settings, you can specified a Search domain. It would usually be your home domain, i.e. if your computer is called "splash", and it's full domain name is "splash.boatanchor.net", the Search Domain would be "boatanchor.net". Unless you specifically need it, it's ok not to define this setting. Again, domestic connection would not need this setting.
The next steps are exposed at la sezione chiamata «Concludendo la configurazione»
If the tool detects network interfaces, it offers to select one and to configure it.
A list of providers is proposed, classified by countries. Select your provider. If it is not listed, select the option Unlisted and then enter the options your provider gave.
Seleziona uno dei protocolli disponibili:
Protocollo Configurazione Dinamica Host (DHCP)
Configurazione TCP/IP manuale
PPP tramite ADSL (PPPoA)
PPP su Ethernet (PPPoE)
Point to Point Tuneling Protocol (PPTP)
Impostazioni di accesso
Login dell'account (nome utente)
Password dell'account
(Advanced) Virtual Path ID (VPI)
(Advanced) Virtual Circuit ID (VCI)
The next steps are exposed at la sezione chiamata «Concludendo la configurazione»
The wizard asks which device to configure:
Scelta manuale (scheda ISDN interna)
Modem ISDN esterno
A list of hardware is proposed, classified by category and manufacturer. Select your card.
Seleziona uno dei protocolli disponibili:
Protocollo per il resto del mondo, eccetto Europa (DHCP)
Protocollo per l'Europa (EDSS1)
A list of providers is then offered, classified by countries. Select your provider. If it is not listed, select the option Unlisted and then enter the options your provider gave you. Then it is asked for parameters:
Nome connessione
Numero telefonico
ID di accesso
Password dell'account
Metodo autenticazione
After that, you have to select if you get the IP address by automatic or manual method. In the last case, specify IP address and Subnet mask.
The next step is to choose how DNS servers address are obtained, by automatic or manual method. In the case of manual configuration, you have to put:
Nome dominio
Primo e secondo DNS Server
Select if the hostname is set from IP. This option is to select only if you are sure that your provider is configured to accept it.
The next step is to choose how the gateway address is obtained, by automatic or manual method. In the case of manual configuration, you have to enter the IP address.
The next steps are exposed at la sezione chiamata «Concludendo la configurazione»
A first window lists the interfaces which are available and an entry for Windows driver (ndiswrapper). Select the one to configure. Use ndiswrapper only if the other configuration methods did not work.
At this step, the choice is given between the different access points that the card has detected.
Specific parameter for the wireless card are to provide:
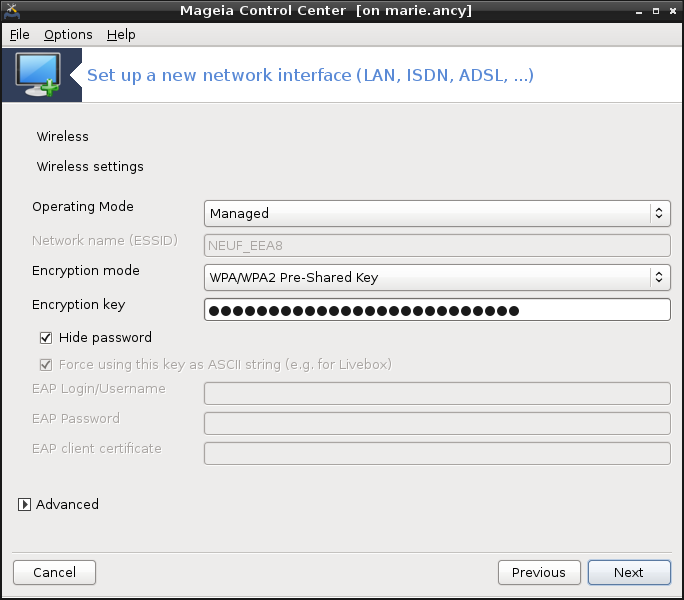
Operating mode:
- Con access point (Managed)
Per accedere ad un punto di accesso esistente (il più frequente).
- Ad-Hoc
Per configurare una connessione diretta fra computers.
Nome del network (ESSID)
Encryption mode: it depends of how the access point is configured.
- WPA/WPA2
Questa modalità di crittografia è da preferire se il tuo hardware te lo consente.
- WEP
Alcuni vecchi hardware funzionano solo con questo metodo di crittografia.
Chiave di cifratura
E' solitamente fornito con l'hardware che da il punto di accesso.
A questo punto la scelta è tra un indirzzo IP automatico oppure un indirizzo IP manuale.
IP automatico
IP settings: you have to select if DNS servers are declared by the DHCP server or are manually specified, as explained below. In the last case, IP address of DNS servers has to be set. The HOSTNAME of the computer can be specified here. If no HOSTNAME is specified, the name localhost.localdomain is attributed by default. The Hostname can also be provided by the DHCP server with the option Assign host name from DHCP server
Il bottone avanzate permette di specificare:
Search domain (not accessible, as provided by the DHCP server)
il client DHCP
DHCP timeout
Get YP server from DHCP (checked by default): specify the NIS servers
Get NTPD server from DHCP (synchronisation of clocks)
the HOSTNAME required by DHCP. Only use this option if the DHCP server requires the client to specify a hostname before receiving an IP address. This option is not dealt by some DHCP servers.
After accepting the configuration the step, which is common to all connection configurations, is explained: la sezione chiamata «Concludendo la configurazione»
Configurazione manuale
IP settings: you have to declare DNS servers. The HOSTNAME of the computer can be specified here. If no HOSTNAME is specified, the name
localhost.localdomainis attributed by default.For a residential network, the IP address always looks like 192.168.x.x, Netmask is 255.255.255.0, and the Gateway and DNS servers are available from your providers website.
In advanced settings, you can specified a Search domain. It must seem to your hostname without the first name, before the period.
The next steps are exposed at la sezione chiamata «Concludendo la configurazione»
Se lo strumento trova un'interfaccia wireless, da l'oppurtinità di selezionarne una e di configurarla.
Il pin è richiesto. Lasciare vuoto se il PIN non è necessario.
The wizard asks for network. If it is not detected, select the option Unlisted.
A list of providers is proposed, classified by countries. Select your provider. If it is not listed, select the option Unlisted and then enter the options your provider gave.
Fornire impostazioni di accesso
Nome dell'access point
Login dell'account (nome utente)
Password dell'account
The next steps are exposed at la sezione chiamata «Concludendo la configurazione»
This section hasn't been written yet for lack of resources. If you think you can write this help, please contact the Doc team. Thanking you in advance.
The wizard asks which device to configure:
Scelta manuale
Hardware identificato, se esistente.
Una lista di porte è proposta. Seleziona la tua.
If not yet installed, it will be suggested that you install the package kppp-provider.
A list of providers is proposed, classified by countries. Select your provider. If it is not listed, select the option Unlisted and then enter the options your provider gave. Then it is asked for Dialup options:
Nome della connessione
Numero di telefono
ID di accesso
Password
Autenticazione, scegli tra:
PAP/CHAP
Basata su script
PAP
Basata su terminale
CHAP
The next steps are exposed at la sezione chiamata «Concludendo la configurazione»
Nel prossimo step puoi specificare:
Permetti agli utenti di gestire la connessione
Avviare la connessione al boot
Enable traffic accounting
Permetti all'interfaccia di essere controllata da Network Manager
In the case of a wireless connection, a supplemental box is Allow access point roaming which give the possibility to switch automatically between access point according to the signal strength.
Con il pulsante avanzate puoi specificare:
Metric (10 by default)
MTU
Collegamento a caldo della rete
Attiva istradamento IPV6 su IPV4
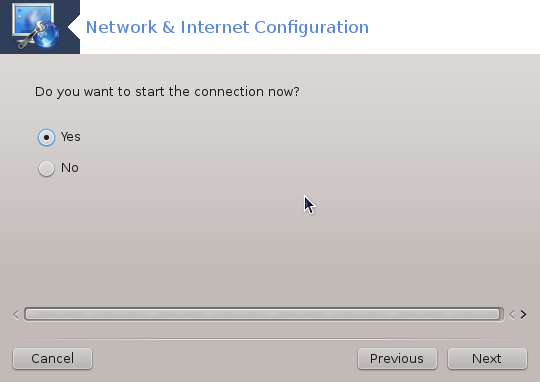
L'ultimo step ti permetterà di specificare se avviare la connessione immediatamente oppure no.