

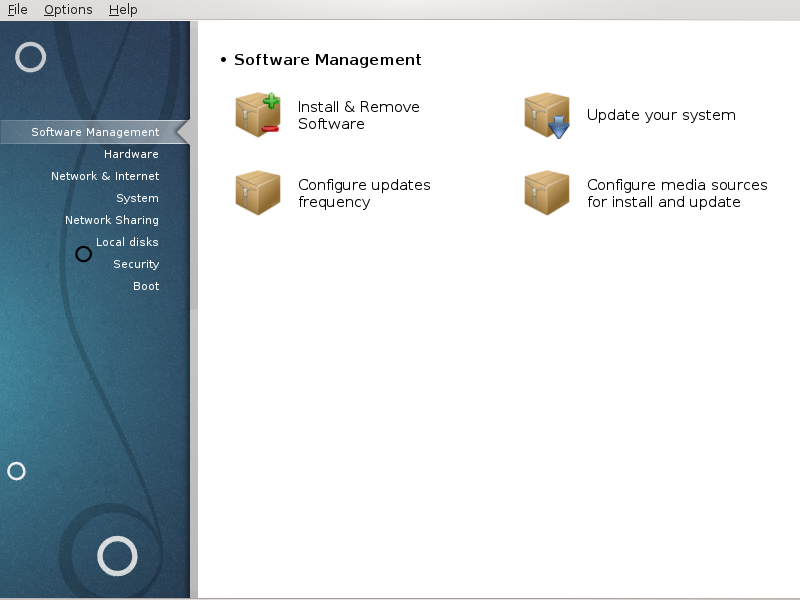
In this screen you can choose between several tools for software management. Click on a link below to learn more.
Gestione software
la sezione chiamata «Software Management (Install and Remove Software)»
la sezione chiamata «Aggiornamento pacchetti software» = Aggiorna il tuo sistema
la sezione chiamata «Configura la frequenza degli aggiornamenti»
la sezione chiamata «Configure Media» = Configure media sources for install and update
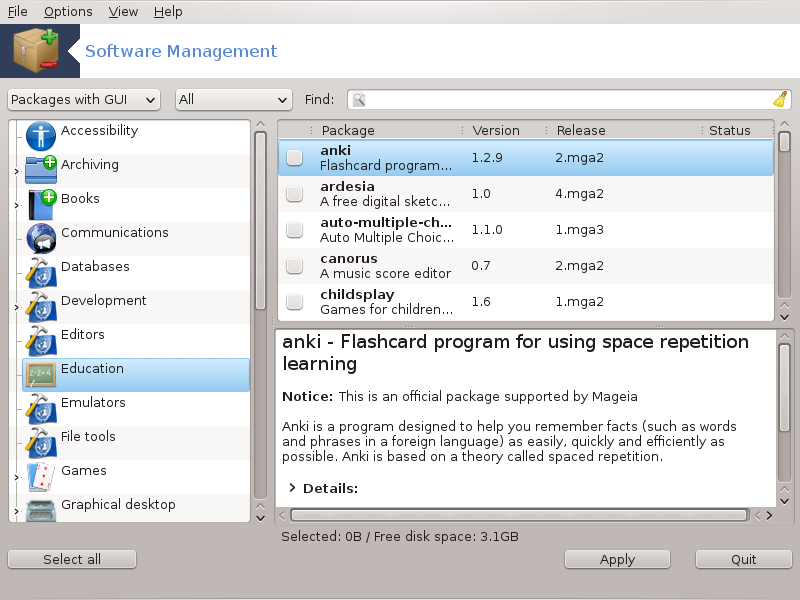
This tool[1], also known as drakrpm, is a program for installing, uninstalling and updating packages. It is the graphical user interface of URPMI. At each start up, it will check online package lists (called 'media') downloaded straight from Mageia's official servers, and will show you each time the latest applications and packages available for your computer. A filter system allows you to display only certain types of packages: you may display only installed applications (by default), or only available updates. You can also view only not installed packages. You can also search by the name of a package, or in the summaries of descriptions or in the full descriptions of packages or in the file names included in the packages.
Per funzionare, rpmdrake necessita della configurazione dei repositories con la sezione chiamata «Configure Media» .
Importante
During the installation, the configured repository is the medium used for the installation, generally the DVD or CD. If you keep this medium, rpmdrake will ask it each time you want to install a package, with this pop-up window :
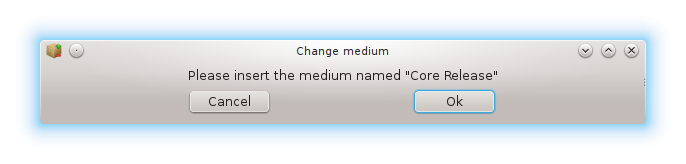
If the above message annoys you and you have a good internet connection without too strict download limit, it is wise to remove that medium and replace it by online repositories thanks to la sezione chiamata «Configure Media» .
Moreover, the online repositories are always up to date, contains much more packages, and allow to update your installed packages.
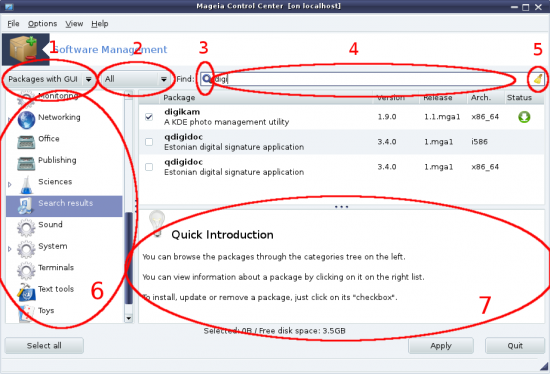
Filtro per tipo pacchetto:
Questo filtro ti consente di visualizzare solo alcuni tipi di pacchetto. La prima volta che avvi il gestore questo mostrerà solamente le applicazioni con una interfaccia grafica. Puoi visualizzare sia tutti i pacchetti che tutte le loro dipendenze e librerie o solo gruppi di pacchetti come le sole applicazioni, i soli aggiornamenti o pacchetti backported da versioni più recenti di Mageia.
Avvertimento
The default filter setting is for new entrants to Linux or Mageia, who probably do not want command line or specialist tools. Since you're reading this documentation, you're obviously interested in improving your knowledge of Mageia, so it is best to set this filter to "All".
Package state filter:
This filter allows you to view only the installed packages, only the packages that are not installed or all of the packages, both installed and not installed.
Modalità di ricerca:
Fare clic su questa icona per cercare attraverso i nomi dei pacchetti, attraverso le loro sintesi, attraverso la loro descrizione completa o attraverso i file inclusi nei pacchetti.
"Find" box:
Enter here one or more key words. If you want to use more than one keyword for searching use '|' between keywords, e.g. To search for "mplayer" and "xine" at the same time type 'mplayer | xine'.
Erase all:
Questa icona può cancellare in un solo click tutte le parole chiave inserite nel campo "Cerca".
Categories list:
This side bar groups all applications and packages into clear categories and sub categories.
Pannello di descrizione:
This panel displays the package's name, its summary and complete description. It displays many useful elements about the selected package. It can also show precise details about the package, the files included in the package as well as a list of the last changes made by the maintainer.
Once you correctly set the filters, you can find your software either by category (in area 6 above) or by name/summary/description using area 4. A list of packages fulfilling your query and, don't forget, the chosen medium is shown with different status markers according to whether each package is installed/not installed/an update... To change this status, just check or uncheck the box before the package name and click on .
Tabella 1.
| Icona | Legenda |
|---|---|
 | Il pacchetto è già installato |
 | Il pacchetto sarà installato |
 | Il pacchetto non può essere modificato |
 | Il pacchetto è un aggiornamento |
 | Il pacchetto sarà disinstallato |
Esempi nello screeshot qui sopra:
If I uncheck digikam (the green arrow tell us it is installed), the status icon will go red with an up arrow and it will be uninstalled when clicking on .
If I check qdigidoc (which is not installed, see the status), the orange with a down arrow status icon will appear and it will be installed when clicking on .

Some packages need other packages called dependencies in order to work. They are for example libraries or tools. In this case, Rpmdrake displays an information window allowing you to choose whether to accept the selected dependencies, cancel the operation or get more information (see above). It may also happen that various packages are able to provide the needed library, in which case rpmdrake displays the list of alternatives with a button to get more information and another button to choose which package to install.
This tool[2] is present in the Mageia Control Center under the tab Software management.
Nota
To work, MageiaUpdate needs the repositories to be configured with drakrpm-editmedia with some media checked as updates. If they are not, you are prompted to do so.
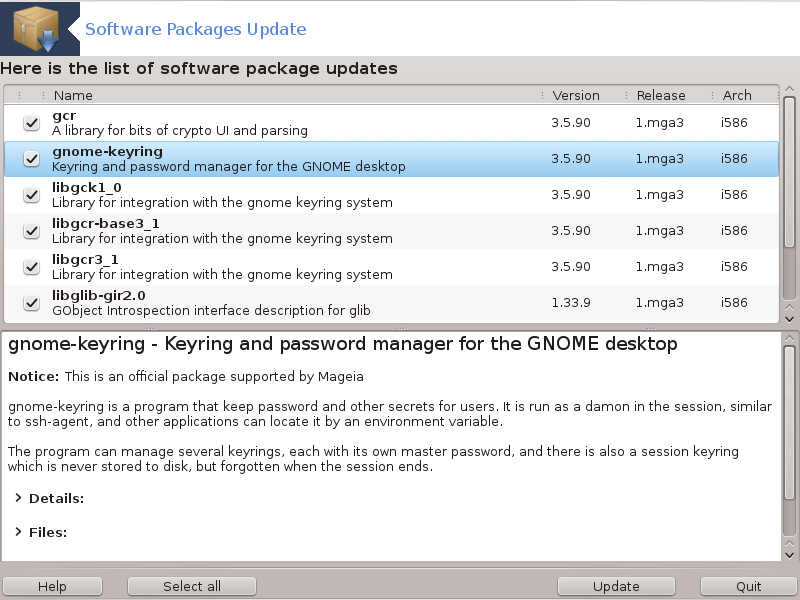
As soon as this tool is launched, it scans the installed packages and lists those with an update available in the repositories. They are all selected by default to be automatically downloaded and installed. Click on the button to start the process.
By clicking on a package, more information is displayed in the lower half of the window. The print > before a title means you can click to drop down a text.
Nota
When updates are available, an applet in the system tray warns you by
displaying this red icon  . Just click and enter the user password to update the system alike.
This tool[3] is present in the Mageia
Control Center under the tab Software
management. It is also available by a on the red icon in the system tray.
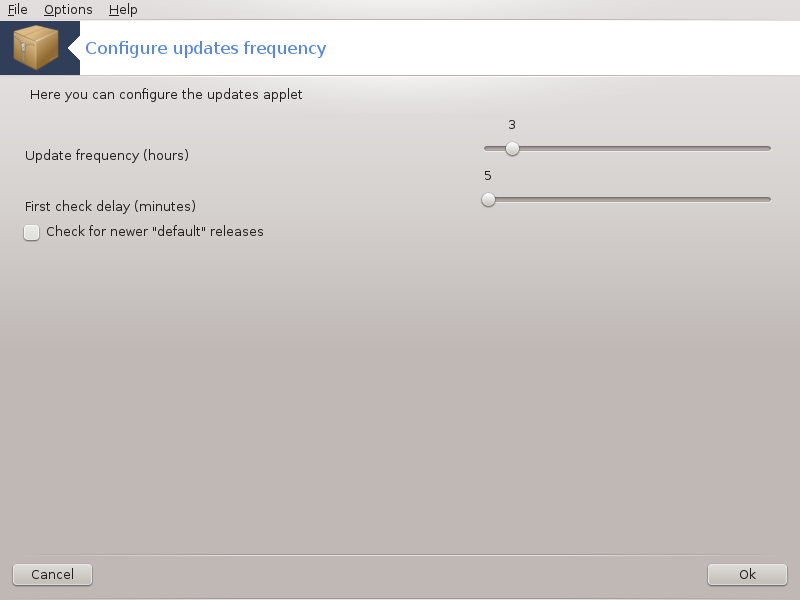
The first slider allows you to change how frequently Mageia will check for updates and the second the delay after booting before the first check. The check box gives you the option to be warned when a new Mageia release is out.
Importante
First thing to do after an install is to add software sources (also known as repositories, media, mirrors). That means you must select the media sources to be used to install and update packages and applications. (see Add button below).
Nota
If you install (or upgrade) Mageia using an optical media (DVD or CD) or a USB device, there will be a software source configured to the optical media used. To avoid being asked to insert the media when you install new packages, you should disable (or delete) this media. (It will have the media type CD-Rom).
Nota
Your system is running under an architecture which may be 32-bit (called i586), or 64-bit (called x86_64). Some packages are independent of whether your system is 32-bit or 64-bit; these are called noarch packages. They don't have their own noarch directories on the mirrors, but are all in both the i586 and the x86_64 media.
This tool is present in the Mageia Control Center under the tab Software management.[4]
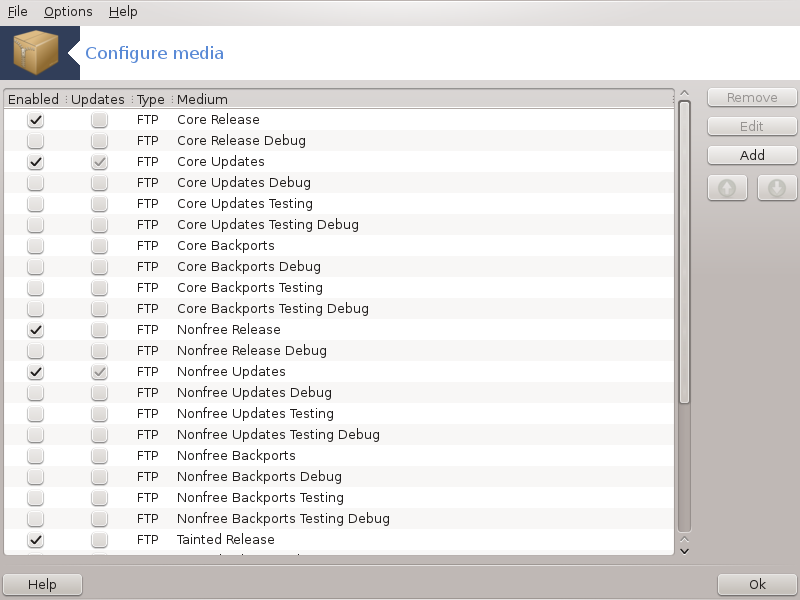
Column Enable:
The checked media will be used to install new packages. Be cautious with some media such as Testing and Debug, they could make your system unusable.
Column Update:
The checked media will be used to update packages, it must be enabled. Only media with "Update" in its name should be selected. For security reasons, this column isn't modifiable in this tool, you must open a console as root and type drakrpm-edit-media --expert.
Column medium:
Mostra il nome del media. I repository ufficiali di Mageia per la versione finale contengono almeno:
Core che contiene per la maggior parte programmi supportati da Mageia.
Nonfree che contiene alcuni software proprietari
Tainted free software for which there might be patent claims in some countries.
Each medium has 4 sub-sections:
Release the packages as of the day the this version of Mageia was released.
Updates the packages updated since release due to security or bug concerns. Everyone should have this medium enabled, even with a very slow internet connection.
Backports some packages of new versions backported from Cauldron (the next version under development).
Testing which is used for temporary tests of new updates, to allow the bug reporters and the QA team to validate the corrections.
To remove a medium, click on it and then on this button. It is wise to remove the medium used for the installation (CD or DVD for example) since all the packages it contains are in the official Core release medium.
Allows you to modify the selected medium settings, (URL, downloader and proxy).
Add the official repositories available on the Internet. These repositories contain only safe and well tested software. Clicking on the "Add" button adds the mirrorlist to your configuration, it is designed to make sure that you install and update from a mirror close to you. If you prefer to choose a specific mirror, then add it by choosing "Add a specific media mirror" from the drop-down "File" menu.
Change the list order. When Drakrpm looks for a package, it reads the list in the displayed order and will install the first package found for the same release number - in the event of a version mismatch, the latest release will be installed. So if possible, put the fastest repositories at the top.
A window pops up with the media list. Select the ones you want to update and click on the button.
Suppose you aren't happy with the actual mirror, because for example it's too slow or often unavailable, you can choose another mirror. Select all the actual media and click on to take them out. Click on , choose between update only or the full set (if you do not know, choose the ) and accept the contact by clicking on . This window opens:
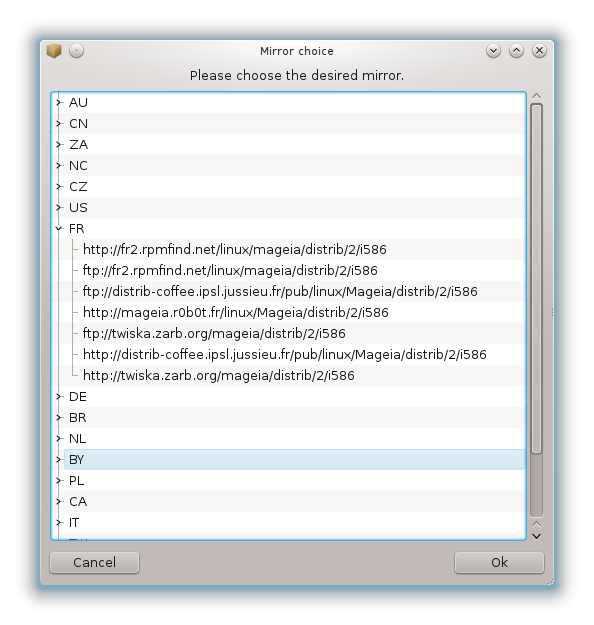
You can see, on the left, a list of countries, choose yours or one very close by clicking on the > symbol, this will display all the available mirrors in that country. Select one and click on .
E' possibile installare un nuovo media (da una terza fonte per esempio) che non è supportato da Mageia. Una nuova finestra apparirà:
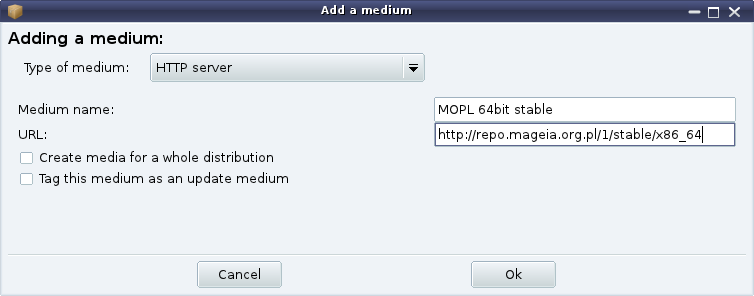
Select the medium type, find a smart name that well define the medium and give the URL (or the path, according to the medium type)
This item allows you to choose when to "Verify RPMs to be installed" (always or never), the download program (curl, wget or aria2) and to define the download policy for information about the packages (on demand -by default-, update only, always or never).
To guarantee a high level of security, digital keys are used to authenticate the media. It is possible for each medium to allow or disallow a key. In the window that appear, select a medium and then click on to allow a new key or to select a key and click on to disallow that key.
Avvertimento
Fai questo con cura, come faresti con tutte le domande relative alla sicurezza.
If you need to use a proxy server for internet access, you can configure it here. You only need to give the and if necessary a Username and Password.
For more information about configuring the media, see the Mageia Wiki page.
[1] Puoi avviare questo strumento dalla riga di comando digitando rpmdrake come root.
[2] You can start this tool from the command line, by typing MageiaUpdate or drakrpm-update as root.
[3] You can start this tool from the command line, by typing mgaapplet-config as root.
[4] You can start this tool from the command line, by typing drakrpm-edit-media as root.
