

Nothing has been written to your hard disk at this point. Therefore, if you
decide not to proceed with the actual installation, then it is safe to
reboot now: go to tty2 with Ctrl+Alt+F2
and press Ctrl+Alt+Del (or Ctrl+Alt+F7 to come back if you
change your mind).
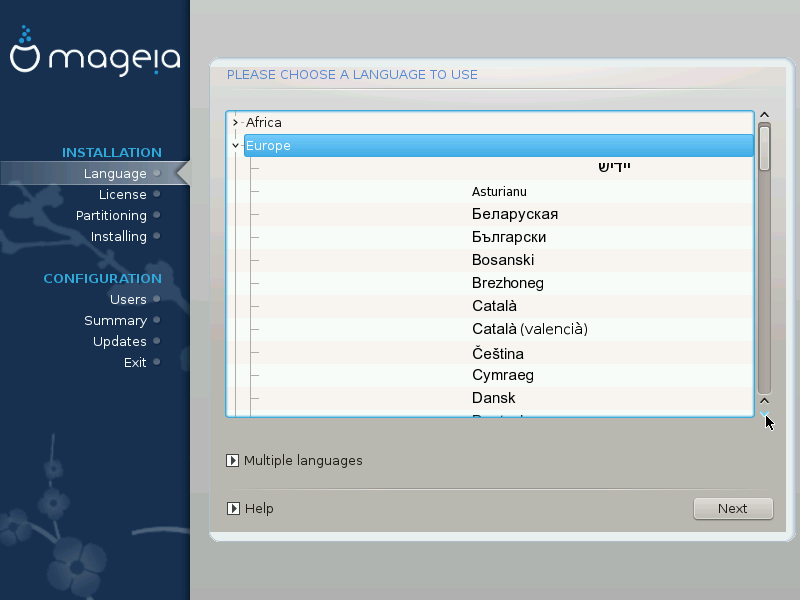
Select your preferred language, by first expanding the list for your continent. Mageia will use this selection during the installation and for your installed system.
If it is likely that you (or others) will require several languages to be installed on your system, then you should use the Multiple languages option to add them now. It will be difficult to add extra language support after installation.
Belangrijk
Even if you choose more than one language, you must first choose one as your preferred language from the main list of languages. It will also be marked as chosen in the Multiple languages screen.
If your keyboard language is not the same as your preferred language, then it is advisable to install the required language for your keyboard as well
Mageia uses UTF-8 (Unicode) support by default. This may be disabled in the Multiple languages screen if you know that it is inappropriate for your language. Disabling UTF-8 applies to all installed languages.
You can change the language for your system post-installation in the → → .
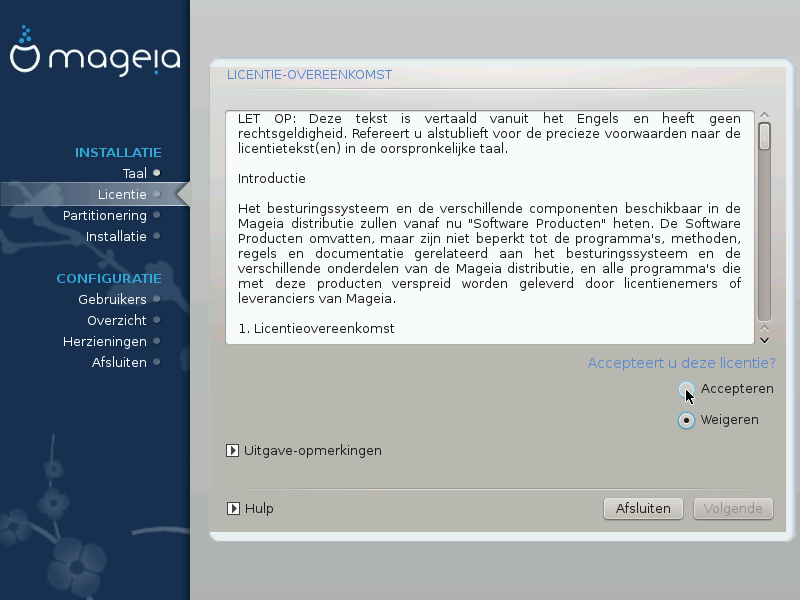
Lees de voorwaarden van de licentie-overeenkomst a.u.b. aandachtig door, voordat u Mageia installeert.
Deze voorwaarden hebben betrekking op de gehele Mageia-distributie en moeten aanvaard worden voordat u verder kunt gaan.
Om verder te gaan, selecteer Accepteren en klik vervolgens op Volgende.
Als u de licentievoorwaarden niet wenst te accepteren, dan danken we u voor uw interesse in Mageia. Wanneer u op Weigeren klikt zal uw computer opnieuw opstarten.
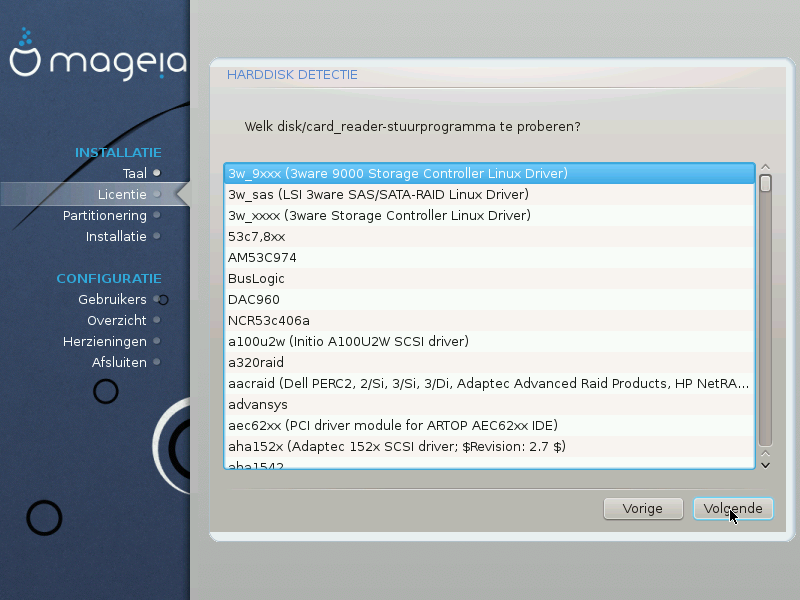
DrakX will normally detect hard disks correctly. However, with some older SCSI controllers it may be unable to determine the correct drivers to use and subsequently fail to recognise the drive.
If your device is not recognised, you will need to manually tell DrakX which SCSI drive(s) you have. DrakX should then be able to configure the drive(s) correctly.
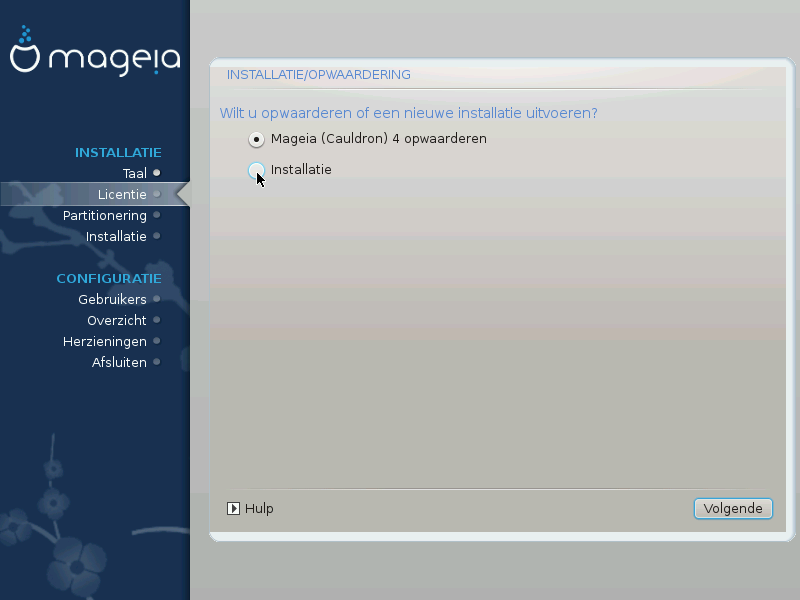
Install
Use this option to perform a fresh installation of Mageia. This will format the
rootpartition (/), but can preserve a pre-existing/homepartition (a dedicated /home partition, rather than being incorporated within the root (/) partition itself).Upgrade
Use this option to upgrade an existing installation of Mageia.
Belangrijk
Only upgrading from a previous Mageia version that was still
supported when this Installer's version was released, has been
thoroughly tested. If you want to upgrade a Mageia version that has reached
its “End Of Life” then it is better to do a
“clean” install instead, while preserving your
/home partition.
Tip
If you have discovered that you forgot to select an additional language, you can return from the Install or Upgrade screen to the language choice screen by pressing Ctrl+Alt+Home. Do NOT do this later in the install.
DrakX selecteert een geschikte toetsenbord-indeling voor uw taal, maar als dat niet lukt zal hij uitgaan van een VS-toetsenbordindeling (US QWERTY).

Verzekert u zich er van dat de gekozen selectie juist is. Als u niet weet wat voor indeling uw toetsenbord heeft, kijk dan in de specificaties die meegeleverd werden of vraag het aan de leverancier. Er kan zelfs een label aan het toetsenbord zitten dat de indeling identificeert. U kunt ook hier kijken: en.wikipedia.org/wiki/Keyboard_layout (Engelstalig)
If your keyboard isn't in the list shown, click on More to get a fuller list, and select your keyboard there.
If you choose a keyboard based on non-Latin characters, you will see an extra dialogue screen asking how you would prefer to switch between the Latin and non-Latin keyboard layouts
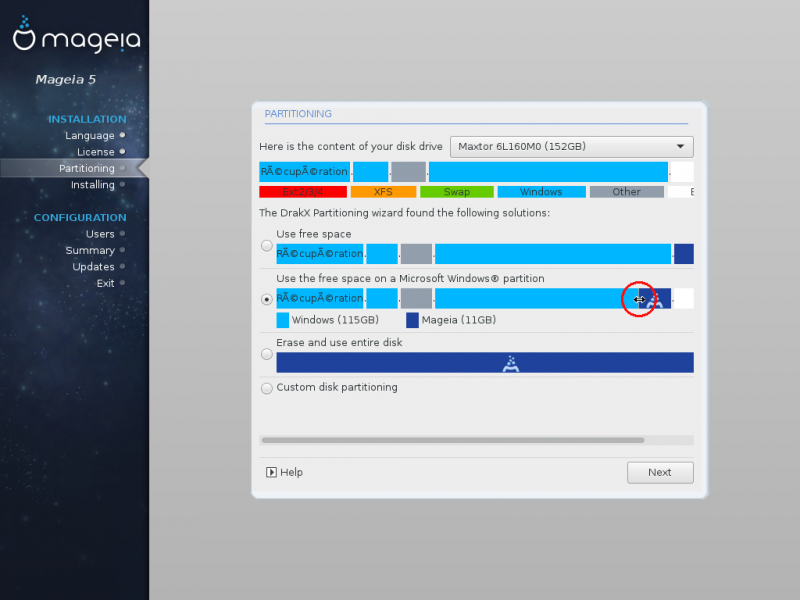
In this screen you can see the content of your hard drive(s) along with the DrakX partitioning proposals for where to install Mageia.
The actual options available from those shown below will vary according to the layout and content of your particular hard drive(s).

Main Options
Als deze optie beschikbaar is, werden bestaande Linux compatibele partities gevonden die gebruikt kunnen worden voor het installeren.
Als u ongebruikte ruimte op uw harde schijf heeft die u voor uw nieuwe Mageia-installatie wilt gebruiken, kies dan deze optie.
Use Free Space on a Windows Partition
If you have unused space on an existing Windows partition, the installer may offer to use it. This can be a useful way of making room for your new Mageia installation, but is a risky operation so you should make sure you have backed up all important files!
With this option, the installer displays the remaining Windows partition in light blue and the proposed Mageia partition in dark blue with their intended sizes just underneath. You have the option to modify these sizes by clicking and dragging the gap between both partitions. See the following screenshot:
This option will allocate the entire drive for Mageia
Waarschuwing
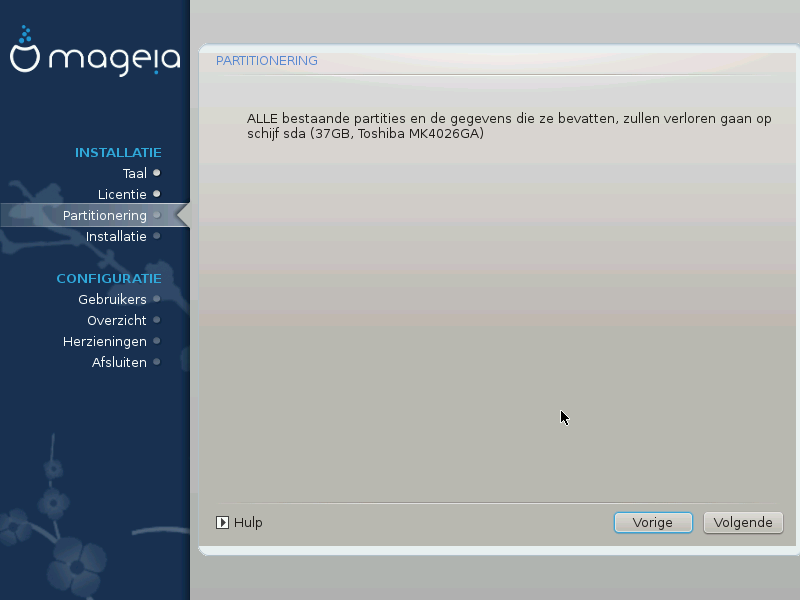
This will erase ALL data on the selected hard drive. Take care! If you intend to use part of the disk for something else, or you already have data on the drive that you are not prepared to lose, then do not use this option.
Belangrijk
Merk op dat de Windows partitie hiervoor kleiner gemaakt moet worden, wat niet zonder enig risico is. De partitie moet "schoon" zijn, wat inhoudt dat Windows correct afgesloten moet zijn toen het voor het laatst gebruikt werd en dat het gedefragmenteerd moet zijn. Dit is echter geen garantie dat alle bestanden op de partitie uit het gebied gehaald zijn dat op het punt staat gebruikt te worden. Het wordt sterk aanbevolen om vooraf een kopie van uw persoonlijke bestanden te maken op een andere schijf of lokatie.
Hiermee krijgt u volledige controle over het plaatsen van de installatie op uw harde schijf of schijven.
If you are not using the Custom disk partitioning option, then the installer will allocate the available space according to the following rules:
If the total available space is less than 50 GB, then only one partition is created. This will be the
/(root) partition.If the total available space is greater than 50 GB, then three partitions are created
6/19 of the total available place is allocated to
/with a maximum of 50 GB1/19 is allocated to
swapwith a maximum of 4 GBthe rest (at least 12/19) is allocated to
/home
This means that from 160 GB or greater available space, the installer will create three partitions:
50 GB for
/4 GB for
swapand the remainder for
/home
Opmerking
If you are using a UEFI system, the ESP (EFI System Partition) will be
automatically detected - or created if it does not exist yet - and mounted
on /boot/EFI. The Custom disk
partitioning option is the only one that allows to check it has
been correctly done.
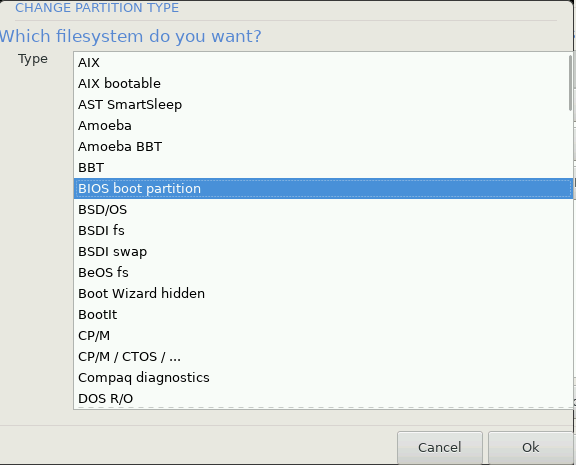
If you are using a Legacy (also known as BIOS) system with a GPT partitioned disk, you need to create a BIOS boot partition if it doesn't already exist. It should be about 1 MiB with no mount point. It can be created with the Installer, under Custom disk partitioning, like any other partition. Be sure to select “BIOS boot partition” for filesystem type.
See DiskDrake for information on how to proceed.
Belangrijk
Some newer drives are now using 4096 byte logical sectors, instead of the previous standard of 512. Due to lack of available hardware, the partitioning tool used in the installer has not been tested with such a drive.
Some SSD devices now use an erase block size over 1 MB. If you have such a device we suggest that you partition the drive in advance, using an alternative partitioning tool like gparted, and to use the following settings:
Align to = MiB
Free space preceding (MiB) = 2
Also make sure all partitions are created using an even number of megabytes.
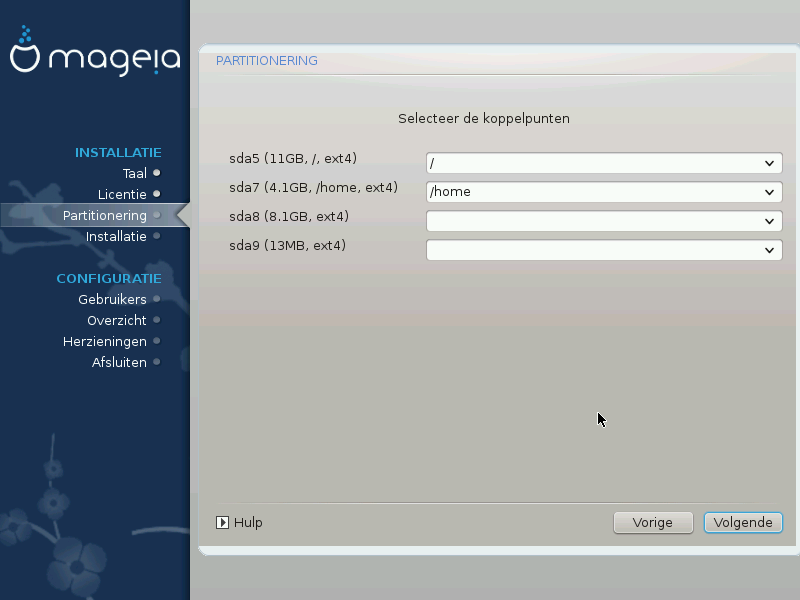
Hier ziet u de Linux-partities die op de computer gevonden zijn. Als u het niet eens bent met de koppelpunten die DrakX voorstelt, kunt u ze veranderen.
Links van de keuzevelden staan de beschikbare partities. Bijvoorbeeld:
sdais een harde schijf en5is een partitienummer, gevolgd door (grootte, koppelpunt, bestandssysteemtype) van de partitie.Als u meerdere partities heeft, kunt u verscheidene koppelpunten kiezen uit de uitvouwlijsten, zoals
/,/homeen/var. U kunt zelfs uw eigen koppelpunten maken, bijvoorbeeld/videovoor een partitie waarop u uw films wilt bewaren, of/Datavoor al uw gegevensbestanden.U kunt het koppelpuntveld leeg laten voor partities waarvan u geen gebruik hoeft te maken.
Waarschuwing
Als u veranderingen aanbrengt, zorg dan dat u tenminste een
/ (root)partitie houdt.
Tip
If you are not sure what to choose, click Previous to go back and then tick Custom disk partitioning, where you can click on a partition to see its type and size.
Als u zeker bent dat de koppelpunten goed zijn, klik dan op Volgende en kies of u enkel de partities wilt formatteren die DrakX voorstelt, of meer.
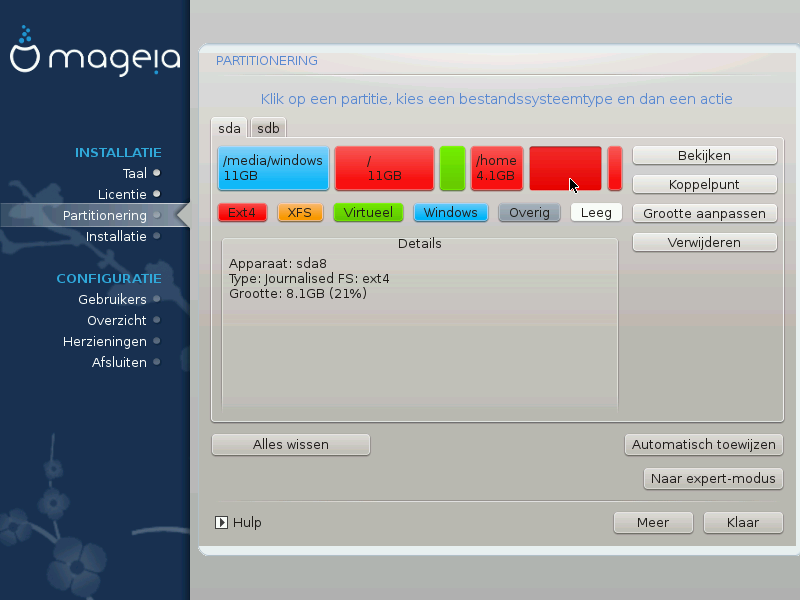
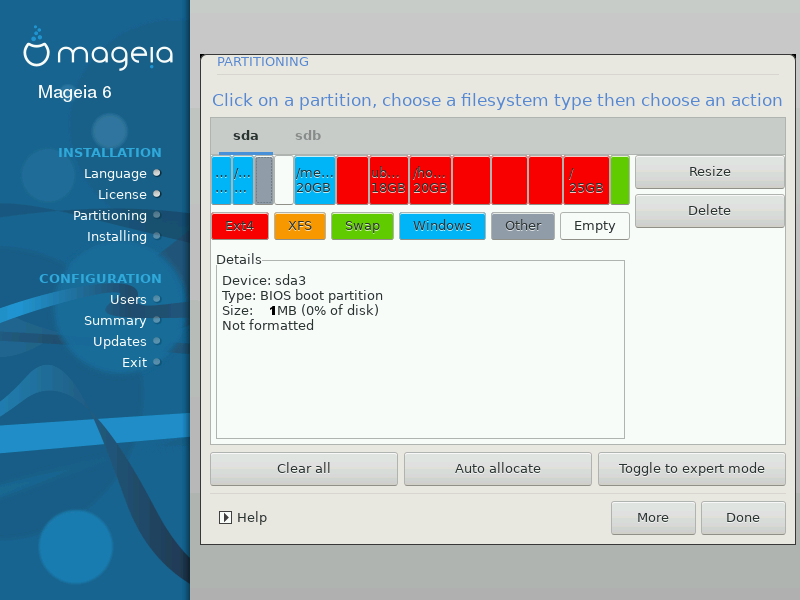
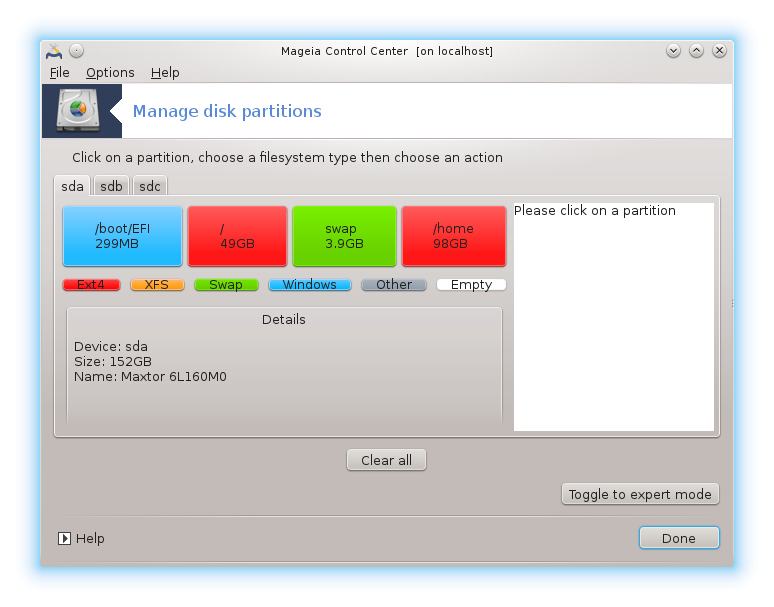
Modify the layout of your disk(s) here. You can remove or create partitions, change the filesystem or size of a partition and even view their details before you start.
There is a tab at the top for every detected hard disk (or other storage device, like a USB key). In the screenshot above there are two available devices:
sdaandsdb.For all other actions: click on the desired partition first. Then view it, or choose a filesystem and a mount point, resize it or wipe it. Expert mode provides more options such as to label (name) a partition, or to choose a partition type.
Continue until you have adjusted everything to your satisfaction, then click Done when you're ready.
Waarschuwing
Take care with the Clear all option, use it only if you are sure you want to wipe all partitions on the selected storage device.
If you wish to use encryption on your
/partition you must ensure that you have a separate/bootpartition. The encryption option for the/bootpartition must NOT be set, otherwise your system will be unbootable.
Belangrijk
If you are installing Mageia on a UEFI system, check that an ESP (EFI System Partition) is present and correctly mounted on
/boot/EFI. See Figure 1 below.If you are installing Mageia on a Legacy/GPT system, check that a BIOS boot partition is present and of the correct type. See Figure 2 below.
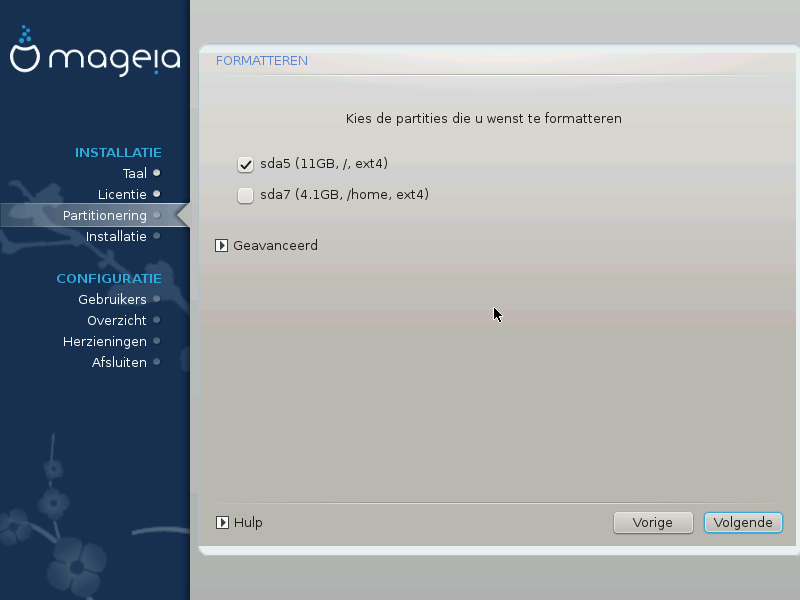
Here you can choose which partition(s) you wish to format. Any data on partitions not marked for formatting will be preserved.
Usually, at least the partitions that DrakX selected need to be formatted.
Click on Advanced to choose the partitions you want to check for so-called bad blocks
Tip
If you're not sure you have made the right choice, you can click on Previous, again on Previous and then on Custom to get back to the main screen, where you can choose to view details of your partitions.
When you are confident about the selections, click on Next to continue.
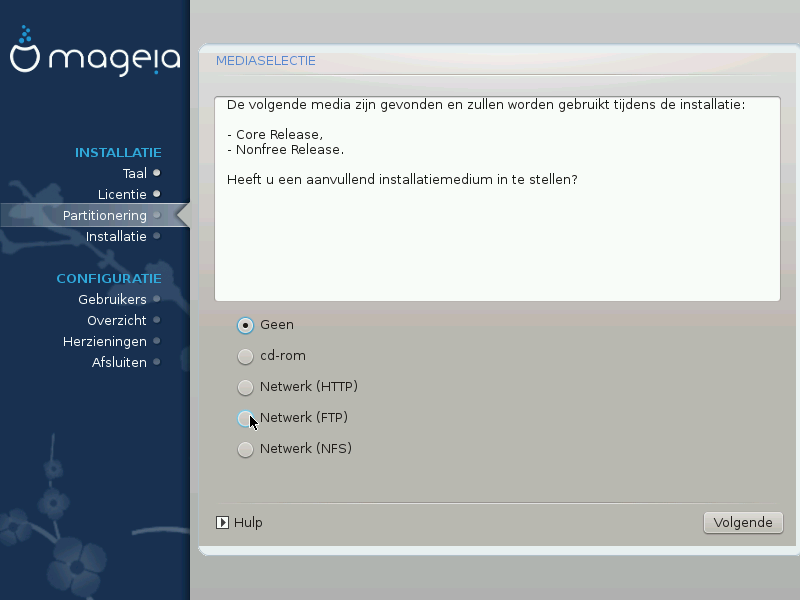
In dit scherm ziet u de lijst van reeds gevonden media. U kunt andere pakketbronnen toevoegen, zoals een optische schijf of een netwerkbron. De mediaselectie bepaalt welke pakketten in de volgende stappen beschikbaar zullen zijn.
Voor een netwerkbron dienen twee stappen gevolgd te worden:
Kiezen en activeren van het netwerk, tenzij reeds actief.
Kiezen van een mirror of specificeren van een URL (de allereerste keuze). Door een mirror te kiezen heeft u toegang tot alle bronnen die beheerd worden door Mageia, zoals de Nonfree-, Tainted- en Updatesbronnen. Met de URL kunt u ook een specifieke bron opgeven of uw eigen NFS-installatie.
Opmerking
Als u een 64-bitsinstallatie die mogelijk enige 32-bitspakketten bevat, opwaardeert, voeg dan hier een online mirror toe door één van de netwerkprotocollen te selecteren. De 64-bits-dvd bevat enkel 64-bits- en noarch-pakketten, hij kan geen 32-bitspakketten opwaarderen. Dat kan echter wel als u een online mirror toevoegt, de 32-bitspakketten worden dan daar opgehaald.
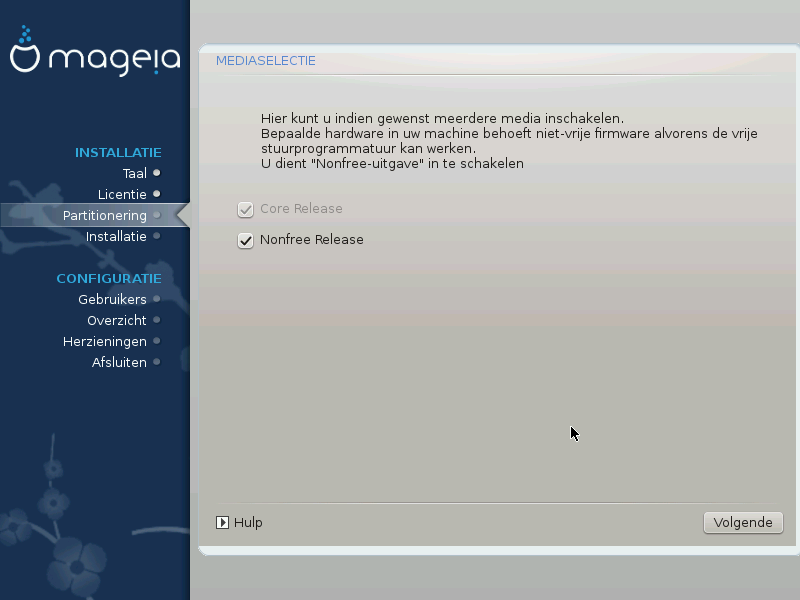
Hier vindt u de lijst van beschikbare bronnen. Niet alle bronnen zijn beschikbaar, overeenkomstig de media die U gebruikt om van te installeren. De selectie van bronnen bepaalt welke pakketten beschikbaar zijn ter keuze in de volgende stappen.
De Core bron kan niet uitgeschakeld worden, want ze bevat de basis van de distributie.
The Nonfree repository includes packages that are free-of-charge, i.e. Mageia may redistribute them, but they contain closed-source software (hence the name - Nonfree). For example this repository includes nVidia and AMD graphics card proprietary drivers, firmware for various WiFi cards, etc.
The Tainted repository includes packages released under a free license. The main criteria for placing packages in this repository is that they may infringe patents and copyright laws in some countries, e.g. multimedia codecs needed to play various audio/video files; packages needed to play commercial video DVD's, etc.
Some choices made here will open other screens with related options.
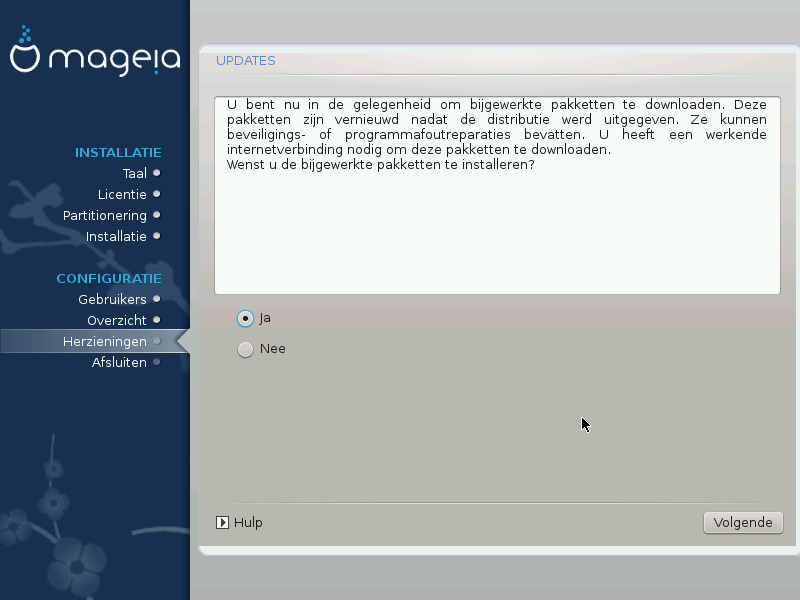
After the selection step(s), you will see a slideshow during the installation of required packages. The slideshow can be disabled by pressing the Details button.

Choose whether you prefer to use the KDE Plasma or GNOME desktop environment. Both come with a full set of useful applications and tools.
Select Custom if you do not wish to use either (or, actually use both) of these, or if you want to modify the default software choices for these desktop environments. The LXDE desktop, for instance, is lighter than the previous two, sporting less eye candy and having fewer packages installed by default.
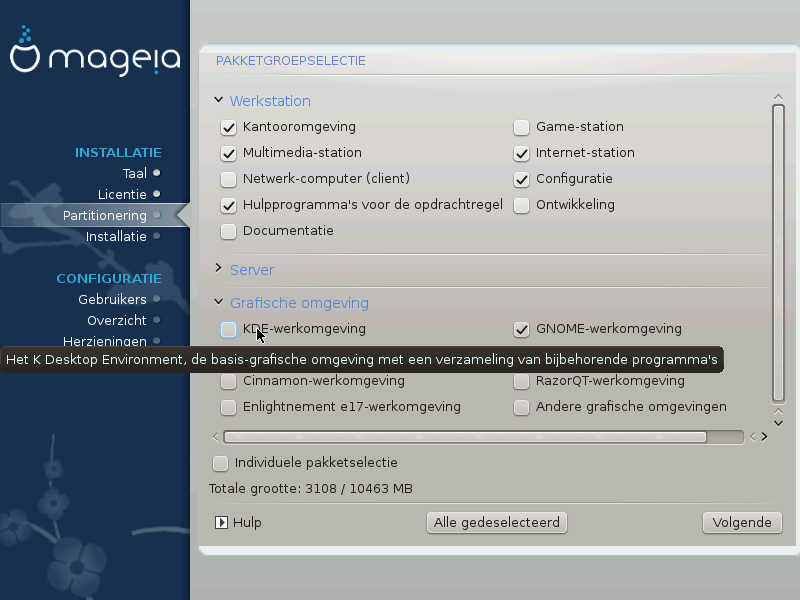
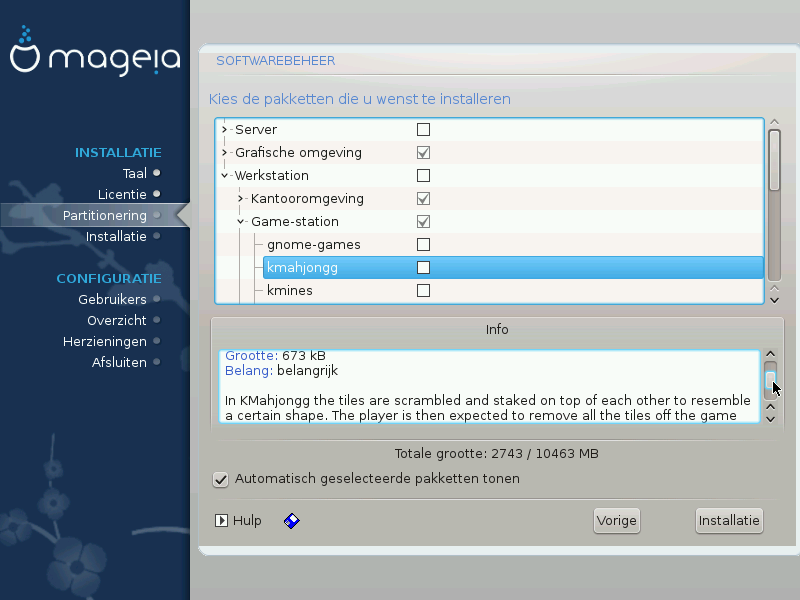
Packages are arranged into common groups, to make choosing what you need on your system a lot easier. The groups are fairly self explanatory, however more information about the content of each is available in tool-tips which become visible as the mouse is hovered over them.
Workstation
Server
Graphical Environment
Individual Package Selection: you can use this option to manually add or remove packages
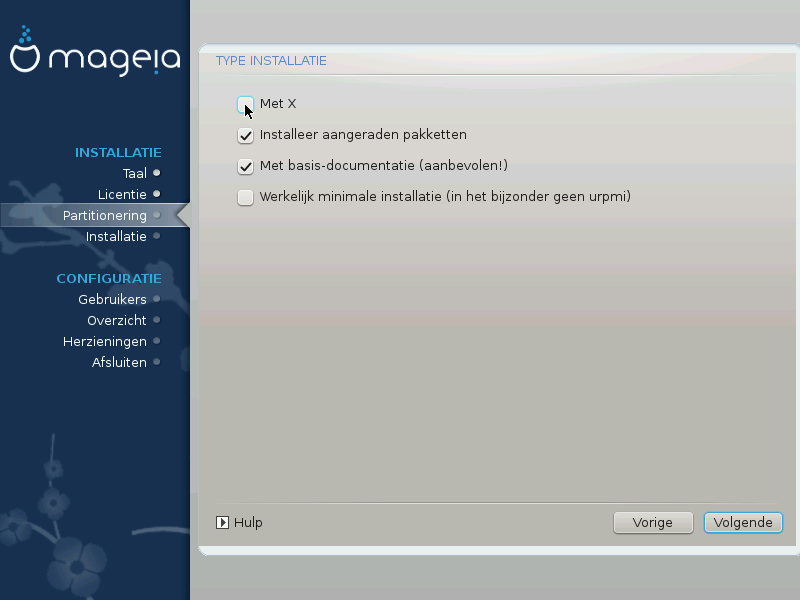
See Minimal Install for instructions on how to do a minimal install (without or with X & IceWM).
Minimal Installation is intended for those with specific uses in mind for Mageia, such as a server or a specialised workstation. You will probably use this option combined with the Individual package selection option to fine-tune your installation. See Choose Packages Tree.
You can choose a Minimal Installation by de-selecting everything in the Package Group Selection screen, see Choose Package Groups.
If desired, you can additionally tick the Individual package selection option in the same screen.
If you choose this installation method, then the relevant screen (see screenshot below) will offer you a few useful extras to install, such as documentation and “X”.
If the With X option is selected, then IceWM (a lightweight desktop environment) will also be included.
The basic documentation is provided in the form of “man” and “info” pages. It contains the man pages from the Linux Documentation Project and the GNU coreutils info pages.
Here you can add or remove any extra packages to customize your installation.
After having made your choice, you can click on the floppy icon at the bottom of the page to save your choice of packages (saving to a USB key works, too). You can then use this file to install the same packages on another system, by pressing the same button during install and choosing to load it.
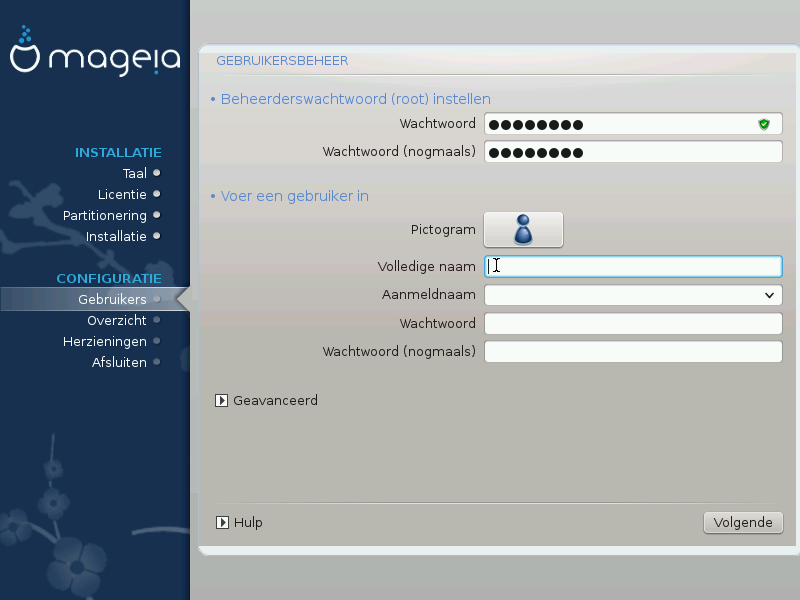
Voor elke Mageia installatie wordt aanbevolen een
superuser-wachtwoord (beheerderswachtwoord) in te
stellen. In Linux heet dit gewoonlijk het
rootwachtwoord. Terwijl u een wachtwoord in het
bovenste tekstvak typt, zal het schildje ernaast van rood via geel in groen
verkleuren, afhankelijk van de sterkte van het wachtwoord. Een groen schild
betekent dat u een goed wachtwoord heeft. Herhaal het wachtwoord in het
volgende vak, ter controle om typefouten uit te sluiten.
Voeg hier een gebruiker toe. Een gebruiker heeft minder rechten dan de
superuser (root), maar genoeg om te internetten,
kantoortoepassingen te gebruiken, te gamen en al het andere te doen waar een
normaal mens zijn computer voor gebruikt.
Pictogram
Klik op het pictogram van de gebruiker om het te veranderen.
Volledige naam
Voer de volledige naam van de gebruiker in dit tekstvak in.
Aanmeldnaam
Voer hier de inlognaam van de gebruiker in, of laat DrakX er een kiezen op basis van de volledige naam. De inlognaam is hoofdlettergevoelig.
Wachtwoord
Typ het wachtwoord van de gebruiker. Aan het eind van het tekstvak is een schild dat de sterkte van het wachtwoord weergeeft. (Zie ook Opmerking)
Wachtwoord (nogmaals): Herhaal het gebruikerswachtwoord. DrakX zal checken of beide wachtwoorden gelijk zijn.
Opmerking
Elke gebruiker die u toevoegt tijdens het installeren van Mageia, krijgt een thuismap die beschermd is tegen zowel lezen als schrijven (umask=0027).
Verdere benodigde gebruikers kunt u toevoegen tijdens de installatiestap Configuratie - Samenvatting. Kies Gebruikersbeheer.
De toegangsrechten kunnen na het installeren ook nog veranderd worden.
De optie Geavanceerd laat u verdere instellingen bewerken voor de gebruiker die u toevoegt.
Shell: In deze uitvouwlijst kan de shell veranderd worden voor de gebruiker die u in het vorige scherm toevoegde.
Bash,DashenShzijn de opties.Gebruikers-ID: Hier kunt u het gebruikers-ID instellen voor de gebruiker die u in het vorige scherm toegevoegde. Laat dit vak leeg als u niet zeker weet waartoe het dient.
Groeps-ID: Hier kan de groeps-ID ingesteld worden. Nogmaals, bij twijfel leeg laten.
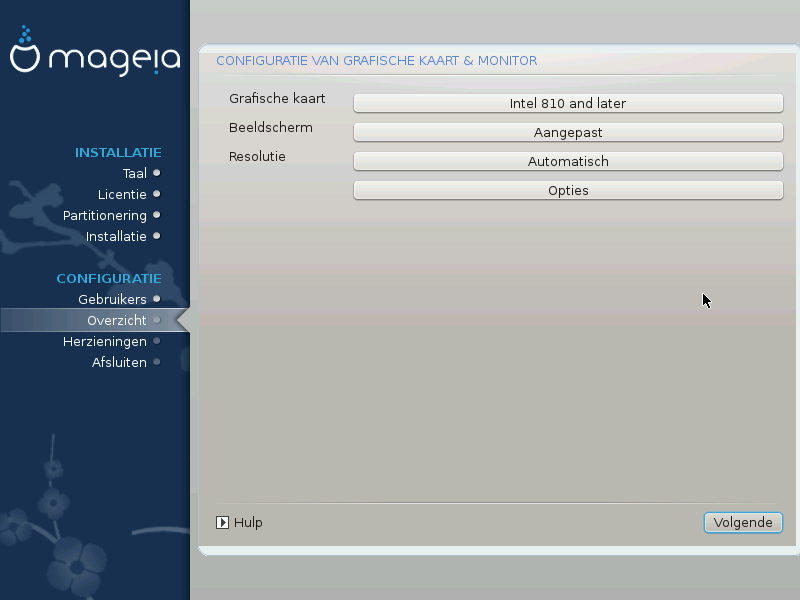
No matter which graphical environment (also known as desktop environment)
you chose for this install of Mageia, they are all based on a graphical user
interface system called X Window System, or simply
“X”. So in order for KDE Plasma, GNOME, LXDE or any other
graphical environment to work well, the following “X” settings
need to be correct.
Choose the appropriate settings manually if you think the details are incorrect, or if none are shown.
If you need to, you can select a specific card from this expandable list. See de paragraaf “Kies een X-server (Configureer uw grafische kaart)”.
You can choose Plug 'n Play, if applicable, or choose your monitor from the Vendor or Generic lists. Choose Custom if you prefer to manually set the horizontal and vertical refresh rates of your monitor. See de paragraaf “Beeldscherm (Selecteer een monitor)”.
The resolution and color depth of your monitor can be set here.
The test button does not always appear during install. If the option is there, and you test your settings, you should be asked to confirm that your settings are correct. If you answer Yes, the settings will be kept. If you don't see anything, you'll return to the configuration screen and be able to reconfigure everything until the test result is satisfactory. If the test option is not available, then make sure your settings are on the safe side.
Here you can choose to enable or disable various options.
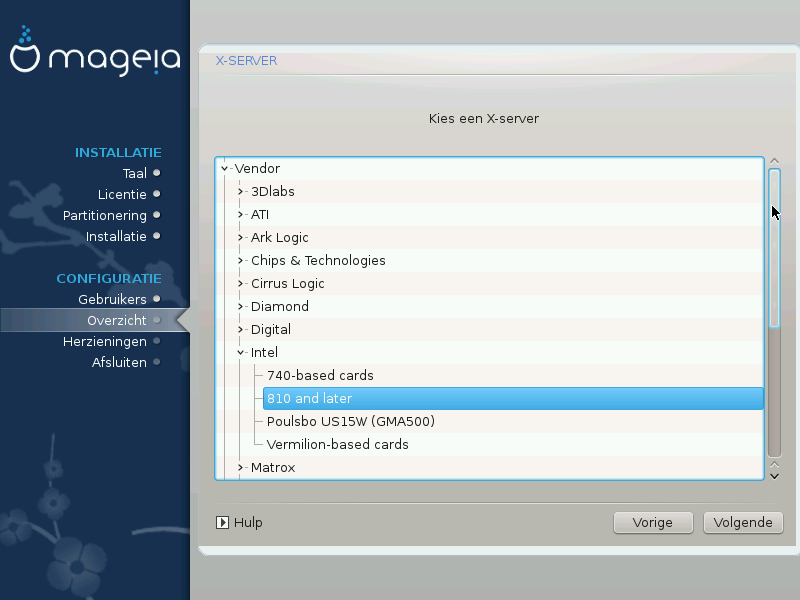
DrakX heeft een veelomvattende gegevensbank van videokaarten en zal uw grafische kaart gewoonlijk juist identificeren.
Als het installatieprogramma uw videokaart niet correct gedetecteerd heeft en u weet welke u heeft, kunt u deze in de boomstructuur selecteren via:
Vendor
then the make of your card
and the model of card
If you cannot find your card in the vendor lists (because it's not yet in the database or it's an older card) you may find a suitable driver in the Xorg category, which provides more than 40 generic and open source video card drivers. If you still can't find a specific driver for your card there is the option of using the VESA driver which provides basic capabilities.
Let op
Be aware that if you select an incompatible driver you may only have access to the Command Line Interface
Some video card manufacturers provide proprietary drivers for Linux which may only be available in the Nonfree repository and in some cases only from the card manufacturers' websites. The Nonfree repository needs to be explicitly enabled to access them. If you didn't enable it previously, you should do this after your first reboot.
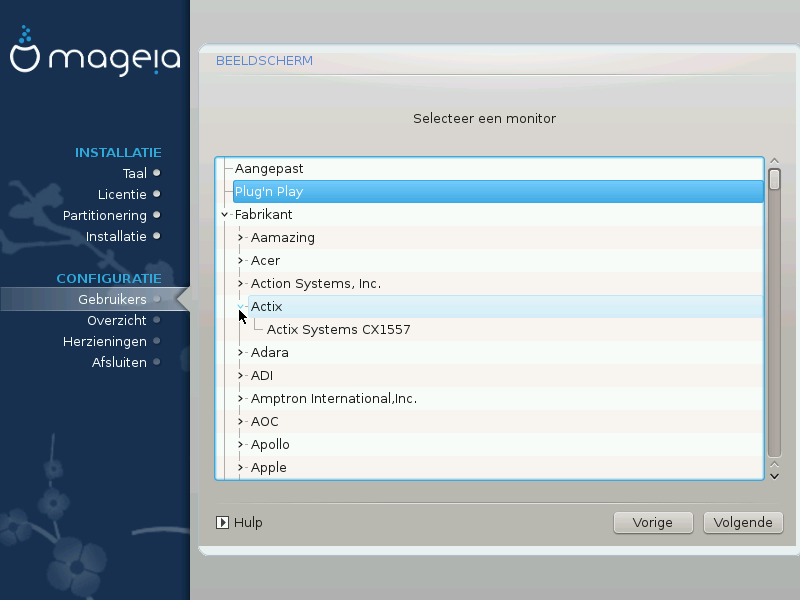
DrakX heeft een uitgebreid gegevensbestand met monitors en zal de uwe gewoonlijk correct identificeren.
Waarschuwing
Selecting a monitor with different characteristics could damage your monitor or video hardware. Please don't try something without knowing what you are doing. If in doubt you should consult your monitor documentation.
- Custom
This option allows you to set two critical parameters: the vertical refresh rate and the horizontal sync rate. Vertical refresh determines how often the screen is refreshed and horizontal sync is the rate at which scan lines are displayed.
Het is ERG BELANGRIJK dat u geen beeldscherm instelt met andere mogelijke verversingsfrequenties dan die van uw monitor: u zou uw monitor kunnen beschadigen. Raadpleeg de handleiding van uw monitor en wees terughoudend bij het instellen in geval van twijfel.
- Plug'n Play
This is the default option and automatically tries to determine the monitor type from the monitor database.
- Vendor
Als DrakX uw beeldscherm niet goed herkent en u weet welke monitor u heeft, kunt u deze als volgt in de boomstructuur kiezen:
Manufacturer
Monitor model
- Generic
Selecting this group will list nearly 30 display configurations such as 1024x768 @ 60Hz and includes flat-panel displays as used in laptops. This is often a good monitor selection group if you need to use the VESA card driver when your video hardware cannot be determined automatically. Once again it may be wise to be conservative in your selections.
Grub2 on Legacy MBR/GPT systems
GRUB2 (with or without graphical menu) will be used exclusively as the bootloader for a Legacy/MBR or Legacy/GPT system.
By default, a new bootloader will be written into either the MBR (Master Boot Record) of your first hard drive or in the BIOS boot partition.
Grub2-efi on UEFI systems
GRUB2-efi will be used exclusively as the bootloader for a UEFI system.
By default, a new bootloader (Grub2-efi) will be written into the ESP (EFI System Partition).
If there are already UEFI-based operating systems installed on your computer (Windows 8 for example), the Mageia installer will detect the existing ESP created by Windows and add grub2-efi to it. If no ESP exists, then one will be created. Although it is possible to have several ESPs, only one is required, whatever the number of operating systems you have.
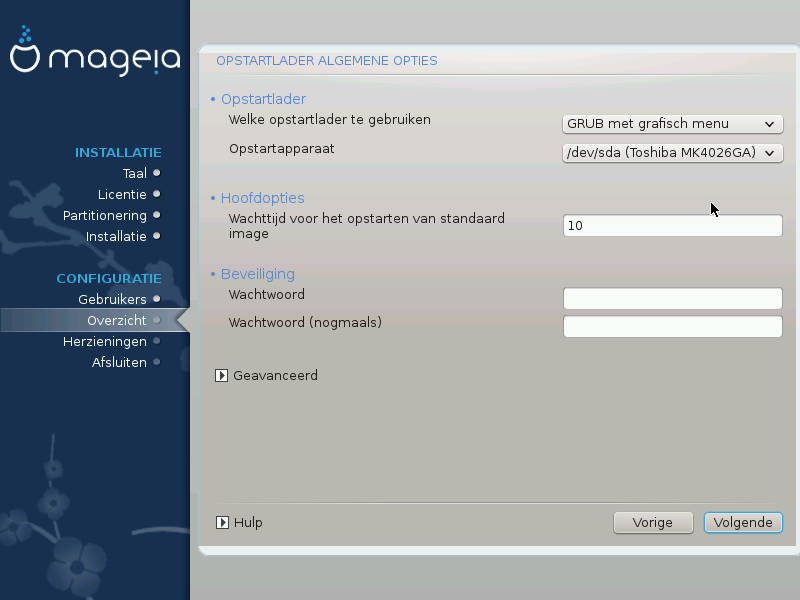
Bootloader to use
This feature is only available to Legacy MBR/BIOS systems. Users of UEFI systems will not see this option here.
Boot device
Don't change this unless you really know what you are doing
Delay before booting the default image
This text box lets you set a delay, in seconds, before the default operating system is started up.
Security
This allows you to set a password for the bootloader. This means a username and password will be required when booting in order to select a booting entry or change settings. This is optional, and most people are not likely to have a need for it. The username is
rootand the password is the one chosen hereafter.Wachtwoord
Choose a password for the bootloader (optional)
Password (again)
Retype the password and DrakX will check that it matches with the one set above
Advanced
Enable ACPI
ACPI (Advanced Configuration and Power Interface) is a standard for power management. It can save energy by stopping unused devices. Deselecting it could be useful if, for example, your computer does not support ACPI or if you think the ACPI implementation might cause some problems (for instance random reboots or system lockups).
Enable SMP
This option enables/disables symmetric multiprocessing for multi-core processors
Enable APIC
Enabling this gives the operating system access to the Advanced Programmable Interrupt Controller. APIC devices permit more complex priority models, and Advanced IRQ (Interrupt Request) management.
Enable Local APIC
Here you can set Local APIC, which manages all external interrupts for a specific processor in an SMP system
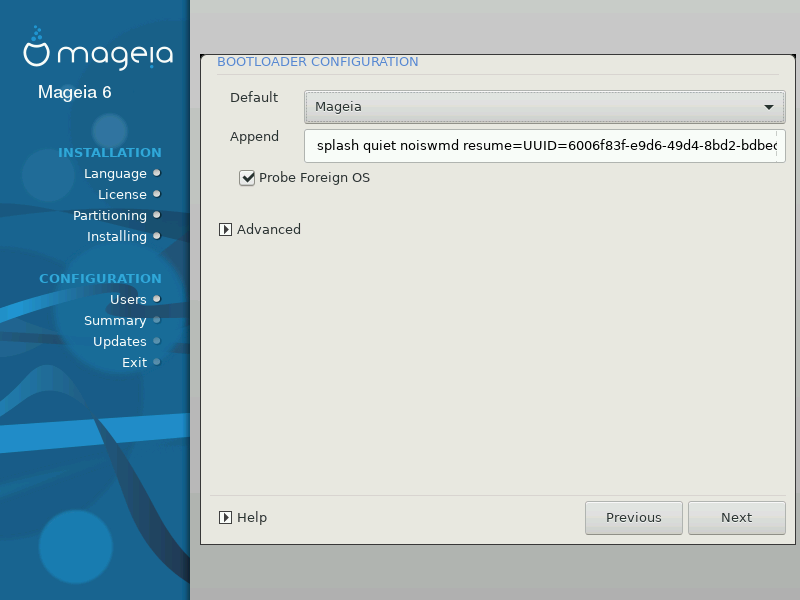
Default
The operating system to be started up by default.
Append
This option lets you pass information to the kernel or tell the kernel to give you more information as it boots.
Probe foreign OS
If you already have other operating systems installed, Mageia attempts to add them to your new Mageia boot menu. If you don't want this behaviour, then untick the Probe Foreign OS option.
Advanced
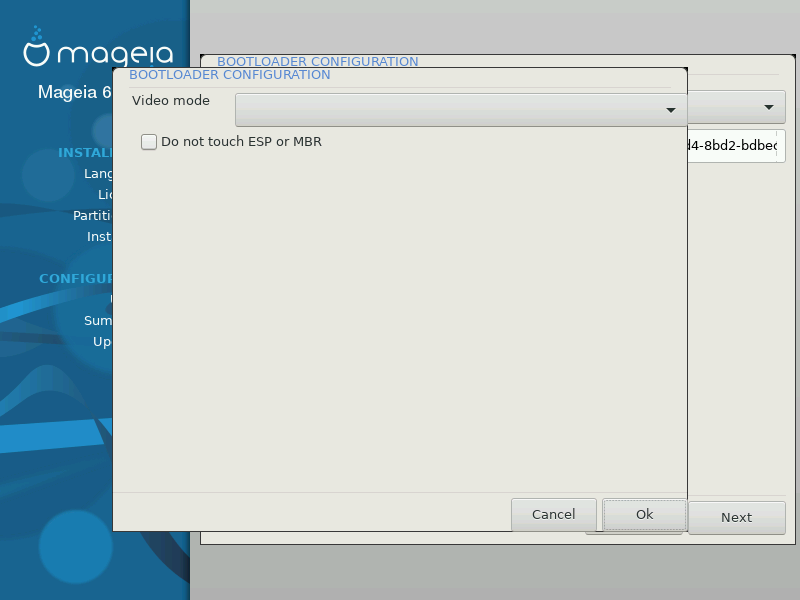
Video mode
This sets the screen size and colour depth to be used by the boot menu. If you click the down-triangle you will be offered other size and colour depth options.
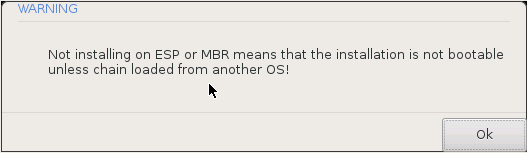
Do not touch ESP or MBR
Select this option if you don't want a bootable Mageia, but would rather chain-load it from another OS. You will get a warning that the bootloader is missing. Click Ok if you are sure you understand the implications, and wish to proceed.
The exact procedure for adding Mageia to an existing bootloader is beyond the scope of this documentation. However in most cases it will involve running the relevant bootloader installation program, which should detect Mageia and automatically add an entry for it in the bootloader menu. See the documentation for the relevant operating system.
While you can opt to install Mageia without a bootloader (see section 2.1 Advanced), this is not recommended unless you absolutely know what you are doing, as without some form of bootloader your operating system will be unable to start.
To do this you need to manually edit /boot/grub2/custom.cfg or use the software grub-customizer tool instead (available in the Mageia repositories).
Opmerking
For more information, see: https://wiki.mageia.org/en/Grub2-efi_and_Mageia
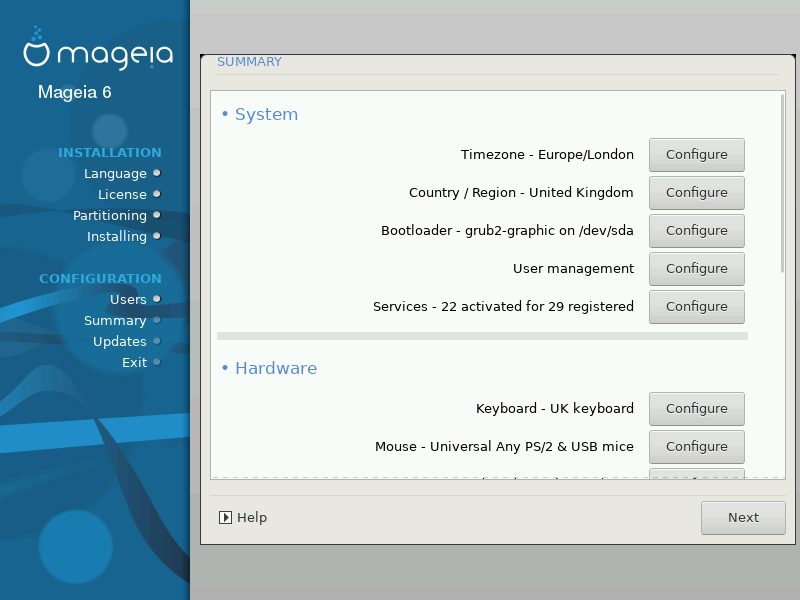
DrakX presents a proposal for the configuration of your system depending on the choices you made and on the hardware detected. You can check the settings here and change them if you want by pressing Configure.
Opmerking
As a general rule, it is recommended that you accept the default settings unless:
Het is bekend dat problemen kunnen optreden als u gebruikt maakt van de standaardinstelling
de standaardinstelling is al geprobeerd en mislukt
some other factor mentioned in the detailed sections below is an issue
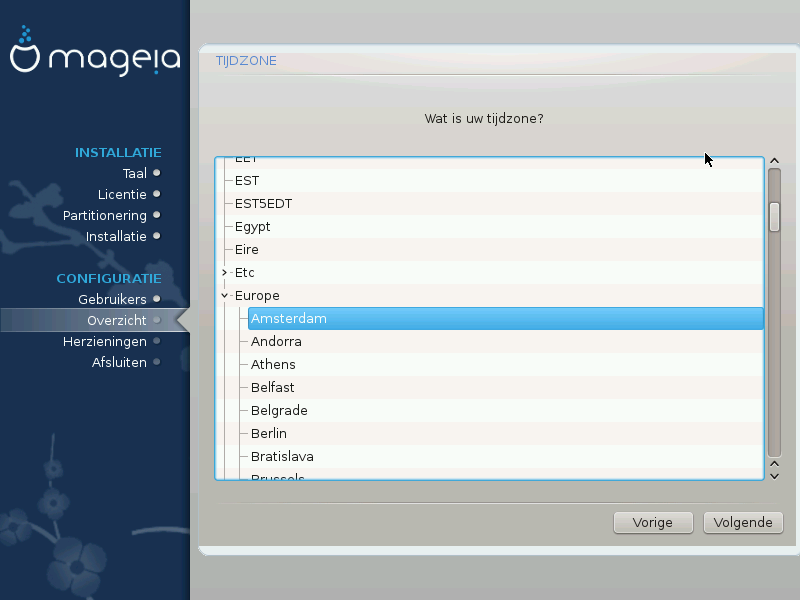
DrakX selects a timezone for you, depending on your preferred language. You can change it if needed. See also Configure Timezone
If the selected country is wrong, it is very important that you correct the setting. See Select Country
DrakX proposal for the bootloader setting
Do not change anything, unless you know how to configure GRUB2. For more information, see Bootloader
You can add extra users here. They will each be allocated their own
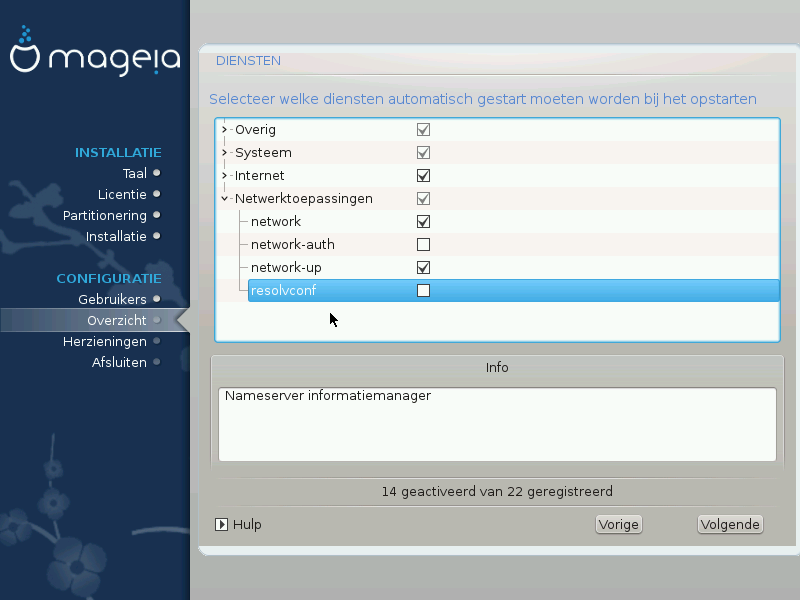
/homedirectories.System services refer to those small programs which run in the background (daemons). This tool allows you to enable or disable certain processes.
You should check carefully before changing anything here - a mistake may prevent your computer from operating correctly. For more information, see Configure Services
Configure your keyboard layout according to your location, language and type of keyboard.
Opmerking
Als u merkt dat de toetsenbordindeling verkeerd is en u wilt dit veranderen, hou dan in gedachten dat uw wachtwoorden ook veranderen.
Hier kunt u ook andere aanwijsapparaten toevoegen of configureren, zoals trackballs and touchpads.
The installer will use the default driver if one is available.
If there is no actual default driver for your sound card, there may be other possible alternative drivers available to choose from. If this is the case, but you think the installer has not made the most appropriate choice, you can click on Advanced to manually specify a driver.
This section allows you to configure your graphics card(s) and displays. For more information, see de paragraaf “Configuratie van grafische kaart en monitor”
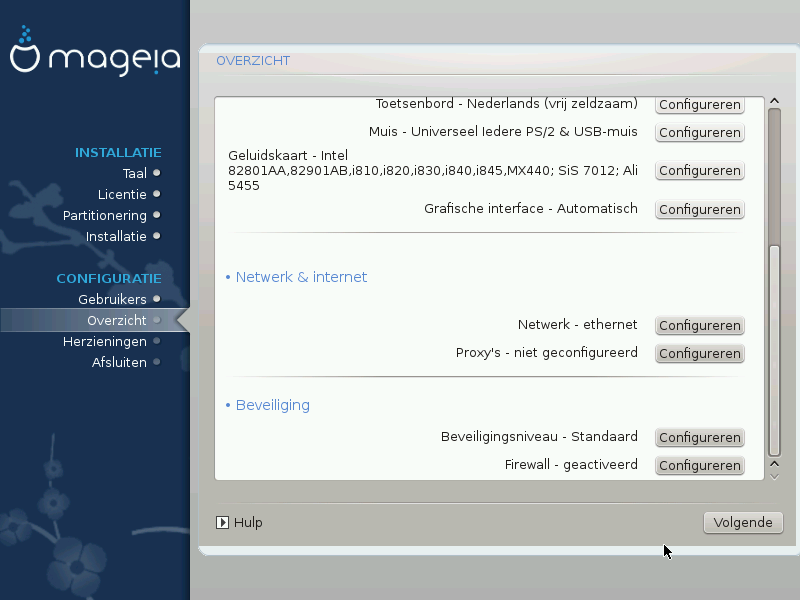
You can configure your network here, but for network cards with non-free drivers it is better to do that after reboot, using the Mageia Control Center, if you have not yet enabled the Nonfree media repositories.
A Proxy Server acts as an intermediary between your computer and the wider Internet. This section allows you to configure your computer to utilize a proxy service.
You may need to consult your systems administrator to obtain the parameters you need to enter here.
The Security level for your computer, in most cases the default setting (Standard) is adequate for general use. Select the option which best suits your usage.
The firewall allows you to manage which network connections are allowed on your computer. The safe and secure default is to allow ZERO inbound connections. This does not stop you connecting outbound and using your computer normally.
Please be aware that the Internet is a high risk network where there are continuous attempts to probe and attack systems. Even seemingly “safe” connections such as ICMP (for ping) have been used as covert data channels for exfiltrating data by malicious persons.
For more information, see Firewall.
In the next screen you can choose to set your hardware clock to local time or to GMT, also known as UTC.
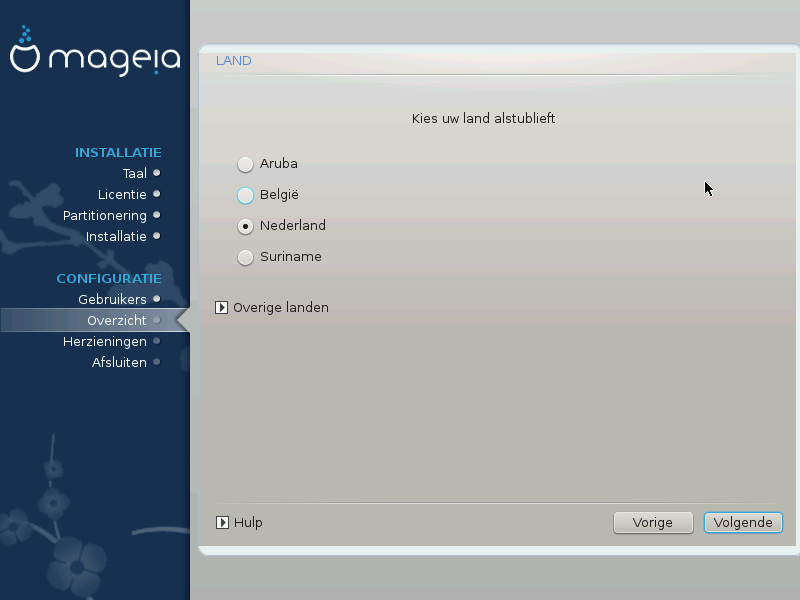
Select your country or region. This is important for all kinds of settings, like the currency and wireless regulatory domain. Setting the wrong country can lead to being unable to use a Wireless network.
If your country isn't in the list, click the Other Countries option and choose your country / region there.
Opmerking
If your country is only in the Other Countries list, after clicking OK it may seem that a country from the main list was chosen. Despite this, DrakX will actually apply your choice.
In the Other Countries screen you can also select an input method (at the bottom of the list). Input methods allow users to input multilingual characters (Chinese, Japanese, Korean, etc). IBus is the default input method, so users should not need to configure it manually. Other input methods (SCIM, GCIN, HIME, etc) also provide similar functions and can be installed if you added HTTP/FTP media before package selection.
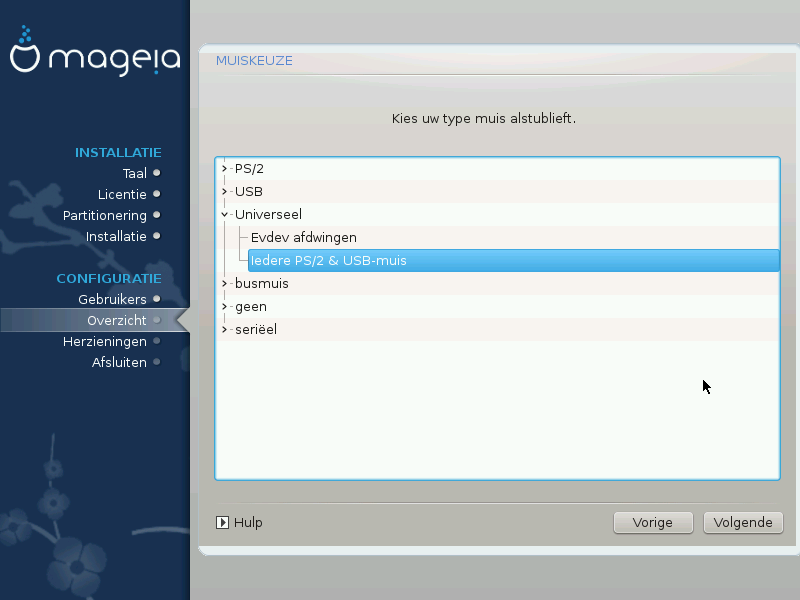
Als u niet gelukkig bent met hoe uw muis reageert, kunt u hier een andere kiezen.
Select → to configure the buttons that do not work on a mouse with six or more buttons.
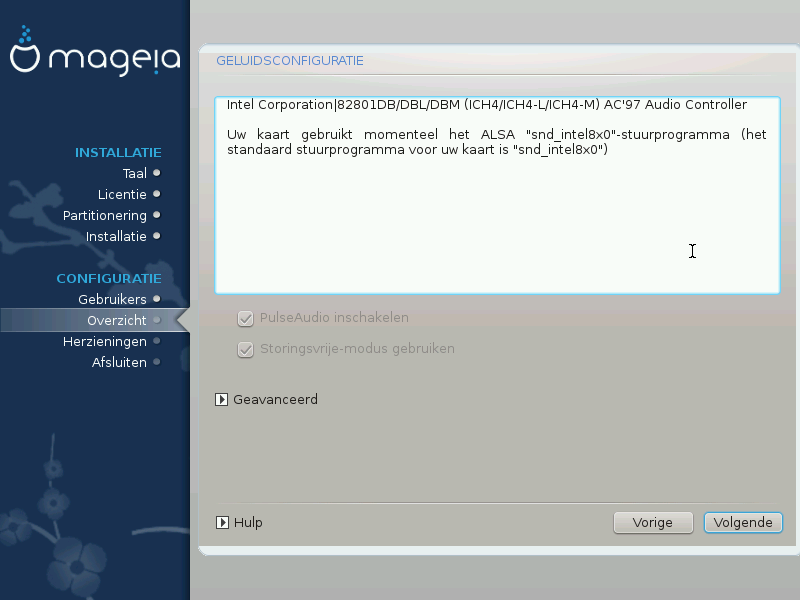
This screen shows the details of the sound card driver chosen for you by the installer, and this driver should work without problems.
However, if you encounter any issues post-install, then run
draksound or start this tool via → → . Then, in the
draksound or Sound Configuration
screen, click on Troubleshooting to find useful advice
about how to solve the problem.
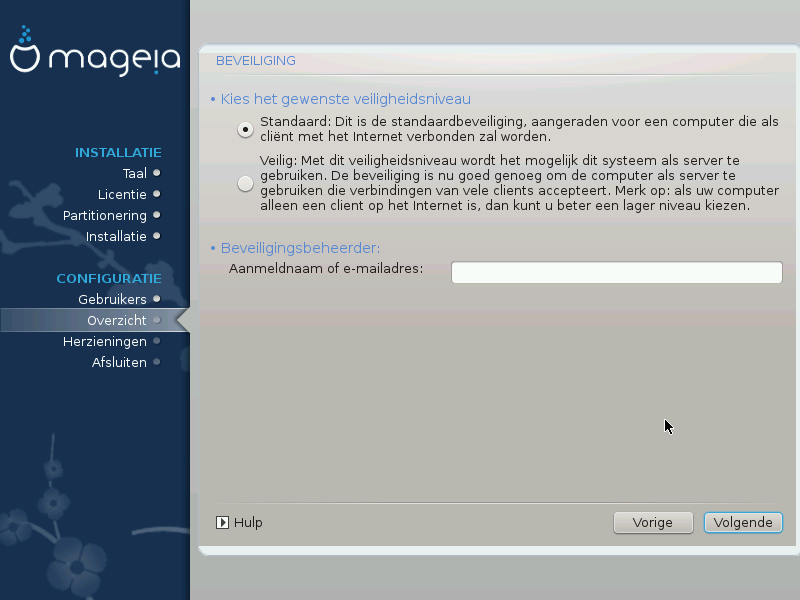
Please choose the desired security level
Standard is the default, and recommended setting for the average user.
Secure will create a highly protected system - for instance if the system is to be used as a public server.
Security Administrator
This item allows you to configure an email address to which the system will send security alert messages when it detects situations which require notification to a system administrator.
A good, and easy-to-implement, choice is to enter <user>@localhost - where <user> is the login name of the user to receive these messages.
Opmerking
The system sends such messages as Unix Mailspool messages, not as "ordinary" SMTP mail: this user must therefore be configured for receiving such mail!
It will always be possible to adjust your security settings post-install in the Security section of the Mageia Control Center.
This section allows you to configure some simple firewall rules: they determine which type of message from the Internet will be accepted by the target system. This, in turn, allows the corresponding services on the system to be accessible from the Internet.
In the default setting (no button is checked), no service of the system is accessible from the network. The Everything (no firewall) option enables access to all services of the machine - an option that does not make much sense in the context of the installer since it would create a totally unprotected system. Its veritable use is in the context of the Mageia Control Center (which uses the same GUI layout) for temporarily disabling the entire set of firewall rules for testing and debugging purposes.
All other options are more or less self-explanatory. As an example, you will enable the CUPS server if you want printers on your machine to be accessible from the network.
Geavanceerd
The Advanced option opens a window where you can enable a series of services by typing a list of “couples” (blank separated)
<poort-nummer>/<protocol>
| - <poort-nummer>Is de waarde van de poort die is toegewezen aan de dienst die u wilt inschakelen (bijvoorbeeld 873 voor de RSYNC-service) zoals gedefinieerd in RFC-433; |
| - <protocol>is één van TCP of UDP - Het internetprotocol dat door de dienst wordt gebruikt. |
Bijvoorbeeld, de vermelding voor het verlenen van toegang tot de RSYNC-dienst is dus 873/tcp.
Als een dienst is geïmplementeerd om beide protocollen te gebruiken, dan specificeert u 2 koppels voor dezelfde poort.
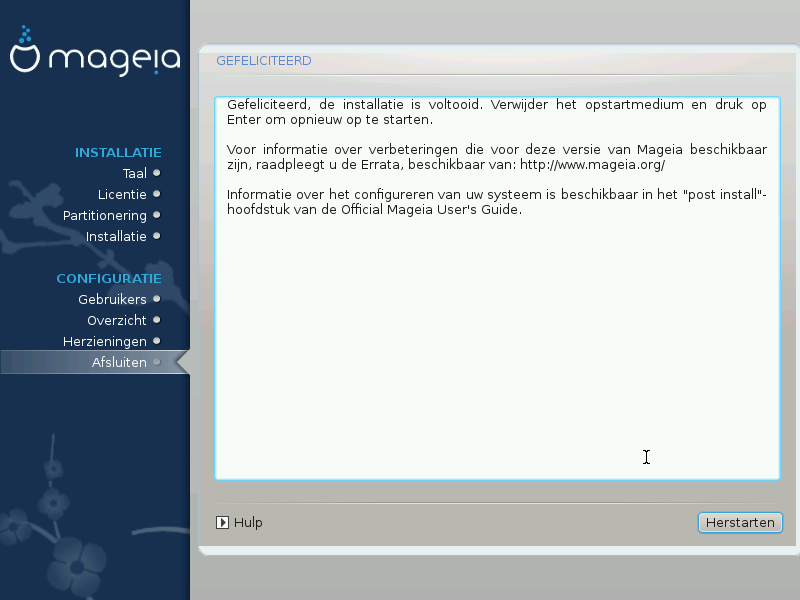
You have finished installing and configuring Mageia and it is now safe to remove the installation medium and reboot your computer.
After rebooting, you can use the bootloader screen to choose which operating system to start (if there are more than one on your computer).
Als u de instellingen voor de opstartlader niet aangepast heeft, wordt Mageia automatisch geselecteerd en gestart.
Visit www.mageia.org/en/ if you have any questions or want to contribute to Mageia
If Mageia didn't convince you or you can't install it correctly - in short you want get rid of it - that is your right and Mageia also gives you the possibility to uninstall. This is not true for every operating system.
After backing up your data, reboot your Mageia installation DVD and select Rescue system, then Restore Windows boot loader. At the next boot, you will only have Windows, with no option to choose your Mageia operating system.
In Windows, to recover the space used by Mageia partitions: click on
→ → → → → . You will recognise a Mageia
partition because they are labeled Unknown, and also by
their size and place on the disk. Right-click on each of these partitions
and select Delete to free up the space.
If you are using Windows XP, you can create a new partition and format it (FAT32 or NTFS). It will then get a partition letter.
If you have Vista or 7, you have one more possibility, you can extend the existing partition that is at the left of the freed space. There are other partitioning tools that can be used, such as gparted, available for both Windows and Linux. As always, when changing partitions, be very careful to back up anything important to you.
